Learn how to manage apps across multiple Kubernetes clusters

Johan Siebens
In this post, you’ll learn how to deploy to multiple public and private Kubernetes clusters using Argo CD and GitOps.
Continuous Deployment on Kubernetes with GitOps
In 2017, Alexis Richardson (CEO of Weaveworks) coined the term GitOps. Since then it’s gained significant interest from the enterprise companies because it allows for easier management and auditing of deployments using standard tooling.
With a GitOps approach, the desired state is set in several configuration files in a Git repository, and an agent component continuously compares this state with the actual state. The differences are known as drift, and the agent’s role is to detect and correct it.
Two of the most popular open-source projects for GitOps are Flux, which was created at Weaveworks. Intuit, an American payroll company, created Argo CD. Both projects were donated to the Cloud Computing Foundation (CNCF) to encourage broader use and contributions.
Managing apps across multiple Kubernetes clusters
There are many reasons why a team may have multiple Kubernetes clusters. We explored how to monitor multiple Kubernetes clusters using inlets in a previous blog post.
Some of our customers need to deploy applications across a number of clouds, or within strictly controlled private networks, where the Kubernetes API server is not available on the Internet.
So how can you use Argo CD with both public and private clusters across a number of clouds?
Well with Argo CD, we have two options to manage multiple private clusters. As a start, we could install Argo CD in each one of them, which could be the most straightforward approach. But it can become quite challenging to configure and maintain all those Argo CD installations when you have many clusters at hand.
Argo CD cannot only apply GitOps on the cluster where it is installed, but it can also manage so-called External Clusters. With this architecture, you will have a single Argo CD installation to register all your target cluster, providing a single pane of glass for all the GitOps deployment across your clusters.
The biggest challenge lies in the communication between Argo CD and the Kubernetes API services of your highly secured private clusters.
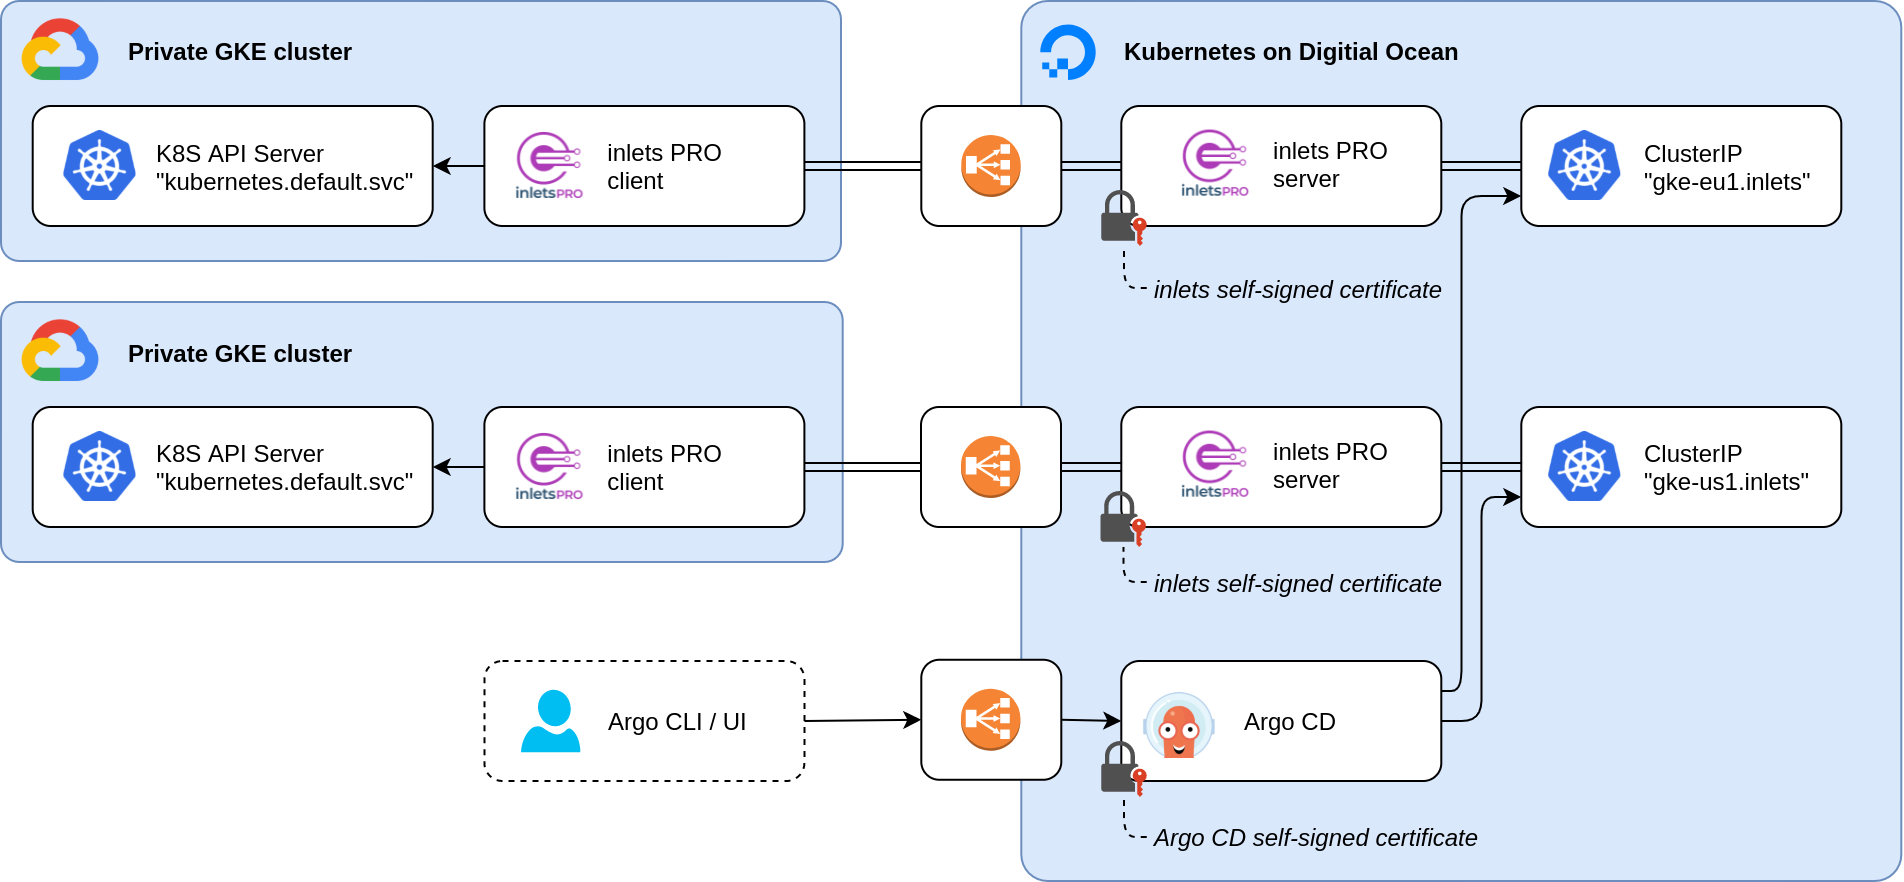
The diagram above shows an architecture where we have multiple private target clusters on the left. Using a secure inlets tunnel with a public control plane, the GitOps agent in the cluster on the right can reach the Kubernetes API services via a private data plan.
In what follows next, you will learn how we leverage inlets Pro to bring the API servers of a remote cluster into the Kubernetes cluster where Argo CD is installed.
Preparation
For this tutorial, I’ve prepared two Kubernetes clusters:
- a public Digital Ocean Kubernetes (DOKS) cluster, running Argo CD
- a private Google Kubernetes Engine (GKE) cluster
Both clusters are configured in my kubectl configuration file and accessible from my machine.
$ kubectl config get-contexts
CURRENT   NAME      CLUSTER                                   AUTHINFO                                  NAMESPACE
*         argocd    argocd                                    argocd                                    default
          gke-eu1   gke_orion-313907_europe-west1-b_orion-1   gke_orion-313907_europe-west1-b_orion-1   default
Argo CD is installed following their Getting Started guide in the “argocd” cluster.
$ kubectl get deployments,services --context argocd -n argocd
NAME                                 READY   UP-TO-DATE   AVAILABLE   AGE
deployment.apps/argocd-redis         1/1     1            1           3d8h
deployment.apps/argocd-server        1/1     1            1           3d8h
deployment.apps/argocd-dex-server    1/1     1            1           3d8h
deployment.apps/argocd-repo-server   1/1     1            1           3d8h

NAME                            TYPE        CLUSTER-IP      EXTERNAL-IP   PORT(S)                      AGE
service/argocd-dex-server       ClusterIP   10.43.19.151    <none>        5556/TCP,5557/TCP,5558/TCP   3d8h
service/argocd-metrics          ClusterIP   10.43.132.63    <none>        8082/TCP                     3d8h
service/argocd-redis            ClusterIP   10.43.94.57     <none>        6379/TCP                     3d8h
service/argocd-repo-server      ClusterIP   10.43.201.182   <none>        8081/TCP,8084/TCP            3d8h
service/argocd-server           ClusterIP   10.43.215.145   <none>        80/TCP,443/TCP               3d8h
service/argocd-server-metrics   ClusterIP   10.43.38.166    <none>        8083/TCP                     3d8h
Preparing the Management cluster
First, we are going to create an exit-server pod on the management cluster. You don’t have to, but prefer placing them in a separate namespace:
kubectl create --context argocd namespace inlets
When the namespace is created, we will start by creating two Kubernetes services, one for the control plane and one for the data plane.
Our target Kubernetes API service is running in a private network such as a different cloud or on-premises. Argo CD needs to access that service from our central management cluster., but we would like to prevent everyone from reaching our private API service. That’s why we will use a split-plane configuration only the control plane of inlets Pro is public, while Argo CD can access the data plane via a private ClusterIP.
export NAME=gke-eu1
export ARGOCD_CTX=argocd

cat <<EOF | kubectl apply --context $ARGOCD_CTX -f -
apiVersion: v1
kind: Service
metadata:
  name: ${NAME}-control
  namespace: inlets
  labels:
    app: ${NAME}-control
spec:
  type: LoadBalancer
  ports:
    - name: ${NAME}-control
      port: 8123
      protocol: TCP
      targetPort: 8123
  selector:
    app: ${NAME}
EOF

cat <<EOF | kubectl apply --context $ARGOCD_CTX -f -
apiVersion: v1
kind: Service
metadata:
  name: ${NAME}
  namespace: inlets
  labels:
    app: ${NAME}
spec:
  type: ClusterIP
  ports:
    - name: ${NAME}
      port: 443
      protocol: TCP
      targetPort: 443
  selector:
    app: ${NAME}
EOF
Wait for the LoadBalancer to be ready with a public IP address and update your DNS records by pointing your domain to LoadBalancer.
If you don’t have a domain or don’t want to use a one, just use the public IP address of the LoadBalancer as value for the
--common-namein the next step below.
Now create the deployment for the server part of the inlets tunnel.
export NAME=gke-eu1
export ARGOCD_CTX=argocd
export TOKEN=<a secure token>
export DOMAIN=gke-eu1.inlets.example.com

cat <<EOF | kubectl apply --context $ARGOCD_CTX -f -
apiVersion: apps/v1
kind: Deployment
metadata:
  name: ${NAME}
  namespace: inlets
spec:
  replicas: 1
  selector:
    matchLabels:
      app: ${NAME}
  template:
    metadata:
      labels:
        app: ${NAME}
    spec:
      containers:
      - name: inlets
        image: ghcr.io/inlets/inlets-pro:0.9.5
        imagePullPolicy: IfNotPresent
        securityContext:
          allowPrivilegeEscalation: false
          runAsUser: 0
        command: ["inlets-pro"]
        args:
        - "tcp"
        - "server"
        - "--auto-tls=true"
        - "--auto-tls-san=${DOMAIN}"
        - "--token=${TOKEN}"
        volumeMounts:
          - mountPath: /tmp/certs
            name: certs-volume
      volumes:
        - name: certs-volume
          emptyDir: {}
EOF
Verify if everything has started correctly, you should see two services and a single pod with status Running:
$ kubectl get -n inlets pods,services
NAME                              READY   STATUS    RESTARTS   AGE
pod/gke-eu1-c9fb8b859-6ffz4       1/1     Running   0          5h7m

NAME                      TYPE           CLUSTER-IP      EXTERNAL-IP     PORT(S)          AGE
service/gke-eu1           ClusterIP      10.43.18.66     <none>          443/TCP          5h6m
service/gke-eu1-control   LoadBalancer   10.43.129.219   <redacted>      8123:30305/TCP   5h9m
The server part of our target implementation is now ready. The control plan of the tunnel is available for clients, and the data plane is accessible only from within the cluster, meaning Argo CD will securely reach the Kubernetes API service via the tunnel as soon a client makes a connection. (In the example above, from Argo CD point-of-view, the target Kubernetes API service will be available at https://gke-eu1.inlets:443)
The steps above should be applied for all the remote cluster you want to manage with the central Argo CD instance. When you have many clusters to manage, this can become quite a task and it can bring additional costs for each LoadBalancer created by your cloud provider. We do have another tutorial available to tackle those issues when scaling inlets tunnels on Kubernetes.
Connecting the target clusters
Now that the exit-node pods are running, it is time to connect the clients and create a tunnel.
To do so, take all the following steps and execute them against all your target clusters.
Switch your kubectl config to the correct cluster:
As before, I prefer the place the inlets client in a separate namespace:
kubectl create --context gke-eu1 namespace inlets
Now create the deployment for an inlets Pro TCP client:
export LICENSE=$(cat ~/.inlets/LICENSE)
export TOKEN=<a secure token>
export DOMAIN=gke-eu1.inlets.example.com
export TARGET_CTX=gke-eu1

cat <<EOF | kubectl apply --context $TARGET_CTX -f -
apiVersion: apps/v1
kind: Deployment
metadata:
  name: inlets-client
  namespace: inlets
spec:
  replicas: 1
  selector:
    matchLabels:
      app: inlets-client
  template:
    metadata:
      labels:
        app: inlets-client
    spec:
      containers:
      - name: inlets-client
        image: ghcr.io/inlets/inlets-pro:0.9.5
        imagePullPolicy: IfNotPresent
        command: ["inlets-pro"]
        args:
        - "tcp"
        - "client"
        - "--url=wss://${DOMAIN}:8123/connect"
        - "--upstream=kubernetes.default.svc"
        - "--port=443"
        - "--token=${TOKEN}"
        - "--license=${LICENSE}"
EOF
This example is creates a client with a single yaml configuration. A helm chart is also provided for the inlets-pro client for easy configuration.
Adding the Target cluster to Argo CD
With the tunnel up and running, we can now register the private target cluster to Argo CD.
Typically you could add a cluster using the Argo CD CLI command argocd cluster add CONTEXTNAME, where the context name is a context available in your current kubectl config. That command installs a ServiceAccount (argocd-manager) into the kube-system namespace of that kubectl context, and binds the service account to an admin-level ClusterRole.
Unfortunately, adding a cluster this way will fail in our scenario. Besides creating the service account in the target cluster, the command will also try to register the cluster in Argo CD with the endpoint in your context and will validate if Argo CD can communicate with the API service.
Luckily for us, we can simulate the steps that the CLI takes to onboard a new cluster:
- create a service account and roles in the target cluster
- fetch a bearer token of the service account
- configure a new cluster for Argo CD with the credentials in a declarative way
First, create a service account manually in the target cluster for Argo CD.
apiVersion: v1
kind: ServiceAccount
metadata:
  name: argocd-manager
  namespace: kube-system
---
apiVersion: rbac.authorization.k8s.io/v1
kind: ClusterRole
metadata:
  name: argocd-manager-role
rules:
- apiGroups:
  - '*'
  resources:
  - '*'
  verbs:
  - '*'
- nonResourceURLs:
  - '*'
  verbs:
  - '*'
---
apiVersion: rbac.authorization.k8s.io/v1
kind: ClusterRoleBinding
metadata:
  name: argocd-manager-role-binding
roleRef:
  apiGroup: rbac.authorization.k8s.io
  kind: ClusterRole
  name: argocd-manager-role
subjects:
- kind: ServiceAccount
  name: argocd-manager
  namespace: kube-system
For Argo CD, cluster configuration and credentials are stored in secrets which must have a label argocd.argoproj.io/secret-type: cluster.
The secret data must include the following fields:
- name: a name for the cluster
- server: the cluster API URL, here we should use the internal URL of the data plane
- namespaces: optional comma-separated list of namespaces that are accessible in that cluster
- config: JSON representation of the cluster credentials
More information on how this structure looks like can be found in the Argo CD documentation.
The following script is an example of how to will fetch the bearer token for the service account created earlier and create such a secret for our target cluster.
For Kubernetes 1.24+, you need to take another step or two to get a bearer token for the service account:
export TARGET_CTX=gke-eu1
export ARGOCD_CTX=argocd

# Request a token by creating a secret with the corresponding
# `kubernetes.io/service-account.name`
cat <<EOF | kubectl apply --context $TARGET_CTX -n kube-system  -f -
apiVersion: v1
kind: Secret
metadata:
  name: argocd-manager-token
  namespace: kube-system
  annotations:
    kubernetes.io/service-account.name: argocd-manager
type: kubernetes.io/service-account-token
EOF

# There's now a static name for the secret:
name="argocd-manager-token"

ca=$(kubectl get --context $TARGET_CTX -n kube-system secret/$name -o jsonpath='{.data.ca\.crt}')
token=$(kubectl get --context $TARGET_CTX -n kube-system secret/$name -o jsonpath='{.data.token}' | base64 --decode)
namespace=$(kubectl get --context $TARGET_CTX -n kube-system secret/$name -o jsonpath='{.data.namespace}' | base64 --decode)

cat <<EOF | kubectl apply --context $ARGOCD_CTX -n argocd -f -
apiVersion: v1
kind: Secret
metadata:
  name: gke-eu1
  labels:
    argocd.argoproj.io/secret-type: cluster
type: Opaque
stringData:
  name: gke-eu1
  server: https://gke-eu1.inlets:443
  config: |
    {
      "bearerToken": "${token}",
      "tlsClientConfig": {
        "serverName": "kubernetes.default.svc",
        "ca": "${ca}"
      }
    }
EOF
Prior to Kubernetes 1.24, run the following instead:
export TARGET_CTX=gke-eu1
export ARGOCD_CTX=argocd

name=$(kubectl get --context $TARGET_CTX sa -n kube-system argocd-manager -o jsonpath='{.secrets[0].name}')

ca=$(kubectl get --context $TARGET_CTX -n kube-system secret/$name -o jsonpath='{.data.ca\.crt}')
token=$(kubectl get --context $TARGET_CTX -n kube-system secret/$name -o jsonpath='{.data.token}' | base64 --decode)
namespace=$(kubectl get --context $TARGET_CTX -n kube-system secret/$name -o jsonpath='{.data.namespace}' | base64 --decode)

cat <<EOF | kubectl apply --context $ARGOCD_CTX -n argocd -f -
apiVersion: v1
kind: Secret
metadata:
  name: gke-eu1
  labels:
    argocd.argoproj.io/secret-type: cluster
type: Opaque
stringData:
  name: gke-eu1
  server: https://gke-eu1.inlets:443
  config: |
    {
      "bearerToken": "${token}",
      "tlsClientConfig": {
        "serverName": "kubernetes.default.svc",
        "ca": "${ca}"
      }
    }
EOF
Notice the "serverName": "kubernetes.default.svc"?
The Argo CD docs explain the use of this property as follows:
ServerName is passed to the server for SNI and is used in the client to check server ceritificates against. If ServerName is empty, the hostname used to contact the server is used.
In this case, such a setting is required, because Argo CD will try to reach the cluster on e.g. https://gke-eu1.inlets:443 which is not a valid domain name according the TLS certificate of the Kubernetes API service. Our inlets client is running in the target cluster, hence the server name kubernetes.default.svc, a way to locate the api server within a pod.
Another option is using the flag "insecure": true" in the TLS client config. By setting this to true, we allow Argo CD to access the server without verifying the TLS certificate, while the communication still flows through a secure private tunnel.
Where we have access to kubeadm or k3s for the private cluster, we can add a TLS SAN name, and the solution works by directly tunnelling the API server. Alex also introduced inlets-connect, a proxy that can help make the “serverName” of “insecure” not needed.
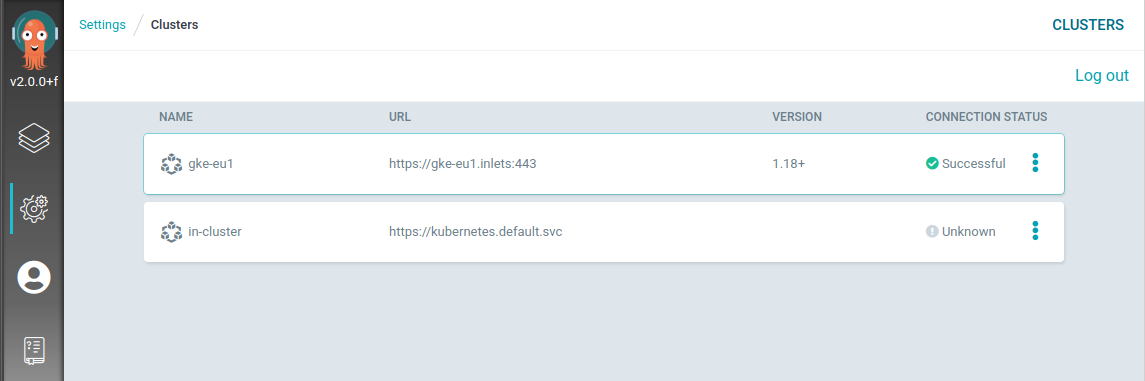
Our private cluster is ready to serve!
Giving it a test
Now it is time to deploy an application.
Let’s try to deploy the guestbook application in a declarative way:
export ARGOCD_CTX=argocd

cat <<EOF | kubectl apply --context $ARGOCD_CTX -n argocd -f -
apiVersion: argoproj.io/v1alpha1
kind: Application
metadata:
  name: guestbook
  namespace: argocd
spec:
  destination:
    namespace: default
    server: https://gke-eu1.inlets:443
  project: default
  source:
    path: kustomize-guestbook
    repoURL: https://github.com/argoproj/argocd-example-apps.git
    targetRevision: HEAD
  syncPolicy:
    automated: {}
EOF
Or if you have the Argo CD cli available, why won’t you try installing OpenFaas with Argo CD?
export TARGET_CTX=gke-eu1

kubectl create --context $TARGET_CTX namespace openfaas
kubectl create --context $TARGET_CTX namespace openfaas-fn

argocd app create openfaas-operator \
      --repo https://github.com/openfaas/faas-netes.git \
      --dest-namespace openfaas \
      --dest-server https://gke-eu1.inlets:443 \
      --path chart/openfaas \
      --helm-set operator.create=true \
      --helm-set generateBasicAuth=true \
      --helm-set functionNamespace=openfaas-fn \
      --self-heal \
      --sync-policy automatic
As soon those commands are applied, you will notice Argo CD starts synchronisation the desired state to the target cluster. And a few moments later, you’re applications are up and running!
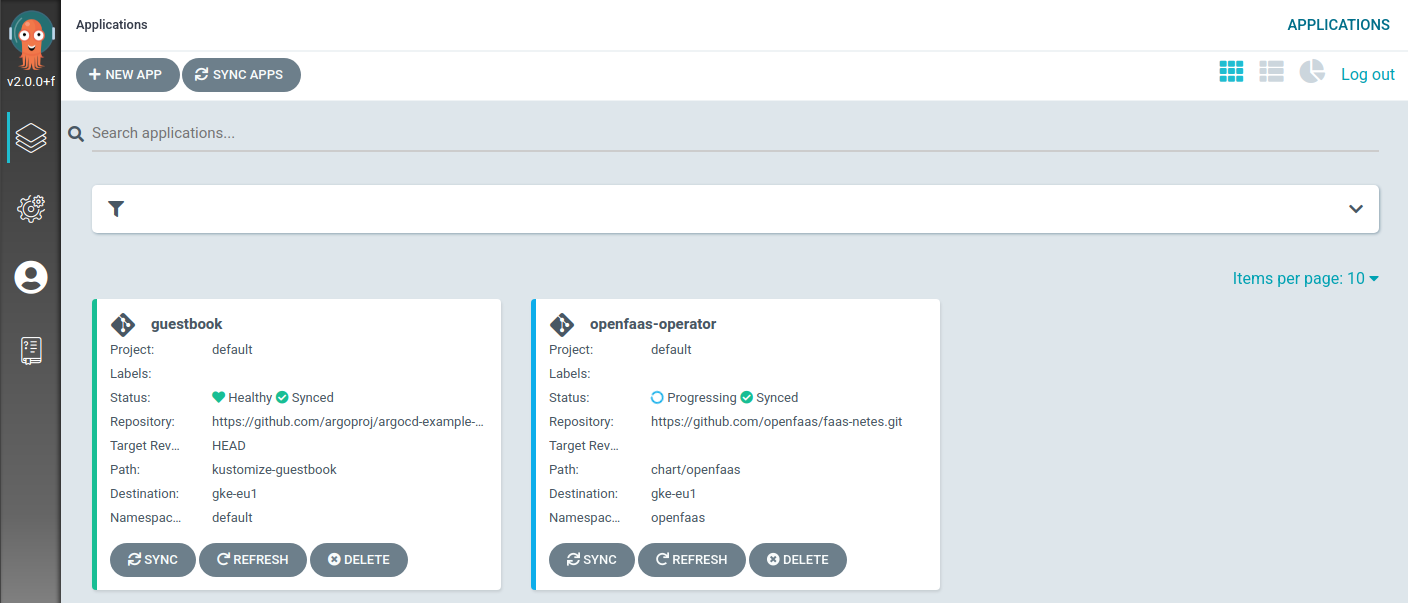
Argo CD installing the guestbook and OpenFaas in the private GKE cluster
Closing thoughts
Managing applications across multiple Kubernetes clusters can be quite challenging, especially if the clusters are tightly controlled in a private environment or running in various cloud providers.
Argo CD, a GitOps continuous delivery tool for Kubernetes, can manage multiple external targets forming a central place to deploy and monitoring all your application across clusters.
This post explains how we use inlets Pro to bring the sensitive Kubernetes API services into a single management cluster in a secure way. While the control plane of the tunnels is accessible for the clients, the data plane is kept private in the central management cluster and available for tools like Argo CD.
This technique applies to all kinds of services. Take the example of collecting metrics. In a previous post, we demonstrated how to monitor multiple clusters with Prometheus and inlets.
Further resources:
- Did you enjoy this article? pGet in touch with us](https://inlets.dev/contact) with your comments & questions, we’d love to help.
- Read tutorials and documentation for inlets
- Follow @inletsdev on Twitter
Subscribe for updates and new content from OpenFaaS Ltd.
By providing your email, you agree to receive marketing emails.