How to connect your on-premises databases to Kubernetes in the cloud

Johan Siebens
Learn how to connect private on-premises services to the public cloud with inlets
What is “hybrid cloud” anyway?
Before we get started, let’s have a clear idea what “hybrid cloud” is all about.
“Hybrid Cloud is a composition of a public cloud and a private environment, such as a private cloud or on-premises resources, offering the benefits of multiple deployment models. … For example, an organization may store sensitive client data in house on a private cloud application, but interconnect that application to services provided on a public cloud as a software service.” – Wikipedia
A hybrid cloud strategy can give a huge benefit for your business by moving workloads to a public cloud, leveraging the flexibility and robustness of managed services, while keeping sensitive data on a private cloud or local data center.
In this post, we’ll demonstrate how you can bring your on-premises services or databases into a Kubernetes cluster running on a public cloud.
This model applies for different use-cases:
- perhaps you are in the middle of a digital transformation where some parts of the architecture is deployed on a public cloud, but they still need to integrate with some legacy services
- you have some sensitive data to be kept in a private data center due to data residency regulation
Tutorial
As an example, we will connect a WordPress instance running in the cloud with a MySQL server running locally. Still, this solution is perfectly applicable to other databases or services like e.g. an Oracle database, a MinIO cluster or a RabbitMQ service.
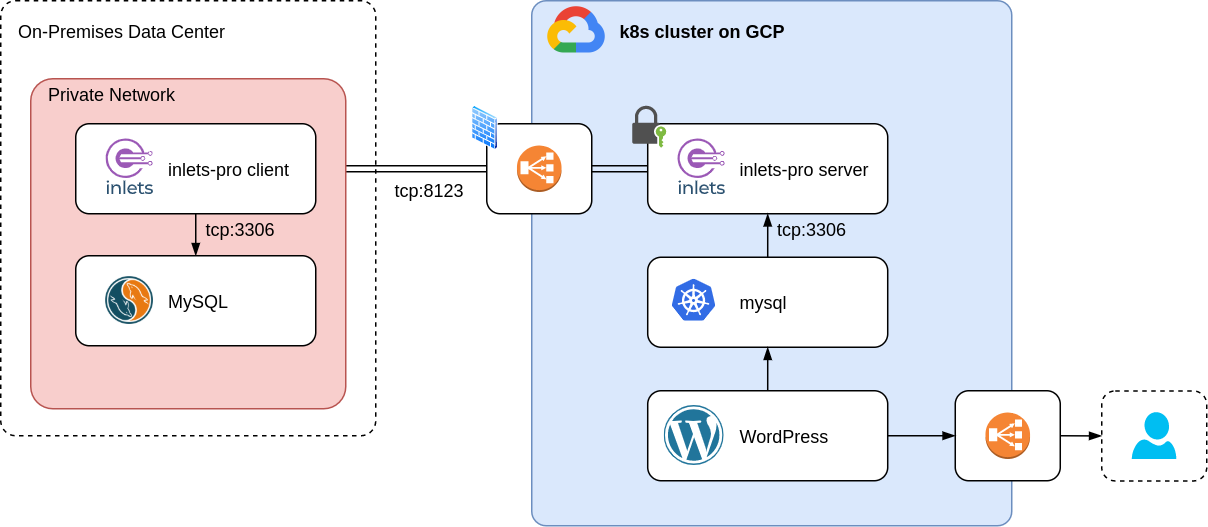
Picture above: our target architecture, a WordPress in the cloud connecting to a MySQL on-prem via inlets Pro
Pre-requisites
You will need:
- A Kubernetes cluster running on a public cloud (e.g. GKE, AKS, EKS, DOKS, …)
kubectl, configured to connect to the cluster- A domain and access to your DNS admin panel to create a sub-domain
- A service, like a database, running locally
- An inlets Pro license
Create the inlets Pro exit server
Before we start an inlets-pro exit service, create a Kubernetes secret with a token:
kubectl create secret generic inlets-token --from-literal=token=<a random token>
First, start an inlets-pro exit server pod and make it public with a LoadBalancer service:
apiVersion: apps/v1
kind: Deployment
metadata:
  name: inlets-pro-server
spec:
  replicas: 1
  selector:
    matchLabels:
      app: inlets-pro-server
  template:
    metadata:
      labels:
        app: inlets-pro-server
    spec:
      containers:
        - name: inlets-pro
          image: inlets/inlets-pro:0.9.5
          imagePullPolicy: IfNotPresent
          command: [ "inlets-pro" ]
          args:
            - "server"
            - "--auto-tls"
            - "--auto-tls-san=inlets.example.com"
            - "--token-from=/etc/inlets/token"
          volumeMounts:
            - name: temp-volume
              mountPath: /tmp
            - name: inlets-token
              mountPath: /etc/inlets
              readOnly: true
      volumes:
        - name: temp-volume
          emptyDir: {}
        - name: inlets-token
          secret:
            secretName: inlets-token
After applying this on the cluster, a exit server pod is available with:
auto-tlsenabled, meaning a TLS certificate for thecommon-nameis automatically generated- the default control port 8123
- the token available in the previously created secret
Now expose the exit server with a LoadBalancer service:
apiVersion: v1
kind: Service
metadata:
  name: inlets-pro-server
  labels:
    app: inlets-pro-server
spec:
  type: LoadBalancer
  ports:
    - name: control
      port: 8123
      targetPort: 8123
  selector:
    app: inlets-pro-server
Instead of using a LoadBalancer service, a Kubernetes Ingress can also be used here, especially when bringing multiple services into your cluster.
As you can see, we’ll only expose the control port 8123 to the outside world. This is actually a good thing, as our database will only reachable from within our Kubernetes cluster, making it more secure.
Wait a little bit until the load balancer is created, grab it’s public IP address and point your domain (remember the common-name) to it.
$ kubectl get service inlets-pro-server
NAME                TYPE           CLUSTER-IP       EXTERNAL-IP       PORT(S)          AGE
inlets-pro-server   LoadBalancer   192.168.197.17   185.136.232.105   8123:31981/TCP   8m11s
TIP: Some cloud providers honor the
loadBalancerSourceRangesfield in the Service spec, which allows you to provide a list of IP CIDR blocks allowed to connect to the load balancer. By creating firewall rules, only connections coming from your on-prem data center are allowed.
Start the inlets-pro client
Now that the server part of the tunnel is running, it is time to start the client in our private data center.
Let’s say we have a MySQL instance available with an internal IP address 10.1.0.50, start the inlets-pro client:
$ inlets-pro client --license-file ~/inlets-license --port 3306 --url wss://inlets.example.com:8123/connect --upstream 10.1.0.50 --token <your token>
2020/11/05 13:23:21 Welcome to inlets-pro! Client version 0.7.2
2020/11/05 13:23:21 Licensed to: Johan Siebens <xxxx@gmail.com>, expires: xxx day(s)
2020/11/05 13:23:21 Upstream server: 10.1.0.50, for ports: 3306
inlets-pro client. Copyright Alex Ellis, OpenFaaS Ltd 2020
INFO[2020/11/05 13:23:21] Connecting to proxy                           url="wss://inlets.example.com:8123/connect"
Perfect! Now the client made the connection, port 3306 of the server pod in our public cloud is accepting connection and will tunnel traffic to the MySQL instance.
Create a MySQL service
When we deploy WordPress, we could configure it to connect directly to the inlets-pro server pod, but it is better to create Kubernetes Service:
apiVersion: v1
kind: Service
metadata:
  name: mysql
  labels:
    app: mysql
spec:
  ports:
    - name: mysql
      port: 3306
      targetPort: 3306
  selector:
    app: inlets-pro-server
The set of Pods targeted by this Service is determined by the same selector as the previous service, but this time it is a service of type ClusterIP, making it only accessible from inside the cluster.
Deploy WordPress
The only thing left for our example is deploying a WordPress instance, connecting to the MySQL database via the inlets-pro tunnel:
apiVersion: apps/v1
metadata:
  name: wordpress
  labels:
    app: wordpress
spec:
  selector:
    matchLabels:
      app: wordpress
  template:
    metadata:
      labels:
        app: wordpress
    spec:
      containers:
      - image: wordpress
        name: wordpress
        env:
        - name: WORDPRESS_DB_HOST
          value: mysql
        ports:
        - containerPort: 80
          name: wordpress
note: this WordPress is not production-ready as it is missing the required volumes for the content
Mission accomplished! Our WordPress application, running in a public cloud environments is using the MySQL server located in the private data center.
Wrapping up
This tutorial gives us a short introduction on how inlets Pro can help us to build a hybrid cloud between existing servers and public cloud. As a cheaper, easier alternative to a data-center uplink or managed product like AWS Direct Connect or Azure Express Route it is a very lightweight, but powerful, tool to bring your on-prem services to a cloud workload.
For the example we chose WordPress, but the same technique can be applied to any other applications that use TCP traffic.
- Resource heavy ETL processes on the cloud, combining multiple data sources like private legacy databases and event streams in the public cloud.
- Data migrations from and to on-prem databases
- Connect your new application to legacy service during a digital transformation
- Keep your LDAP side on-premises in Active Directory and connect to a SaaS IDP product like Auth0. That way anyone can log into a website using their corporate identity without having to migrate Active Directory to the cloud.
Further resources:
Subscribe for updates and new content from OpenFaaS Ltd.
By providing your email, you agree to receive marketing emails.