The simple way to share files directly from your computer

Alex Ellis
When it comes to sharing files, there are many SaaS options out there, but what if you need a quick and simple solution?
Introduction
When I released the first version of inlets, my mind was set on solving just one problem. My team at an enterprise company needed to receive webhooks from a GitHub App in order to build a CI/CD platform we were working on. We looked to solutions like Ngrok and SSH tunnels, but both were blocked or had limits that meant they were not suitable.
The project did well, and then I got a message from Roman Dodin who had just used inlets to transfer a large file.
I just transferred a 70Gb disk image from a NATed NAS to a remote NATed server with @alexellisuk’ inlets tunnels and a one-liner python web server. Check it out, works like a breeze.
Notice that Roman did not have to upload 70GB to One-Drive or Dropbox, only to download it again. He was simply able to set up an inlets exit-server and get access to the file directly, without having to wait for an initial upload and download.
Maybe you need to share a 5GB video recording with someone for editing, or as part of a virtual conference? Perhaps you have a number of smaller files to share with a colleague, and don’t want to clog up your Google Drive with them.
In this post I’ll explain how it was not as simple as I expected to share a large file over my inlets tunnel, and what I did to make it simpler. I hope you’ll also find the tool useful whether you run it directly on a cloud instance, or expose it securely over an inlets tunnel.
Not so simple
So when I was having issues with my Apple Mac and Big Sur, and was asked to provide a dump of my Mac’s diagnostic information, we decided to try to use inlets to share the zip file.
I thought: “I’ll simply use
inletsctlto create a quick self-hosted server tunnel the inlets server, then connect my inlets client running on my laptop, and the engineer can grab the file”
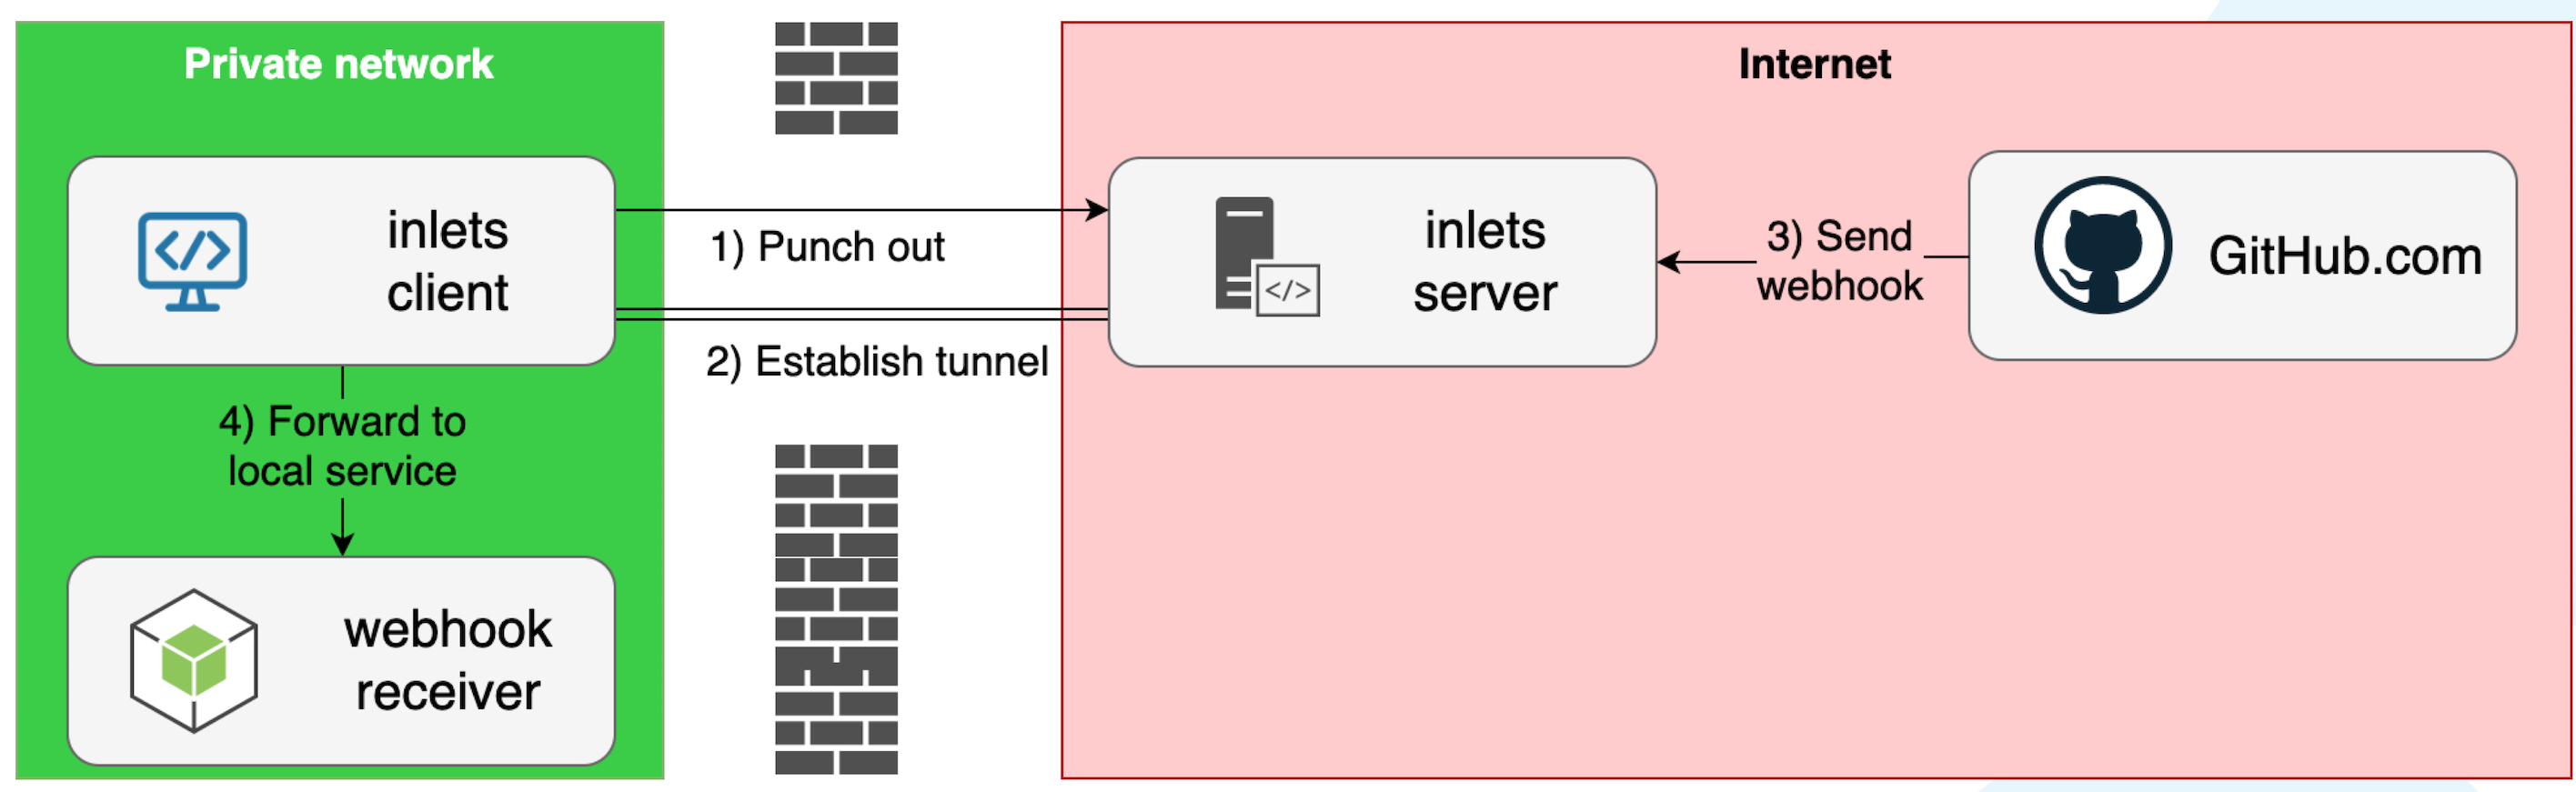
Conceptual diagram showing how inlets uses a client/server architecture to bridge networks.
First of all, I tried to use python -m SimpleHTTPServer - the built-in HTTP server, but it didn’t work.
Here’s what went wrong:
- it couldn’t support the large file-size (~500MB)
- directory listing is turned on by default, so anyone could see the file who found the IP address
- there was no password protection, so anyone could download the file
In the end, I ran an nginx container with Docker Desktop, and mounted my file into the container. That also didn’t work:
- Nginx didn’t want me to serve such a large file
- I had to build a custom config file and rebuild the container
- I still didn’t have basic auth, which is trivial to set up, but lots of manual steps
Fixing the pain
Having written HTTP servers using the Golang standard library for the past 4 years, I thought I’d try making my own which could solve this pain and be built into inlets going forward.
So I went ahead and built the inlets-pro http fileserver command, and to test it, used it to share a new pre-release version of the feature with the community.
The main flags that solve the pain pain points above are:
-a, --allow-browsing Allow directories to be browsed by clients
This means I can quickly turn on or off browsing, so I could keep a private URL, and have no need for a password.
-p, --port int port for server and for tunnel (default 8000)
This one means we don’t have to have port clashes, even the SimpleHTTPServer supports changing the port. I also get to run two servers or more.
  -t, --token string        token or password for Basic Authentication
  -f, --token-from string   read the authentication token from a file
The token when set is the basic auth password. Basic auth over TLS is a reasonable combination for providing ad-hoc downloads.
-w, --webroot string select the webroot, or leave empty for the current directory
Finally I wanted to give the option to easily set a webroot. It’s quite common for users to accidentally share their home directory, which includes .ssh keys and a whole host of other confidential data. This flag exists to help you be more intentional about what you share.
Just like with Python’s built-in HTTP server, you run inlets-pro http fileserver on your local computer.
Here’s how to turn on file-browsing and enable a password (read from a file)
inlets-pro http fileserver \
  --token-file $HOME/password.txt \
  --webroot /tmp/share \
  --allow-browsing
Here’s how to make it a little easier for who is accessing your tunnel by disabling the password but making sure they access a direct URL for a given file.
inlets-pro http fileserver \
  --webroot /tmp/share \
  --allow-browsing=false
Finally, if you want to generally share files with anyone who may find them, you can do it like this:
inlets-pro http fileserver \
  --webroot /tmp/share \
  --allow-browsing=true
To put this all together you’d do the following:
- Run
inlets-pro http fileserveron your local machine - Create a server on the cloud to host the
inlets-pro http server - Run
inlets-pro http clienton your local machine
And then share the URL with your colleagues or friends.
For a walk-through of everything using a custom domain and Let’s Encrypt, try this quick quest:
Your quest - establish a secure tunnel with a custom domain
Wrapping up
So next time you need to share a file from your local computer, or need to run a simple, but powerful HTTP server, why not try inlets-pro’s new http fileserver mode?
There is no enforced requirement to have a license to use the fileserver, but if you want to support the project and benefit from self-hosted HTTP and TCP tunnels, why not check out a personal license that you can use at home and work? inlets pricing
Further resources:
Subscribe for updates and new content from OpenFaaS Ltd.
By providing your email, you agree to receive marketing emails.