Deploy to a private cluster from GitHub Actions without exposing it to the Internet

Alex Ellis
Learn options to deploy to a private cluster from a GitHub Action without exposing it to the Internet.
Introduction
When it comes to building and deploying code, who actually wants to maintain a CI/CD server for their projects? That’s where services like GitHub Actions come into their own - within a short period of time you can be building containers and publishing images to your private registry.
But what about when it comes to deploying to your servers? What if they are running on-premises or within a private VPC that you simply cannot expose to the Internet?
There’s three options that come to mind:
- Establish a full VPN between GitHub Actions and your private network
- Use a GitHub self-hosted runner for the deployment steps
- Establish a temporary tunnel for deployment purposes only.
- Use a “GitOps” tool to pull state outside of the flow of GitHub Actions
If we want to move away from managing infrastructure, then building a full VPN solution with a product like OpenVPN or Wireguard is going to create management overhead for us. We also need to be certain that we are not going to make our whole private network accessible from GitHub’s network.
Self-hosted runners can make for a useful alternative. They work by scheduling one or more actions jobs to run on servers that you enroll to the GitHub Actions control-plane. You’ll need to either install these tools to an existing server or provision a new one to act as a proxy. The risk is that you are enabling almost unbounded access to your private network.
The third option is more fine-grained and easier to automate. It involves forwarding one or more local ports from within your private network or Kubernetes cluster to the public GitHub Actions runner. The only thing it will be able to do, is to authenticate and send requests to what you’ve chosen to expose to it.
For the fourth option - a GitOps agent like ArgoCD will run in your cluster and keep checking for new images to apply or deploy. This only works well but you are tied to Kubernetes. The approach I’m outlining today works whatever API or system you’re using. But, if you are tied into Kubernetes and your resource can be created through kubectl, then a tool like FluxCD or ArgoCD could be a good option. We covered this approach on the blog: Learn how to manage apps across private Kubernetes clusters.
Using a GitOps agent means you will need to split up how you build your images from how you deploy them. This may not suit traditional companies who are well versed with a CI job both building and deploying images.
Conceptual architecture
On the left hand side we have a private VPC running on AWS. This could also be an on-premises Kubernetes cluster for instance. It has no incoming traffic enabled, other than through a load balancer for port 8123 into our inlets server. The inlets server only exposes a control plane to inlets clients. It has authentication and TLS encryption enabled.
On the right hand side, GitHub Actions needs a URL to deploy to OpenFaaS. It cannot access the OpenFaaS gateway running inside our local, private network, so we establish an inlets tunnel and forward the gateway service from the network network to localhost. It’ll only be available for the GitHub Action at this point.
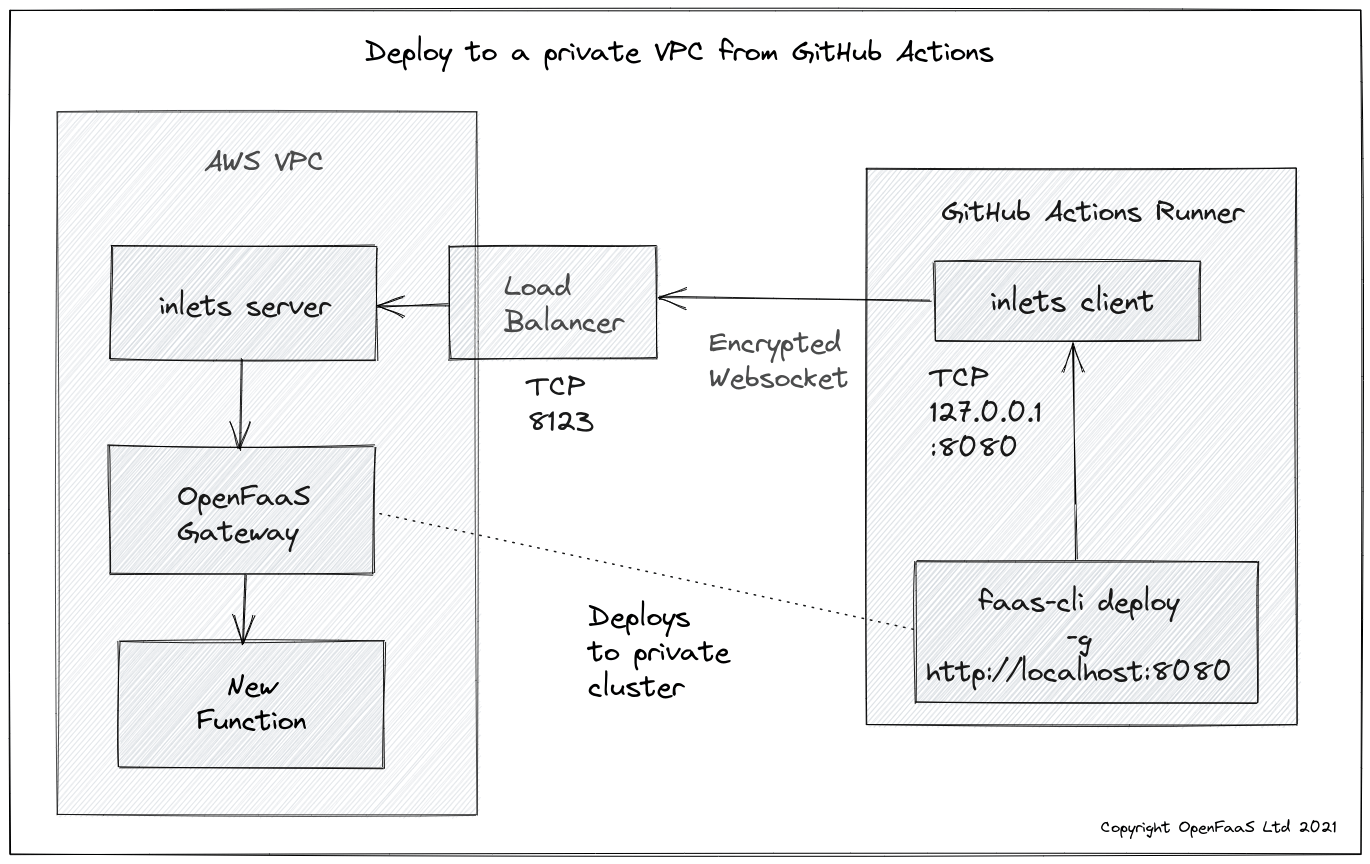
The inlets client binds the remote OpenFaaS Gateway to:
http://127.0.0.1:8080within the GitHub Actions runner, but does not expose it anywhere on the Internet
Example command for the server:
export SERVER_IP=$(curl -sfSL https://checkip.amazonaws.com)
export SERVER_TOKEN=$(head -c 16 /dev/urandom | shasum | cut -d ' ' -f 1)

inlets-pro tcp server \
  --auto-tls-san $SERVER_IP \
  --token $SERVER_TOKEN \
  --client-forwarding
You can deploy the inlets server through a Kubernetes YAML manifest and place it alongside your OpenFaaS containers.
Create a LoadBalancer service, and wait until you have its public IP address:
cat <<EOF > inlets-forwarding-svc.yaml

apiVersion: v1
kind: Service
metadata:
  name: inlets-forwarding-server
  namespace: openfaas
spec:
  selector:
    app: inlets-forwarding-server
  ports:
    - name: https
      protocol: TCP
      port: 8123
      targetPort: 8123
      nodePort: 32007
  type: LoadBalancer
---
EOF

kubectl apply -f inlets-forwarding-svc.yaml
Next, create a Deployment for the inlets server:
# Populate with the IP of the LoadBalancer
# You can get the IP of the LoadBalancer by running:
# kubectl get svc -n openfaas inlets-forwarding-server

export SERVER_IP=$(kubectl get svc -n openfaas inlets-forwarding-server -o jsonpath="{.status.loadBalancer.ingress[0].ip}")
export SERVER_TOKEN=$(head -c 16 /dev/urandom | shasum | cut -d ' ' -f 1)

# Capture the token for later use.
echo $SERVER_TOKEN > server-token.txt

cat <<EOF > inlets-forwarding-deploy.yaml
---
apiVersion: apps/v1
kind: Deployment
metadata:
  name: inlets-forwarding-server
  namespace: openfaas
  labels:
    app: inlets-forwarding-server
spec:
  replicas: 1
  selector:
    matchLabels:
      app: inlets-forwarding-server
  template:
    metadata:
      labels:
        app: inlets-forwarding-server
    spec:
      containers:
      - name: inlets-forwarding-server
        image: ghcr.io/inlets/inlets-pro:0.9.5
        imagePullPolicy: IfNotPresent
        command: ["inlets-pro"]
        args:
        - "tcp"
        - "server"
        - "--auto-tls-san=$SERVER_IP"
        - "--token=$SERVER_TOKEN"
        - "--client-forwarding"
        ports:
        - containerPort: 8123
---
EOF

kubectl apply -f inlets-forwarding-deploy.yaml
Note that only port 8123 needs to be exposed. Nobody will be able to access any services within your private network.
Check the pod’s logs with: kubectl logs deployment.apps/inlets-forwarding-server.
In the GitHub Action, you’ll run an inlets client at the beginning of the job or just before you need it.
This is the syntax for running a inlets client with forwarding enabled:
# Populate from previous step
export SERVER_IP=""

# Create a GitHub Action secret with the token i.e. secrets.SERVER_TOKEN
export SERVER_TOKEN=""

# Assuming the tunnel is running as a Kubernetes Pod in the same namespace
# use "gateway" otherwise "gateway.openfaas"

export UPSTREAM="gateway.openfaas"
export PORT=8080

inlets-pro tcp client \
  --local $PORT:$UPSTREAM:$PORT \
  --local-addr 127.0.0.1: \
  --ports 8000 \
  --url wss://$SERVER_IP:8123 \
  --token $SERVER_TOKEN
And this is what it might look like in a GitHub Action:
name: build

on:
  push:
    branches:
      - '*'
  pull_request:
    branches:
      - '*'

permissions:
  actions: read
  checks: write
  contents: read
  packages: write

jobs:
  build:
    runs-on: ubuntu-latest
    steps:
      - uses: actions/checkout@master
        with:
          fetch-depth: 1
      - name: Get faas-cli
        run: curl -sLSf https://cli.openfaas.com | sudo sh
      - name: Get inlets
        run: |
          curl -sLSf https://github.com/inlets/inlets-pro/releases/download/0.9.1/inlets-pro -o ./inlets-pro
          chmod +x ./inlets-pro
          sudo mv ./inlets-pro /usr/local/bin/
          inlets-pro version
      - name: Establish tunnel
        run: |
          export SERVER_IP="${{secrets.SERVER_IP}}"

          # Create a GitHub Action secret with the token i.e. secrets.SERVER_TOKEN
          export SERVER_TOKEN="${{secrets.SERVER_TOKEN}}"

          # Assuming the tunnel is running as a Kubernetes Pod in the same namespace
          # use "gateway" otherwise "gateway.openfaas"

          export UPSTREAM="gateway"
          export PORT=8080

          inlets-pro tcp client \
            --local $PORT:$UPSTREAM:$PORT \
            --local-addr 127.0.0.1: \
            --ports 8000 \
            --url wss://$SERVER_IP:8123 \
            --license "${{secrets.INLETS_LICENSE}}" \
            --token $SERVER_TOKEN &
      - name: Login
        run: >
          echo ${{secrets.OPENFAAS_PASSWORD}} |
          faas-cli login --gateway http://127.0.0.1:8080 --password-stdin
      - name: Deploy
        run: >
          faas-cli version --gateway http://127.0.0.1:8080
      - name: Close tunnel
        run: |
          killall -9 inlets-pro
Create the following secrets:
INLETS_LICENSE- with your license for inletsSERVER_TOKEN- with the token you generated earlier to authenticate the clientOPENFAAS_PASSWORD- with your OpenFaaS admin password required for the GitHub Action to log into your OpenFaaS gateway
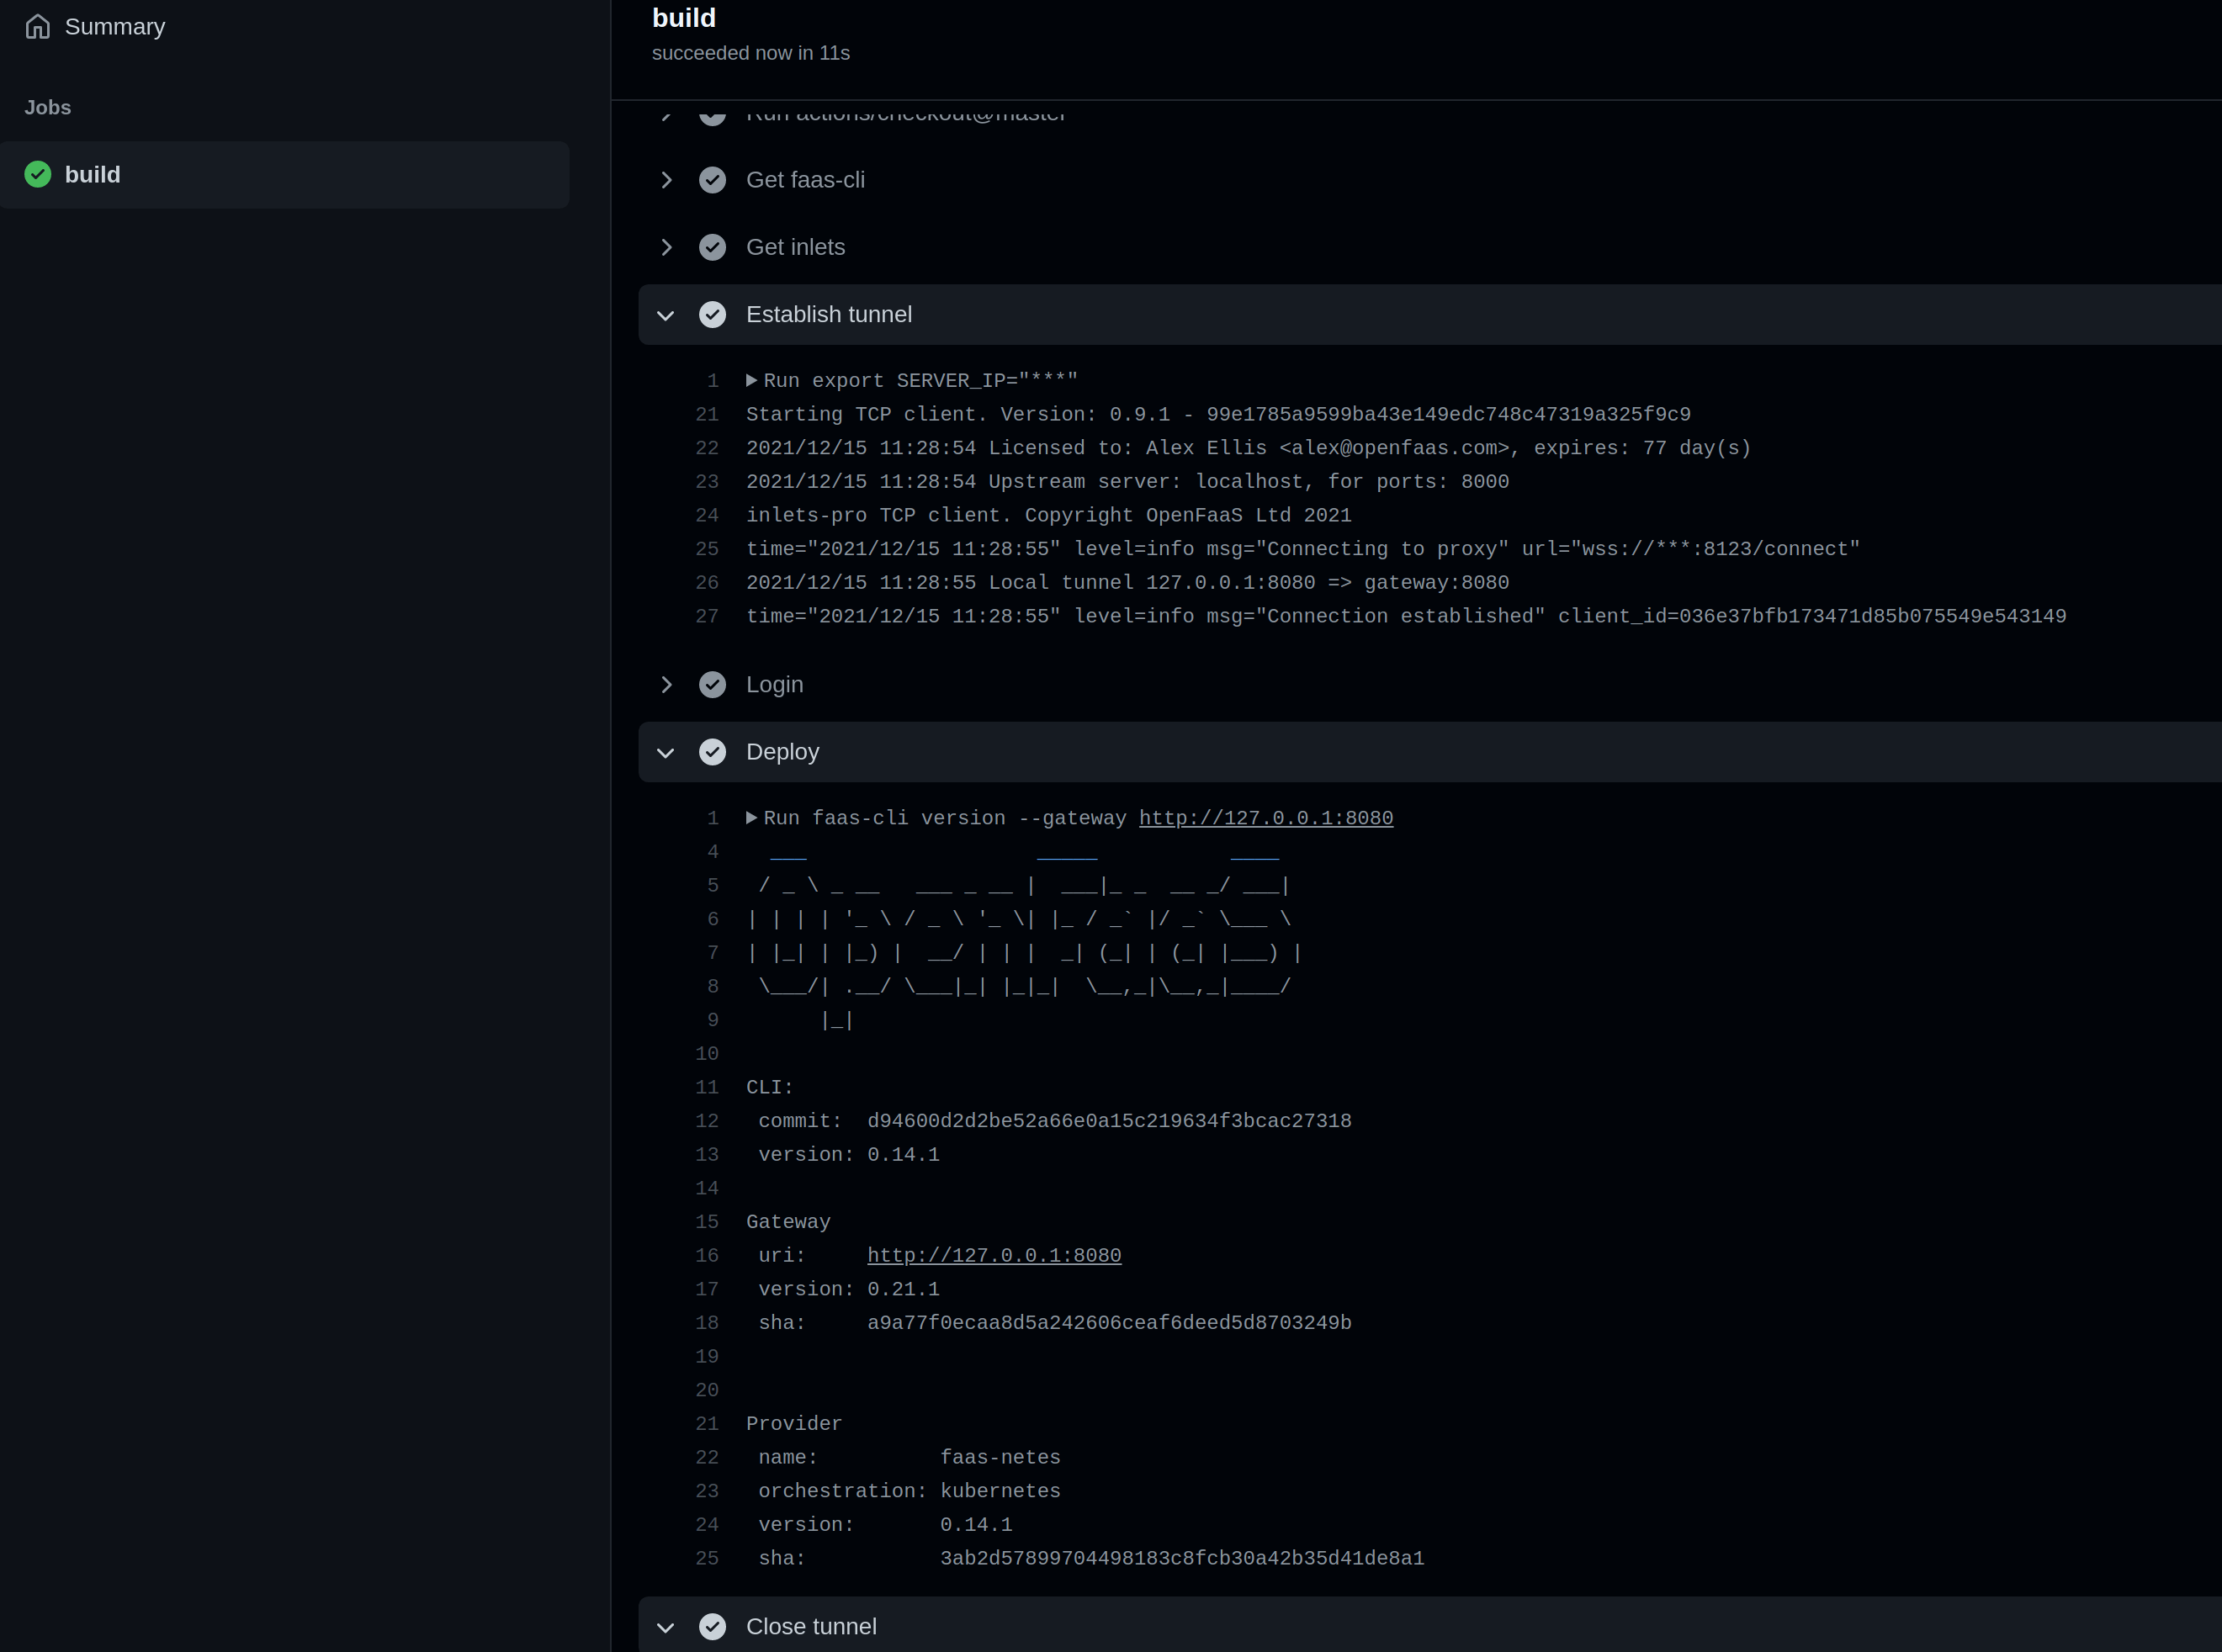
Here’s my GitHub Action deploying to my private OpenFaaS gateway which is not exposed on the Internet.
In the action we ran the faas-cli login command and then the faas-cli version command, however in a fully-fledged CI/CD pipeline, you may also build an image, publish it to a private registry then run the faas-cli deploy command.
Wrapping up
Without resorting to a fully-fledged VPN, that can be hard to lock down, or a self-hosted runner which requires additional maintenance and administration, we were able to deploy to a private cluster using a tunnel.
What if you wanted to deploy to Kubernetes?
You could also forward the Kubernetes API server by changing the “–local” flag to 6443:kubernetes.default:443. Then you’d use kubectl within your GitHub Actions, changing the server address in your KUBECONFIG file to 127.0.0.1:6443 and adding the parameter: --tls-server-name.
What if you cannot expose a LoadBalancer for the inlets server?
A workaround is to use a double-tunnel. This is beyond the scope of the article, but you are welcome to get in touch for some pointers on the configuration.
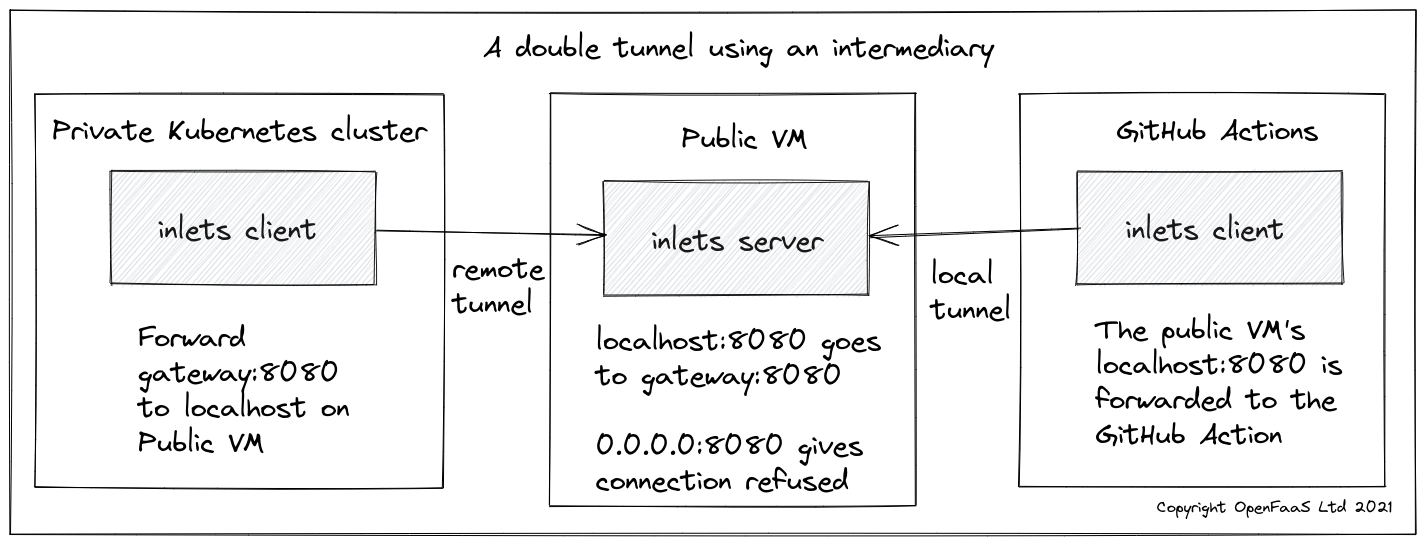
A double-tunnel, where we add an intermediary server which does have a publicly accessible IP address.
You can follow us on Twitter for more content like this: @inletsdev
Why not try out the tutorial? Get started with a monthly plan here
Or get in touch with us if you have any questions about inlets.
Subscribe for updates and new content from OpenFaaS Ltd.
By providing your email, you agree to receive marketing emails.