Manage tunnels for your team with inlets cloud

Alex Ellis
inlets-cloud makes it quick and easy to create, manage and monitor tunnel servers for yourself or your team.
Why central management is important
There’s several key ways that we see customers using inlets: from remote access, to remote support for customers to collaboration to self-hosting and CI. Each tunnel is made up of a client that usually runs in the network you’re trying access, and a server that acts as a broker, bastion or conduit.
Tunnels can be created through our automation tools, or manually by setting up the inlets-pro binary on an existing VM or host.
The automation tools can closely match a SaaS-based solution for speed and convenience, but because they are not centrally managed, you may run into issues as you add users and scale.
- What if you have multiple members of your team?
- Or give support to multiple customers?
- Connect a myriad of edge and IoT devices?
- A need to provision tunnels dynamically for preview environments during your CI process?
At some point, you may have trouble tracking usage, credentials, IP addresses and reliability of your tunnels.
To solve this issue for growing teams, or users who want multiple tunnels, we created a self-hosted product called inlets-cloud. inlets-cloud is not a SaaS solution that we host, you will run this on your own private infrastructure, so that you can retain ownership of your data and maximise privacy.
Your team can request secure, private HTTPS tunnels to help them collaborate and carry out their work.
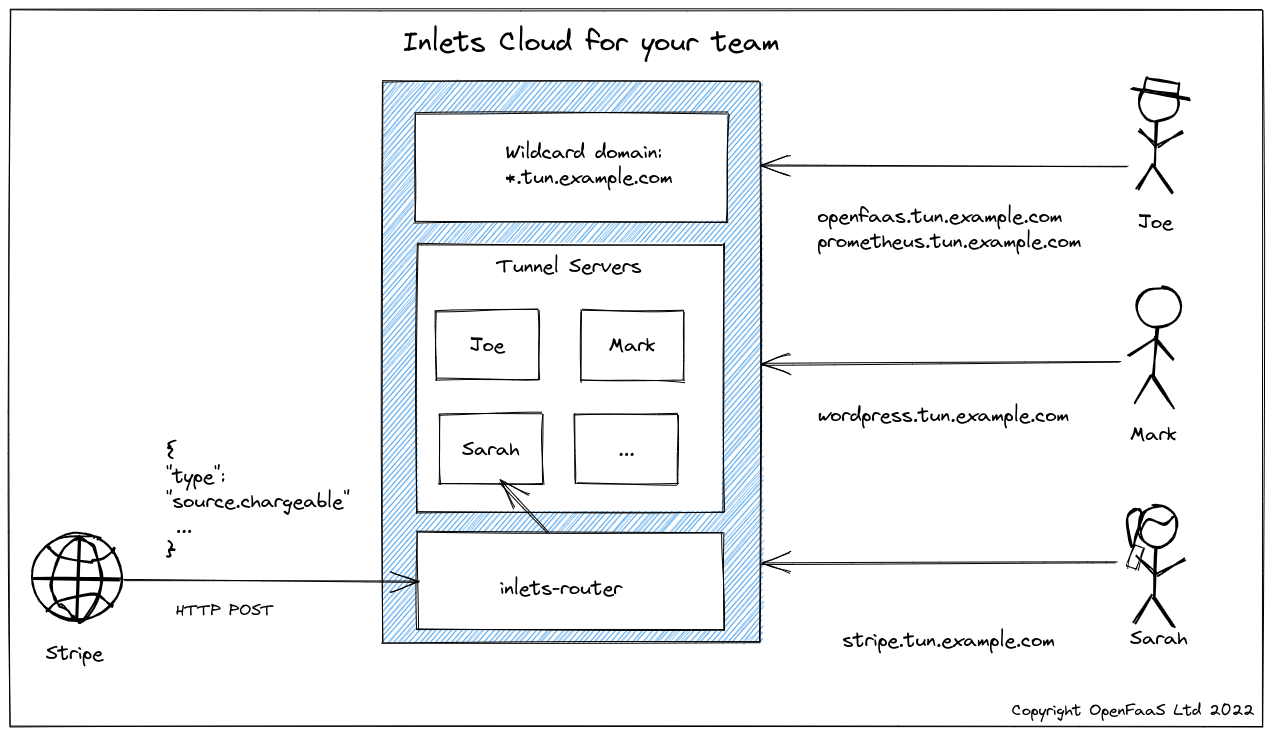
In the diagram above, we can see three different users sharing our corporate inlets-cloud installation under the wildcard domain of *.tun.example.com. Every tunnel makes use of our TLS certificate, so encryption is on by default, and there’s no need to wait for a new certificate for each tunnel.
Joe is learning PromQL for his work on OpenFaaS and created a tunnel so that he can collaborate with Sarah. She can access prometheus.tun.example.com and get to his Prometheus UI to run queries, and suggest new ones.
Mark is in marketing and needs Joe to review the blog post on Prometheus that he’s put together. This is a very quick way to preview the article before it goes live, or gets published on the Internet.
Sarah’s working on integrating billing, which is this quarter’s top priority. In the diagram Stripe is sending her webhooks directly to the code running on her local environment. When she has this work completed, she needs to integrate with PayPal separately. Fortunately, she can request a new tunnel to do this quickly and efficiently, via the inlets-cloud CLI.
How does it work?
inlets-cloud is installable on any Kubernetes cluster and comes with:
- An intuitive CLI to create and manage tunnels using Kubernetes authentication
- A REST API for integration with your own existing systems
- A simple router component so that you can use a single wildcard DNS entry for all your tunnels
And over time, we plan to add additional features to help you get insights on resource consumption and reliability via the Prometheus metrics we added.
Here’s how you can create a new tunnel server which you or your team can use within about 1-2 seconds of you typing in the command:
$ inlets-cloud create docs-preview
Additional 0 domains: []
Created tunnel docs-preview. OK.
Then you can list the tunnels being managed by your inlets-cloud:
$ inlets-cloud list
TUNNEL       UPSTREAMS      CREATED
docs-preview []             2022-01-19 09:43:26 +0000 GMT
From there, the connect command will print out a connection string that you can copy and paste to connect the tunnel:
$ inlets-cloud connect docs-preview --domain tun.example.com
# Access your tunnel via: https://docs-preview.tun.example.com

inlets-pro http client \
  --token=G0cVUKCs3sPyX1g0BuFnjTZuBIthCgCw35HwjxXwAdY7UNbzkwDhijS4 \
  --url=wss://docs-preview-tunnel.tun.example.com \
  --upstream=http://127.0.0.1:8080 \
  --auto-tls=false
Once you’ve started the tunnel, you’ll be able to access it via https://docs-preview.tun.example.com
If you inadvertently leaked the token for your tunnel, then you can rotate it with immediate effect:
$ inlets-cloud rotate docs-preview
A new token will be generated for tunnel: docs-preview
Any connected tunnels will disconnect at this point, and won’t be able to reconnect until you configure them with the updated token.
If you want to make the tunnel client run at start-up, simply add the flag --generate=systemd to your inlets-pro http client command and it’ll generate a systemd unit file that you can install on your system.
$ inlets-pro http client \
  --token=G0cVUKCs3sPyX1g0BuFnjTZuBIthCgCw35HwjxXwAdY7UNbzkwDhijS4 \
  --url=wss://docs-preview-tunnel.tun.example.com \
  --upstream=http://127.0.0.1:8080 \
  --auto-tls=false \
  --license-file=$HOME/.inlets/LICENSE \
  --generate=systemd > inlets-pro.service

$ sudo mv inlets-pro.service /etc/systemd/system/inlets-pro.service
$ sudo systemctl enable inlets-pro.service
You can also set up multiple hostnames for a single tunnel, going back to the diagram, Mark had a Prometheus and an OpenFaaS tunnel:
$ inlets-cloud create \
    mark \
    --upstream prometheus \
    --upstream openfaas
Additional 2 domains: [prometheus openfaas]
Created tunnel mark. OK.
The tunnel is provisioned immediately, and the connect command prints out everything Mark will need to connect:
$ inlets-cloud connect mark --domain tun.example.com

# Access your tunnel via: https://prometheus.tun.example.com
# Access your tunnel via: https://openfaas.tun.example.com

$ inlets-pro http client \
  --token=JaKoZyI2qVwpqT6df7BuVOdJwAYvkAyqmxa11fGbzX8Ornp9EjBW0CUb \
  --url=wss://mark-tunnel.tun.example.com \
  --upstream=prometheus.tun.example.com=http://127.0.0.1:9090 \
  --upstream=openfaas.tun.example.com=http://127.0.0.1:8080 \
  --auto-tls=false
FAQ
-
How much does it cost? During beta, you can use your existing Gumroad or inlets Pro subscription to deploy inlets-cloud at no additional cost.
-
How do I run inlets-cloud? You’ll need a Kubernetes cluster on a public cloud, your own domain name and an DNS provider which has support for DNS01 challenges from cert-manager
-
Where do you recommend running inlets-cloud? We have done testing with DigitalOcean Kubernetes, Google Cloud Kubernetes Engine (GKE), AWS EKS. You can also use CloudFlare for your domain if you wish, along with a different managed Kubernetes engine.
-
How many tunnels can I run? This will depend on your subscription. Each tunnel created will represent one “license” or “tunnel pair”
-
What are the resource requirements for inlets-cloud? inlets HTTP tunnels tend to use single-digit amounts of RAM and CPU, but it depends on how you’re using them. The control-plane components are fairly lightweight, but a cluster with 3x 2GB RAM nodes should suffice for moderate use.
-
How do I share access with my team? You can either manage tunnels yourself as an administrator, or create Kubernetes service accounts with granular permissions to your team. For automated / machine-based access, inlets-cloud has a separate REST API and token that can be used.
-
What’s on the roadmap for inlets-cloud? inlets now supports detailed usage and reliability metrics, a future version of inlets-cloud will generate Prometheus configuration for all your tunnels, so they can be monitored in one place. But we also want to hear from you, so feel free to get in touch
Try it out
You can reach out to us for a demo, or kick the tires with inlets-cloud on your own Kubernetes cluster using these instructions:
You can follow our work on Twitter via @inletsdev
You may also like:
Subscribe for updates and new content from OpenFaaS Ltd.
By providing your email, you agree to receive marketing emails.