Automate a self-hosted HTTPS tunnel in less than 5 minutes without any limits

Alex Ellis
We’ll show you to automated a self-hosted HTTP tunnel in less than 5 minutes on any of the major cloud providers, with no bandwidth or rate limits enforced.
What is a HTTPS tunnel for, and why would you want one?
The use-case for a HTTPS tunnel is to expose a local HTTP endpoint on the Internet, whilst being able to use encryption and a TLS certificate.
Here are a few use-cases I run into frequently:
- Blog post previews
- Receiving webhooks from (mostly GitHub, Stripe, Gumroad, etc)
- Sharing a local development environment with my team
- Self hosting OpenFaaS functions or other services on my Kubernetes cluster
But there are dozens of use-cases we’ve been since 2019 and I’m sure you have your own.
Why would you want to self-host it, and why automate it?
The main reasons to self-host a tunnel are probably: privacy, convenience and autonomy. Cost may also be a factor.
When you use a hosted platform like Ngrok or Cloudflare’s Argo tunnel system, you’re going to be limited on bandwidth, or paying for it if you exceed a certain allowance. You may have to pay for every single domain you want to expose, and you may even get limited on how many connections are allowed to be made over the tunnel.
So for a self-hosted solution, we can’t possibly offer the exact same convenience of a SaaS platform, you wouldn’t want that anyway, because we’d also have to impose the same sensible limits on you.
But sensible limits for a SaaS platform don’t often fit our own personal needs, that’s where a self-hosted solution like Inlets comes in, with some automation sprinkled on top.
What is Inlets?
Inlets is a HTTPS and TCP tunnel built for cloud native environments. It’s a single binary that you can run on your laptop, or in a Kubernetes cluster, or as a container, on MacOS, Windows and Linux.
The server part is usually run on a machine with a public IP, and the client part is usually run on a private network.
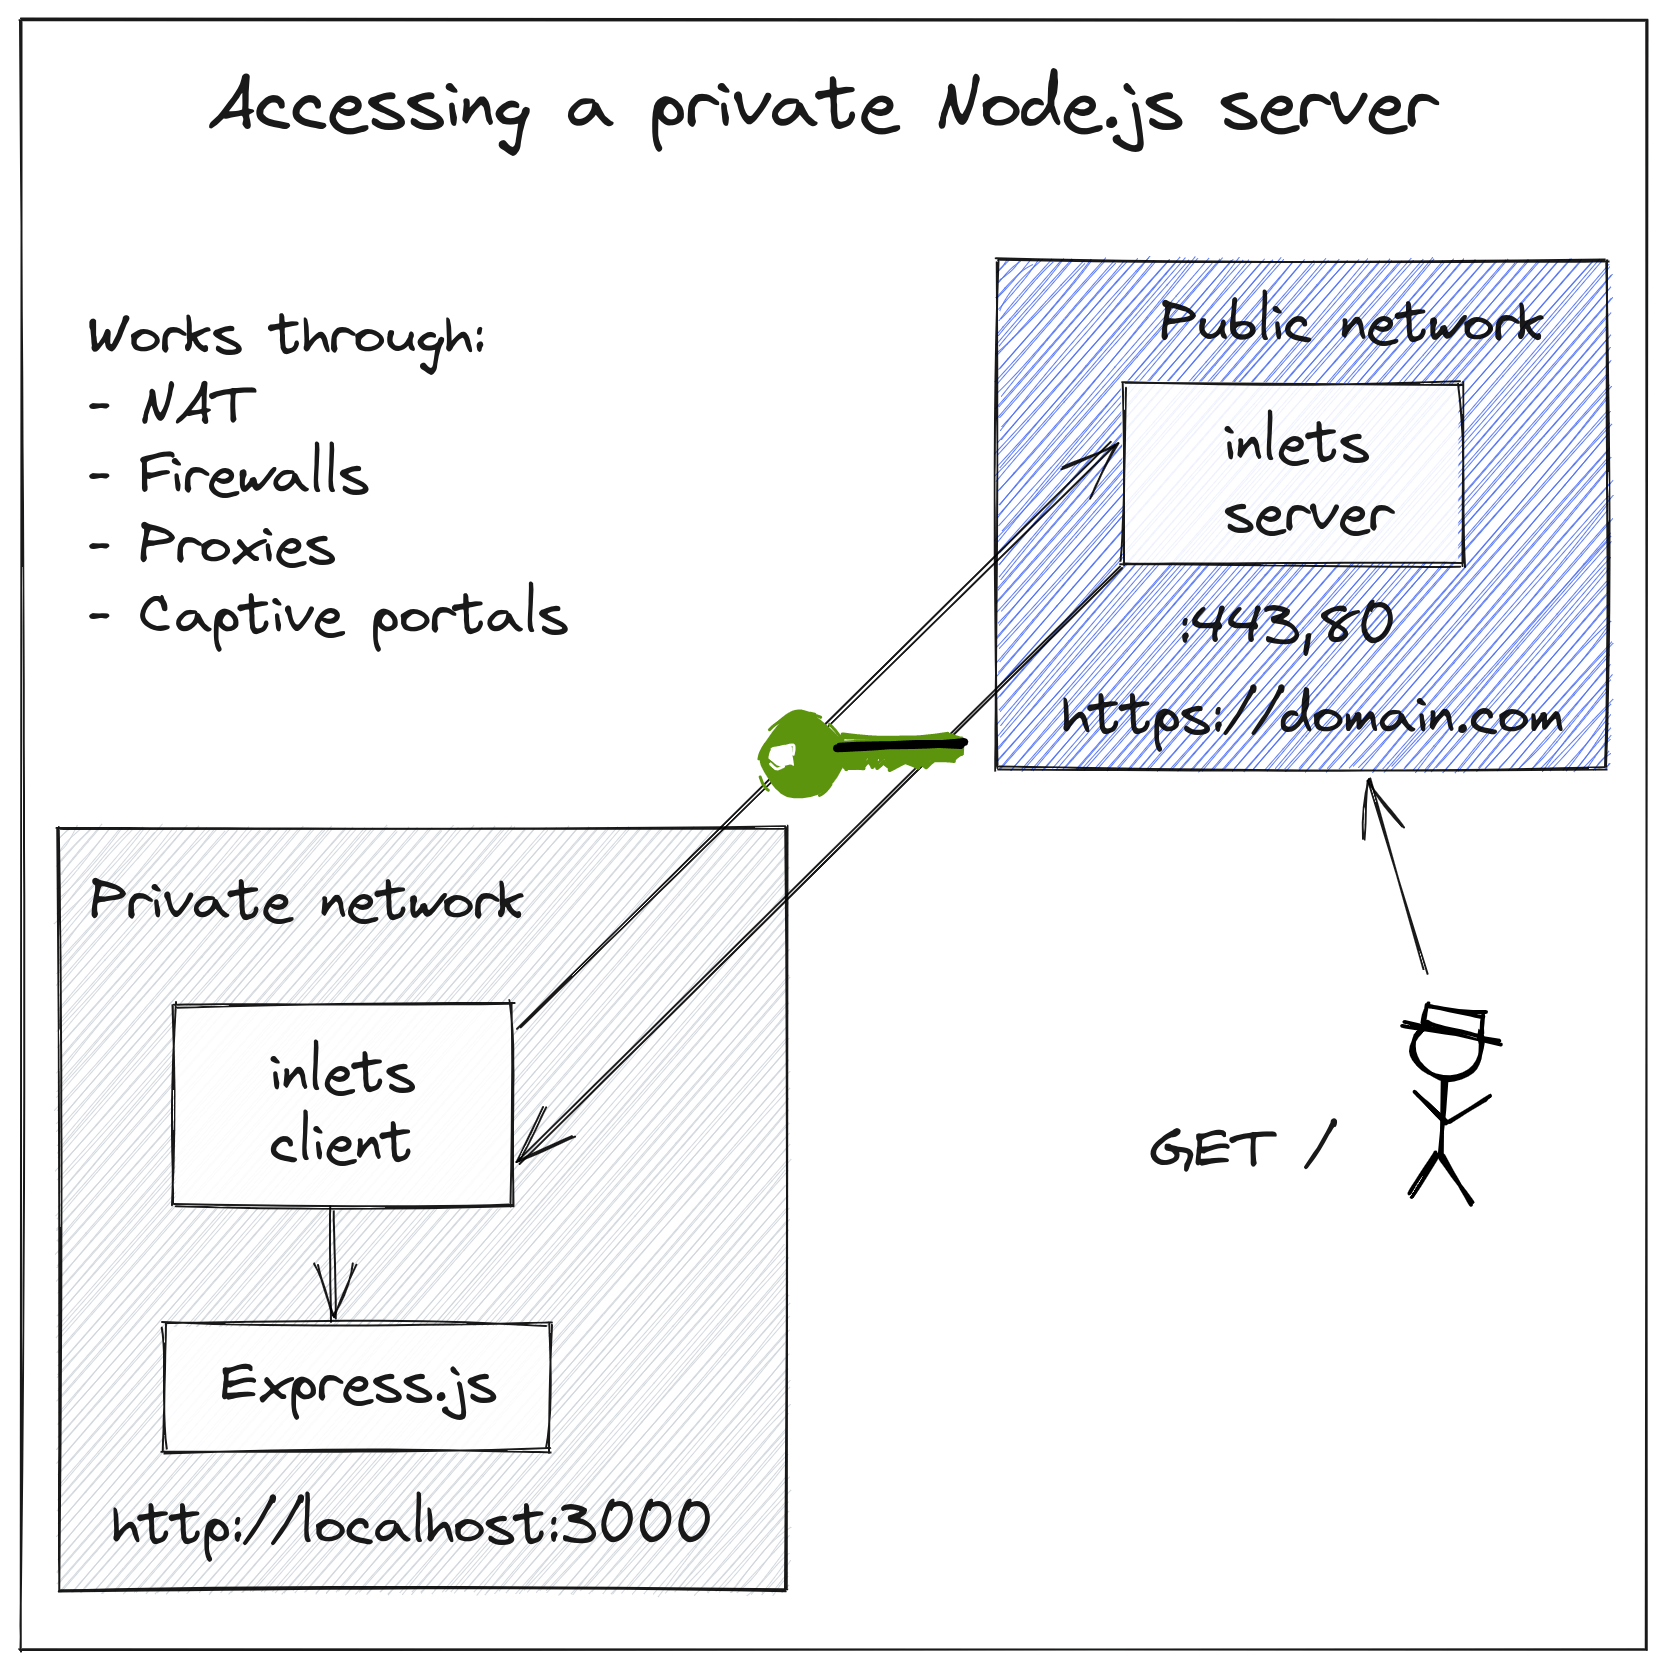
Example exposing a Node.js server from your local network, with HTTPS
Say you had a domain called example.com and wanted to host an Mkdocs site.
By using our open source inletsctl tool, you can create a tunnel server with inlets pre-installed, which will then get TLS certificates from Let’s Encrypt for you:
inletsctl create --provider digitalocean \
  --region lon1 \
  --letsencrypt-domain blog.example.com \
  --access-token-file ~/do-token
If you’d like any additional domains, simply add them such as: --letsencrypt-domain docs.example.com
After a few moments, you’ll see the tunnel server’s IP address along with a connection command for your inlets-client.
You’ll also see it in your cloud dashboard, it’s just a normal IP that’s been configured via user-data with an inlets-pro via service.
Using provider: digitalocean
Requesting host: busy-mayer3 in lon1, from digitalocean
2022/11/18 16:38:08 Provisioning host with DigitalOcean
Host: 326730619, status:
[1/500] Host: 326730619, status: new
...
[15/500] Host: 326730619, status: new
[16/500] Host: 326730619, status: active
inlets Pro HTTPS (0.9.6) server summary:
  IP: 161.35.162.47
  HTTPS Domains: [alex.o6s.io]
  Auth-token: X7pUG6hc+FsEJEcHezEfdfemUwlTYhuQ694CgW4Df0I=

Command:

# Where to route traffic from the inlets server
export UPSTREAM="http://127.0.0.1:4000"

inlets-pro http client --url "wss://161.35.162.47:8123" \
--token "X7pUG6hc+FsEJEcHezEfdfemUwlTYhuQ694CgW4Df0I=" \
--upstream $UPSTREAM

To delete:
  inletsctl delete --provider digitalocean --id "326730619"
After you have the IP, you can create your DNS entry:
doctl compute domain create --ip-address 161.35.162.47 alex.o6s.io
inletsctl can be used to download the inlets-pro binary if you don’t have it already:
inletsctl download
I then connected my tunnel and previewed the blog post, changing the –upstream flag to match Jekyll running at http://127.0.0.1:4000
inlets-pro http client --url "wss://161.35.162.47:8123" \
  --token "X7pUG6hc+FsEJEcHezEfdfemUwlTYhuQ694CgW4Df0I=" \
  --upstream alex.o6s.io=http://127.0.0.1:4000
If you have two sub-domains to expose, you can simply add them them as extra --upstream flags.
That’s basically it, you’ve now got a HTTPS tunnel for multiple domains and you can keep it around for as long as you like.
Or you can delete the tunnel using the command you got earlier, or from your cloud dashboard:
inletsctl delete --provider digitalocean --id "326730619" \
  --access-token-file ~/do-token
I used DigitalOcean, but a dozen other clouds are supported for automation, and if you don’t see yours there yet, you can send a PR to the open source inletsctl tool, or simply use user-data to configure your own tunnel with automation. If you prefer, you can even use Terraform and tear down the tunnel between uses, but these VMs are going to be about as cheap as possible at ~ 5 USD / month.
DigitalOcean has a very generous 1TB of bandwidth allowance per Droplet per month, and Linode has an even higher allowance.
You can even host up to three tunnels on Fly.io at no cost, just follow the steps here: Run an inlets Pro tunnel server for free on fly.io
Wrapping up
That was a quick introduction to inlets and inletsctl, but there’s more. We’ve written up different tutorials in the docs including for TCP pass-through tunnels and for Kubernetes.
We also have an option for private tunnelling, a bit like a VPN which is great for IoT and anyone who runs a SaaS company and needs to access customer endpoints from their cloud: Inlets Uplink for SaaS & Service Providers.
Feel free to get in touch on Twitter @inletsdev or Contact us here
Subscribe for updates and new content from OpenFaaS Ltd.
By providing your email, you agree to receive marketing emails.