Introducing sshmux - connect to any of your private servers with a single tunnel VM

Alex Ellis
Access all your remote SSH servers on your network from a single TCP tunnel using the new sshmux feature in inlets-pro 0.9.28.
Introduction
Quite often those of us wanting to expose or tunnel a single server or service, have several more like that which we’d also like to access. Take a HTTP server for instance, it’s quite likely you’ll have more than one domain - maybe one for Prometheus, one for Grafana, one for your blog, and maybe OpenFaaS on your Raspberry Pi.
At L7 HTTP routing is solved by inspecting the “Host:” header sent by the HTTP client. When traffic is encrypted end to end, you have L4 TLS routing, which obscures the Host header, however, it does a handshake which allows a server name to be read. This is called “Server Name Indication” or SNI.
So what about SSH?
SSH is a bespoke protocol which is usually multiplexed by having to use different ports, or various distinct IP addresses. You could do that with inlets prior to the new sshmux feature, but it would mean remapping ports, or adding extra tunnel server VMs to get additional IPs.
The sshmux feature acts just like a reverse proxy, and reads a TLS header to determine which server to forward the connection to. It’s SNI for SSH.
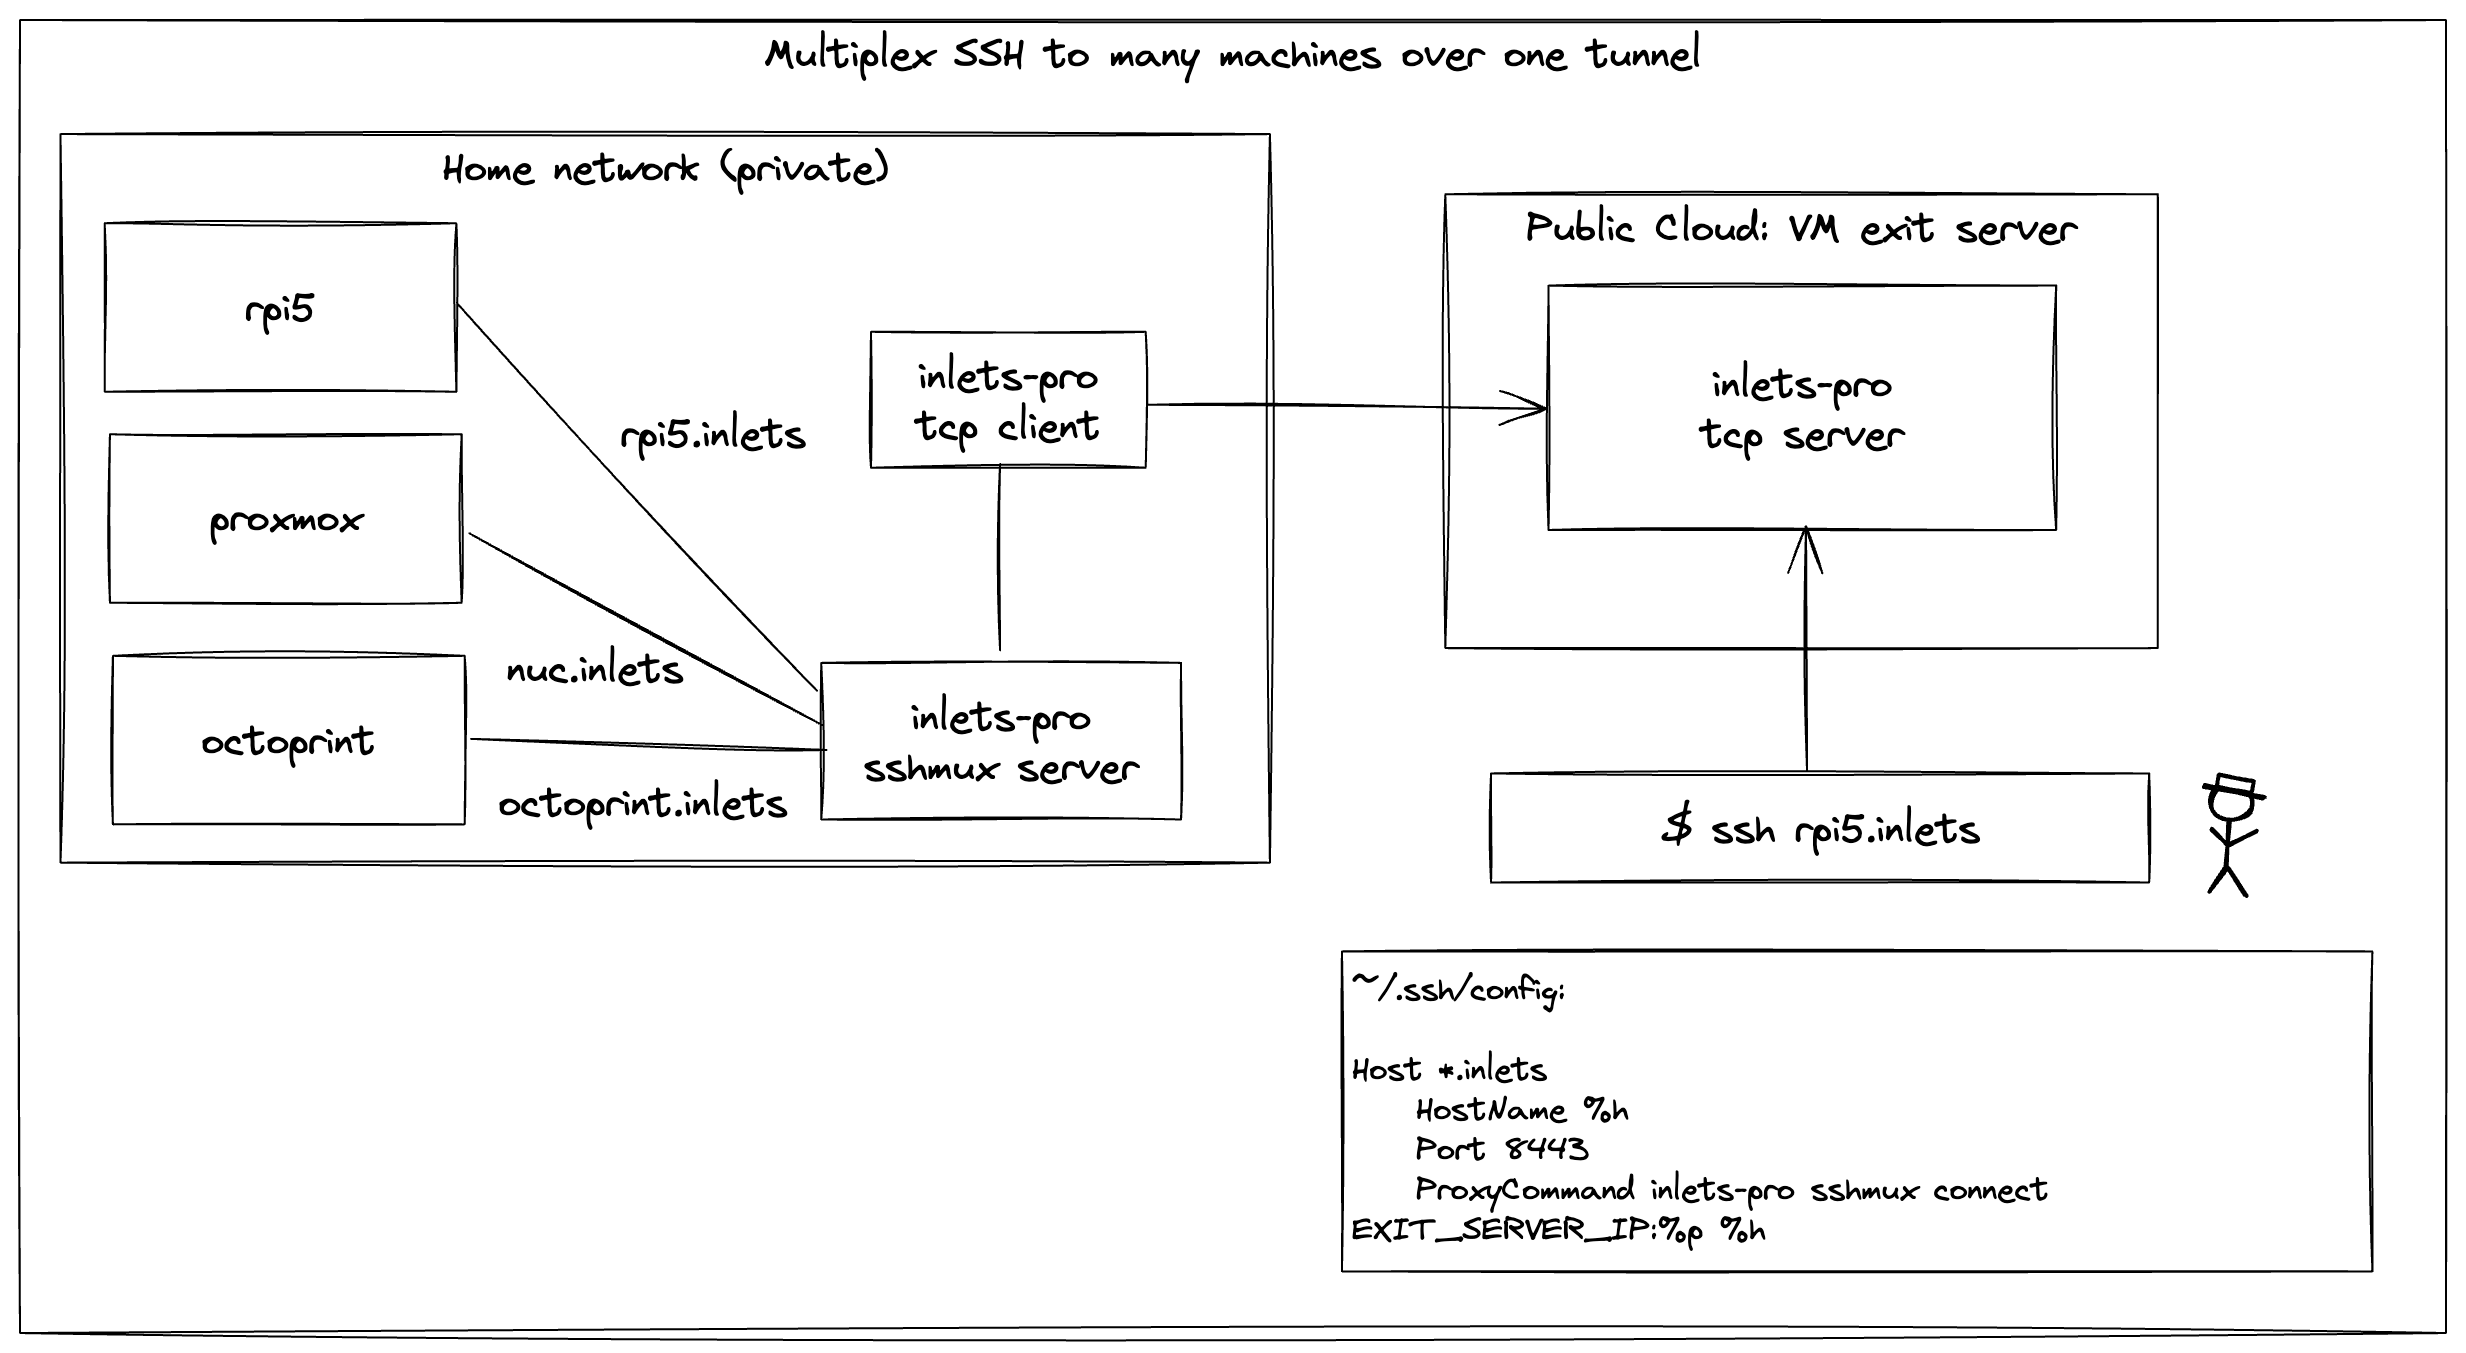
You have a Raspberry Pi 5, Proxmox and Octoprint running on different machines on your private network at home or in your lab. You want to be able to SSH into any of these, or to do things that SSH enables like port-forwarding and file transfers using (scp/sftp).
Just want to expose a single SSH server?
If you’d like to learn how to expose a SSH server only, then see this tutorial: Tutorial: Expose a private SSH server over a TCP tunnel.With this tutorial, since the tunnel VM itself had SSH installed on port 22, you needed to add an extra port on your private SSH server’s configuration. That’s no longer needed with sshmux.
Disclaimer
Now it goes without saying that there’s a few things you should do before you put an computer running SSH onto the Internet.
At a bare-minimum, I’d suggest you:
- Disable password-based logins
- Disable root logins
- Only allow key-based logins
- Only put the hosts in the config.yaml file that you’d like to connect to remotely
These settings are very well documented and you can find them in /etc/ssh/sshd_config on most Linux systems.
How it works
First off, you’ll want to create a new TCP tunnel server with inletsctl so that you can play with it and not worry about breaking anything:
inletsctl create \
    --provider digitalocean \
    --region lon1 \
    --tcp
Fill in the other fields as prompted such as your access token. You can see the full reference for inletsctl here.
DigitalOcean will email you an initial root password, which is handy if you need to log in to debug things or make any edits.
Next create a config.yaml file on a computer in your private network. You can think of this machine as being like a jumpbox, or a bastion host. The sshmux server will run here in order to forward connections to your other servers.
# config.yaml

upstreams:
- name: nuc.inlets
  upstream: 172.10.0.100:22
- name: rpi.inlets
  upstream: 172.10.0.101:22
I’ve used the IP addresses of my machines on my local network in the upstream field. You can also use a DNS name here like raspberrypi.local, so long as you first add an extra in /etc/hosts such as raspberrypi.local 172.10.0.101.
If you also want to expose the jumpbox in the list of upstreams, that’s fine, but don’t use the value 127.0.0.1, instead use its local network IP address.
Update inlets-pro on both your jumpbox and wherever you are going to run the client. You can use inletsctl download or arakde get inlets-pro to get the latest version. Alternatively, there’s the GitHub releases page.
Run the sshmux server on the jumpbox:
inlets-pro \
    sshmux server \
    config.yaml
It’ll listen for TCP traffic on port 8443, so now you can connect the inlets-pro tcp client using the details you were given when you created the tunnel server.
inlets-pro \
    tcp client \
    --url "wss://..." \
    --token "..." \
    --upstream "127.0.0.1" \
    --port 8443
Try it out
From your laptop, you can now use the IP address of the exit server VM to ssh into any of the machines in the config.yaml file.
Edit ~/.ssh/config and add the following:
Host *.inlets
    HostName %h
    Port 8443
    ProxyCommand inlets-pro sshmux connect TUNNEL_IP:%p %h
Just update TUNNEL_IP to the IP address of the exit server VM.
Now you can use the nuc.inlets and rpi.inlets aliases to connect to your servers just like if you were addressing them on your home network as nuc and rpi.
ssh nuc.inlets "uname -a && uptime"
ssh rpi.inlets "uname -a && uptime"
You can also use scp and sftp to transfer files.
Here’s an example of sending and then receiving a 10MB file from the Raspberry Pi to your laptop:
dd if=/dev/urandom of=10MB.bin bs=1M count=10

# Sending the file to the Raspberry Pi
scp 10MB.bin rpi.inlets:~/10MB.bin

# Copying the same file back from the Raspberry Pi to your laptop
scp rpi.inlets:~/10MB.bin 10MB.bin
If you want to tunnel a remote service back from your Octoprint server like port 8080, you can do it like this:
ssh -L 8080:127.0.0.1:8080 octoprint.inlets
Then access it via http://127.0.0.1:8080 in your web browser.
What if you also want to access Kubernetes?
In addition to SSH, sshmux can also multiplex Kubernetes API traffic, so you can use one single TCP server to access your SSH servers and your Kubernetes API server.
Log into your K3s server and add an extra --tls-san, make sure you use this exact format and wrapping:
ExecStart=/usr/local/bin/k3s \
    server \
+        '--tls-san' \
+        'k3s.inlets' \
If installing Kubernetes with k3sup, you can simply add the flag:
--tls-san k3s.inletsto thek3sup installcommand.
Restart the k3s service with sudo systemctl daemon-reload && sudo systemctl restart k3s.
Then add an entry to sshmux’s config.yaml file:
+ - name: k3s.inlets
+   upstream: https://raspberrypi.local:6443
+   passthrough: true
The passthrough flag is required to ensure that Kubernetes does the TLS handshake and not sshmux.
Finally, edit your kubeconfig file, usually found at ~/.kube/config and add the following:
-   server: https://raspberrypi.local:6443
+   server: https://EXIT_SERVER_IP:8443
+   tls-server-name: k3s.inlets
  name: rpi
Make sure to replace the EXIT_SERVER_IP with the IP address of your exit server VM. The tls-server-name must match the value used for the name in the config.yaml.
After that you can now run kubectl get nodes, run helm, arkade, k9s and anything else that you’d like to do with your Kubernetes cluster from wherever you like.
Wrapping up
In a very short period of time, a prototype written over the FOSDEM weekend has made it into the inlets-pro product. It’s not the only way to connect to various machines with your local network, but it’s a very simple and effective way to do it if you’re already using inlets.
As an extra layer of security, you may also want to configure an allowed range or list of IP addresses on the TCP tunnel server for the data plane. See also: Restrict your tunnels with IP allow lists
How does this compare to a VPN? It’s much simpler, and fully under your own control and privacy. It doesn’t need any Kernel privileges and runs just as well in containers as a static binary. It’s tempting to think that the new generation of “SaaS VPNs” are somehow innately simple, but it doesn’t take long browsing the codebase to realise how complex they are.
There are tradeoffs between tunnels like inlets and SaaS VPNs. Inlets tries to keep things as simple and minimal as possible, whilst remaining completely under your control. In our testing it was more reliable, and a little quicker to transfer files and run commands remotely when away from home on captive portals, hotel WiFi and mobile hotspots.
See also: Inlets FAQ & comparison
You may also like:
Other home-lab and remote access tutorials:
- Exposing a private SSH server over a TCP tunnel - the use-case for a single SSH server only
- Exposing Kubernetes Ingress
- Accessing your Kubernetes API server remotely via kubectl
Subscribe for updates and new content from OpenFaaS Ltd.
By providing your email, you agree to receive marketing emails.