Expose Kubernetes services via inlets tunnels on AWS EC2

Alex Ellis
Learn how to install an inlets tunnel server to AWS EC2 and expose services from within a private Kubernetes cluster.
Introduction
There are several ways to expose services from Kubernetes with inlets, and there are a number of ways to create inlets tunnel servers. In this guide, we’re going back to basics, and will use as little automation as possible, so you can learn how each step works to create a tunnel server and expose a service from within Kubernetes.
At the end of the page you can also watch a walk-through on my YouTube channel.
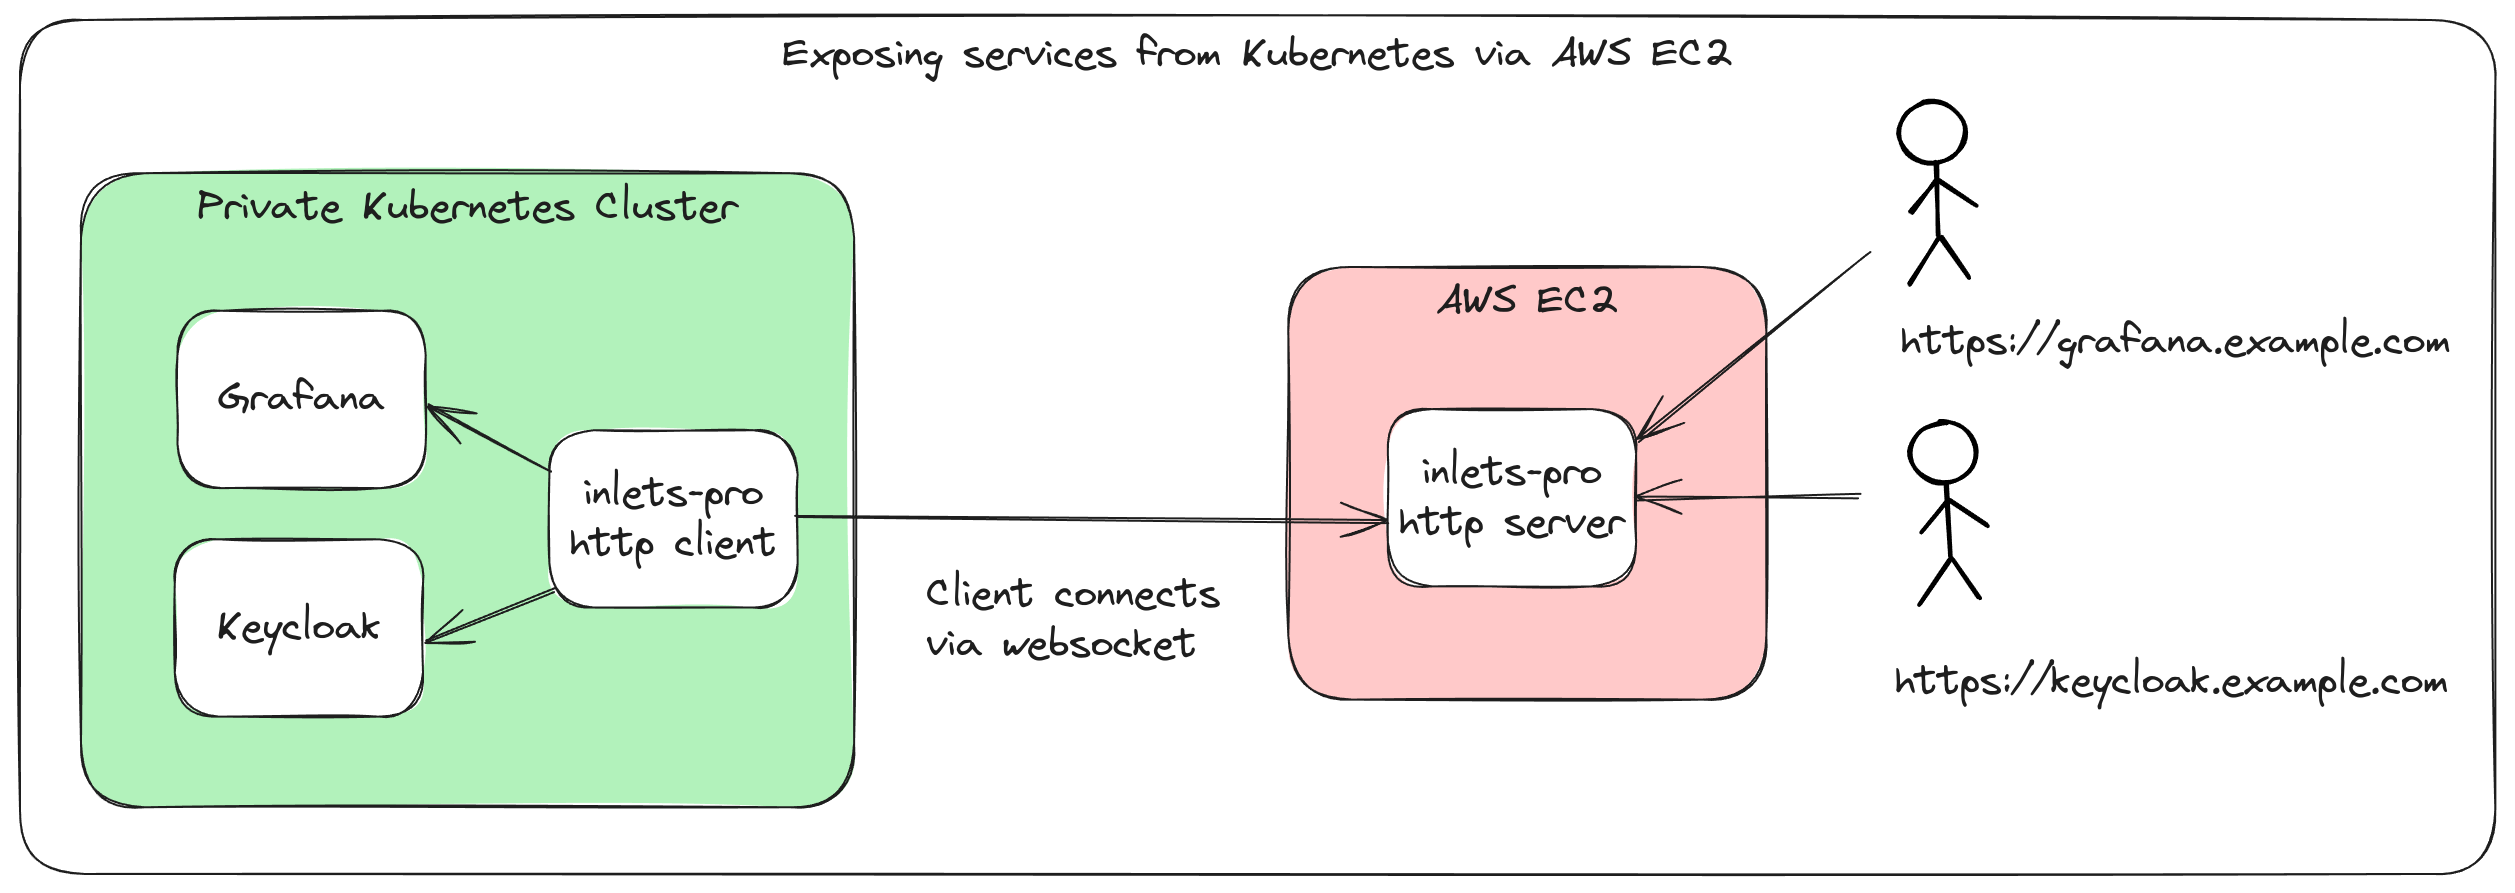
Above: exposing Keycloak and Grafana from a private Kubernetes cluster over a single tunnel client and server.
Prerequisites
- A Kubernetes cluster running locally or in a private network
- An AWS account with access to AWS EC2
- A domain under your control with access to create new records
arkade- we use the arkade tool to install some CLIs and Helm charts, you are free to find these binaries manually or via another package manager if you prefer.
Step 1 - Create an EC2 instance
First, create an EC2 instance in the AWS console with the Ubuntu 24.04 Operating System.
The smallest instance type is fine for this tutorial. If you start to use inlets in production, then we recommend an instance without burstable CPU, for more predictable performance.
You can use the default settings for the instance, but make sure to open up port 80, 443, and 8123 in the security group.
- 22 - used for SSH access for maintenance (Allow SSH traffic from)
- 80 - used for Let’s Encrypt HTTP-01 challenges (Allow HTTP traffic from the internet)
- 443 - used for HTTPS traffic (Allow HTTPs traffic from the internet)
- 8123 - used for inlets clients to connect over TLS (Requires a custom rule)
The rules for 22, 80 and 443 can all be created on the first page, the rule for 8123 needs to be created after instance creation.
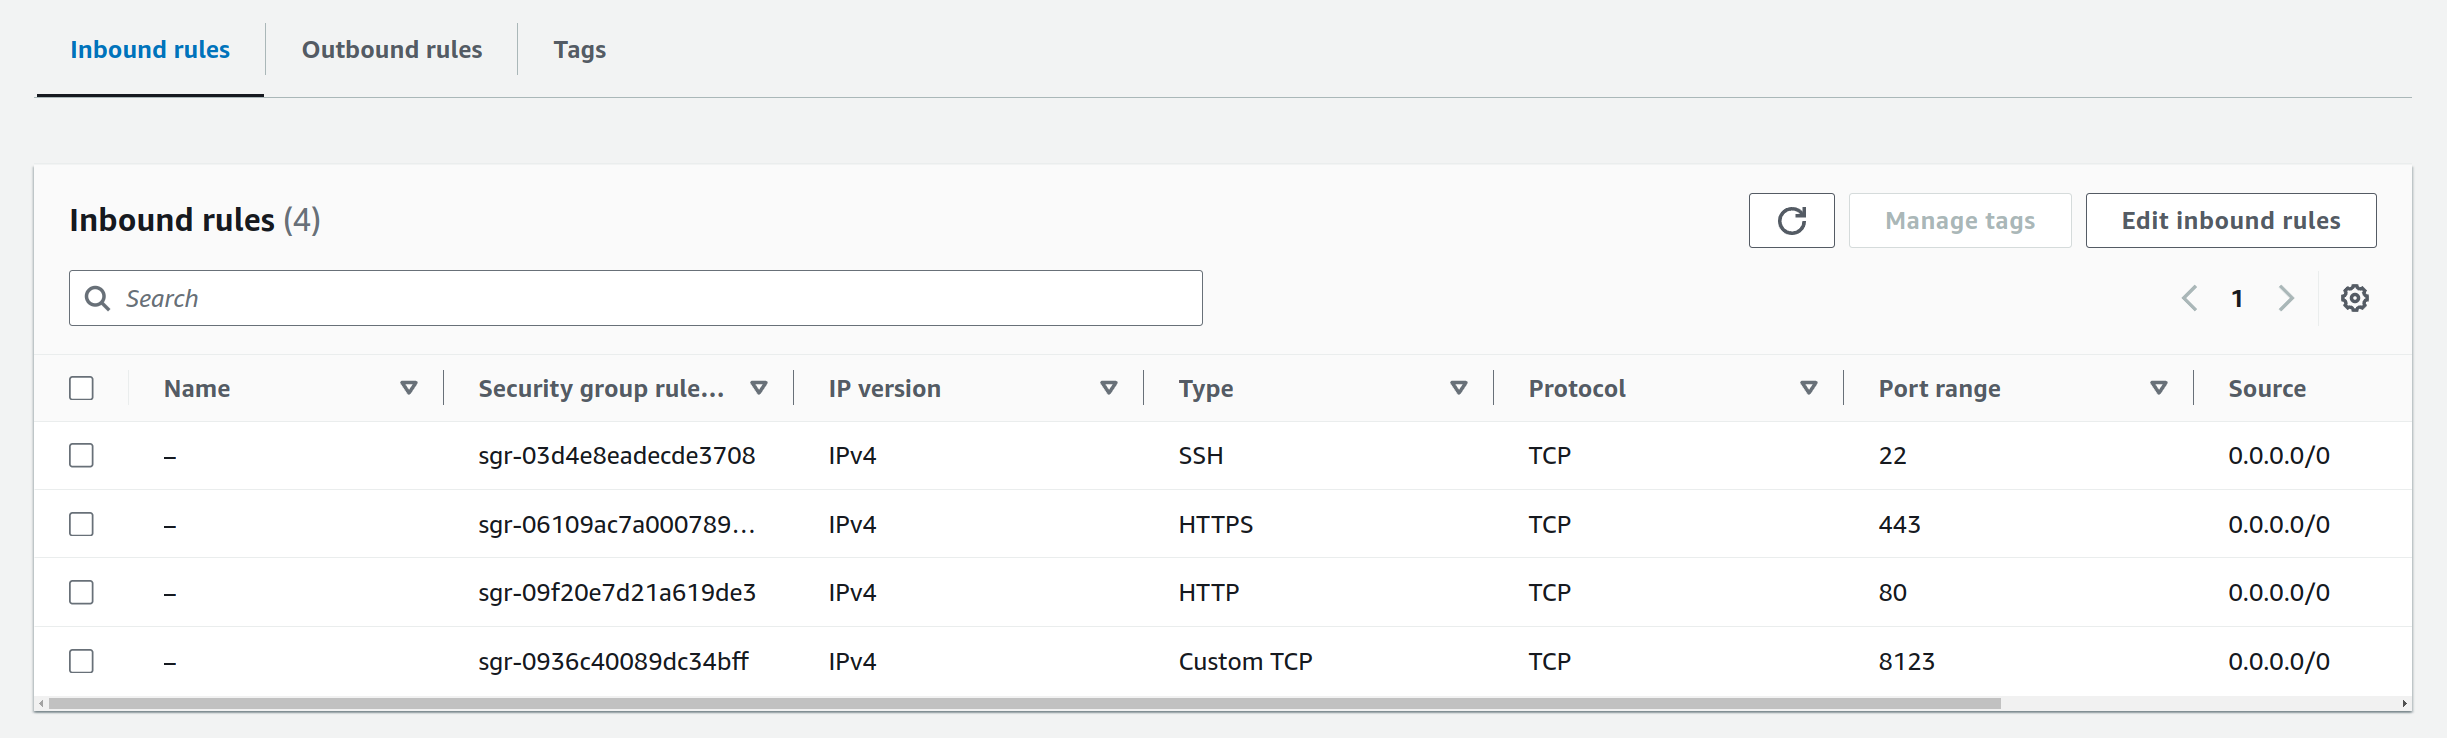
Above: Inbound rules for the EC2 instance
Step 2 - Create the DNS records
Create an DNS CNAME or A record for your domain that points to the public IP address of your EC2 instance.
I created CNAME entries for the “Public IPv4 DNS” of the EC2 instance, which was something like ec2-18-200-243-119.eu-west-1.compute.amazonaws.com.
In our example, we’ll expose both Grafana and Keycloak from our Kubernetes cluster.
keycloak.example.com->EC2-public-IPgrafana.example.com->EC2-public-IP
Step 3 - Install inlets on the EC2 instance
Connect to the EC2 instance with SSH:
chmod 0600 inlets-k8s-tutorial.pem
ssh -i ./inlets-k8s-tutorial.pem ubuntu@ec2-18-200-243-119.eu-west-1.compute.amazonaws.com
Download the inlets-pro binary:
curl -sLS https://get.arkade.dev | sudo sh

arkade get inlets-pro
sudo mv $HOME/.arkade/bin/inlets-pro /usr/local/bin/inlets-pro
Generate an API token for the inlets server:
openssl rand -base64 32 > token.txt
Create a system service for the tunnel server:
export DOMAIN1=keycloak.example.com
export DOMAIN2=grafana.example.com
export EMAIL=webmaster@example.com

inlets-pro http server \
    --auto-tls-discovery external \
    --auto-tls \
    --token-file `pwd`/token.txt \
    --letsencrypt-domain $DOMAIN1 \
    --letsencrypt-domain $DOMAIN2 \
    --generate=systemd > inlets-server.service

sudo mv inlets-server.service /etc/systemd/system/inlets-server.service
sudo systemctl enable inlets-server
sudo systemctl start inlets-server
Check the status with:
sudo journalctl -u inlets-server -f

# Or

sudo systemctl status inlets-server
You should see a line such as:
Jun 06 13:42:27 ip-172-31-0-131 inlets-pro[1460]: 2024/06/06 13:42:27 [keycloak.example.com grafana.example.com] Serving HTTP->HTTPS on [::]:80 and [::]:443
If there are issues with the DNS propagation, then stop the service with sudo systemctl stop inlets-server and wait until the DNS records are resolving
If you want to enable an IP whitelist, you can do so via the --allow-ips flag. By default, this is set to 0.0.0.0/0,::1 to allow access from all IPv4 and IPv6 addresses.
Step 4 - Install the sample software to the Kubernetes cluster
If you don’t have a Kubernetes cluster handy, you can run one inside Docker using KinD:
arkade get kind kubectx kubectl
kind create cluster --name inlets
Now install Grafana:
arkade install grafana
Next, install Keycloak:
openssl rand -base64 32 > keycloak-password.txt

cat > keycloak.yaml <<EOF
apiVersion: v1
kind: Namespace
metadata:
  name: keycloak
---
apiVersion: v1
kind: Service
metadata:
  name: keycloak
  namespace: keycloak
  labels:
    app: keycloak
spec:
  ports:
    - name: http
      port: 8080
      targetPort: 8080
  selector:
    app: keycloak
  type: ClusterIP
---
apiVersion: apps/v1
kind: Deployment
metadata:
  name: keycloak
  namespace: keycloak
  labels:
    app: keycloak
spec:
  replicas: 1
  selector:
    matchLabels:
      app: keycloak
  template:
    metadata:
      labels:
        app: keycloak
    spec:
      containers:
        - name: keycloak
          image: quay.io/keycloak/keycloak:24.0.5
          args: ["start-dev"]
          env:
            - name: KEYCLOAK_ADMIN
              value: "admin"
            - name: KEYCLOAK_ADMIN_PASSWORD
              value: "$(cat keycloak-password.txt)"
            - name: KC_PROXY
              value: "edge"
          ports:
            - name: http
              containerPort: 8080
          readinessProbe:
            httpGet:
              path: /realms/master
              port: 8080
EOF
Apply the keycloak.yaml file:
kubectl apply -f keycloak.yaml
The admin password will be generated in a file called keycloak-password.txt.
You’ll see both have internal ClusterIP services, we’ll use their names for the inlets tunnel client.
kubectl get svc -n grafana
kubectl get svc -n keycloak


$ kubectl get svc -n keycloak
NAME       TYPE        CLUSTER-IP     EXTERNAL-IP   PORT(S)    AGE
keycloak   ClusterIP   10.96.197.53   <none>        8080/TCP   26s
$ kubectl get svc -n grafana
NAME      TYPE        CLUSTER-IP     EXTERNAL-IP   PORT(S)   AGE
grafana   ClusterIP   10.96.32.130   <none>        80/TCP    113s
Neither of these services will be exposed to the Internet or the local network. We’ll now use an inlets tunnel client to expose them to the server we created earlier.
Step 5 - Configure the inlets client
The inlets client will need to run inside Kubernetes, so we will generate YAML for a Deployment to manage the client.
Make sure you’ve saved your license file to: ~/.inlets/LICENSE.
Then copy token.txt from the server to the local directory. This token will be used by the client to authenticate to the server.
Next, generate the YAML:

```bash
export PUBLIC_IP=""
export DOMAIN1=keycloak.example.com
export DOMAIN2=grafana.example.com

inlets-pro http client \
    --url wss://$PUBLIC_IP:8123 \
    --token-file ./token.txt \
    --upstream $DOMAIN1=http://keycloak.keycloak:8080 \
    --upstream $DOMAIN2=http://grafana.grafana:80 \
    --auto-tls \
    --generate k8s_yaml \
    --generate-name inlets-client \
    --license-file ~/.inlets/LICENSE > inlets-client.yaml
Apply the YAML for the inlets client:
kubectl apply -f inlets-client.yaml
You can then check the logs for the tunnel client with:
kubectl logs deploy/inlets-client -f
Here’s what I saw:
inlets-pro HTTP client. Version: 0.9.30
Copyright OpenFaaS Ltd 2024.
Upstream: keycloak.example.com => http://grafana.grafana:80
Upstream: grafana.example.com => http://keycloak.keycloak:8080
2024/06/06 13:49:39 Licensed to: alex <alex@openfaas.com>, expires: 111 day(s)
time="2024/06/06 13:49:39" level=info msg="Connecting to proxy" url="wss://18.200.243.119:8123/connect"
time="2024/06/06 13:49:39" level=info msg="Connection established" client_id=410e373e5adf46628f4817efdf2d2fd7
Step 6 - Access your services
You can now access your services via the domain names you set up in Step 2.
https://keycloak.example.comhttps://grafana.example.com
The sites accessed via the Internet:
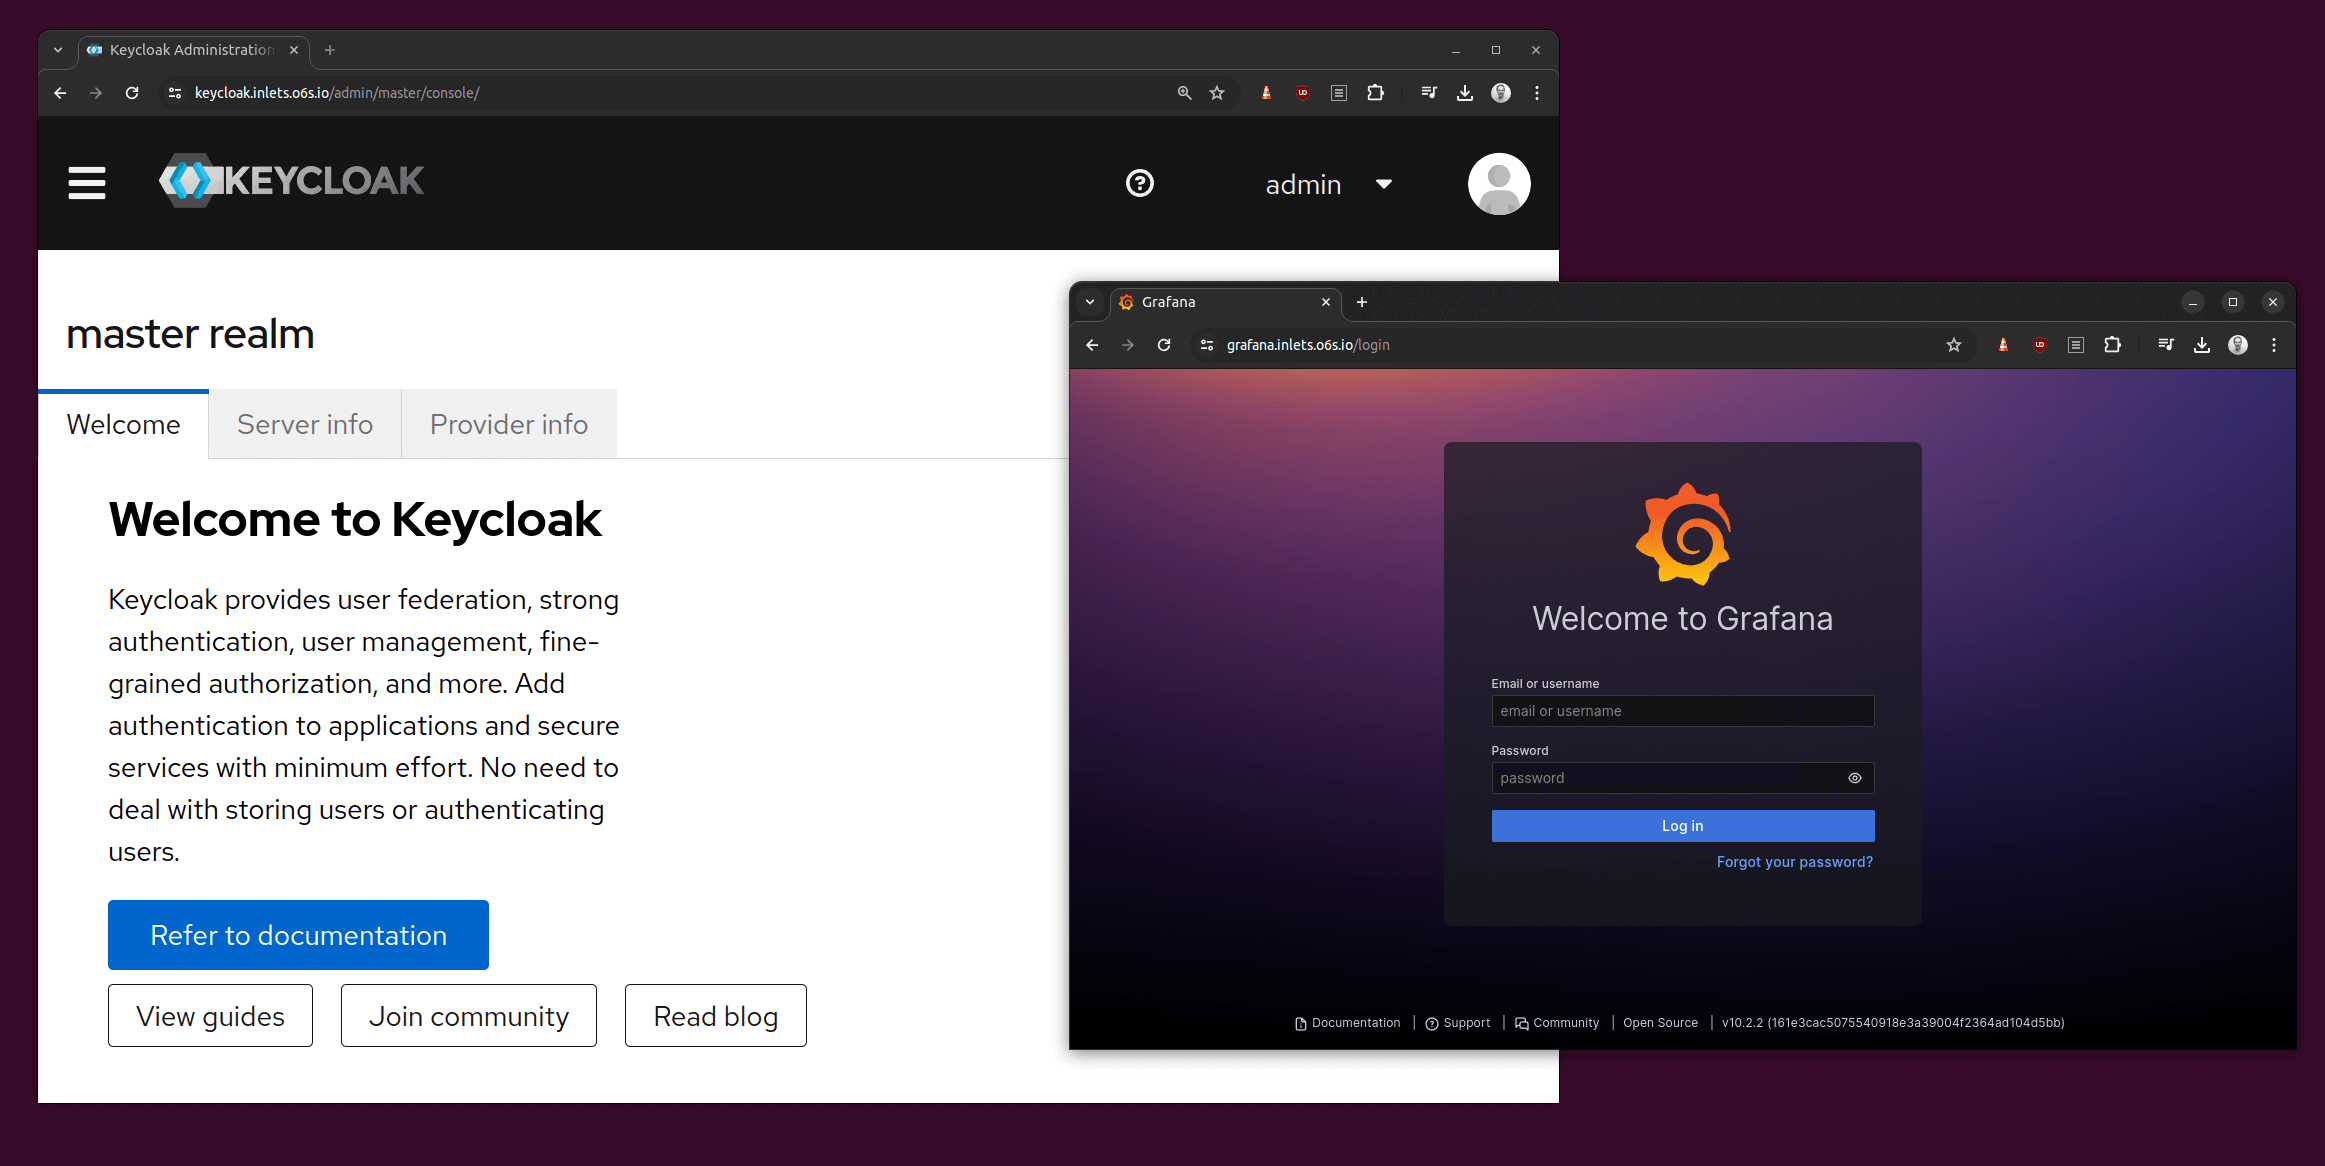
Above: Keycloak and Grafana accessed via the Internet
Wrapping up
You’ve now learned how to install an inlets tunnel server to AWS EC2 instance and how to expose multiple HTTP services from a private Kubernetes cluster.
If you have multiple Kubernetes clusters, then we would suggest creating one tunnel server per cluster.
There’s also a video walk-through available on my YouTube channel, so you can see each step you’ll need to take to make this work:
The EC2 instances can be created with automation tools like our inletsctl command-line, or via Terraform, by passing commands into user-data/cloud-init.
In addition to inletsctl, there’s a Kubernetes operator for inlets that will automate creating the tunnel server VM, and the tunnel client Deployment within your cluster. It is called the inlets-operator.
When you use inlets-operator, it manages the lifecycle of the tunnel server and client for you, which means your tunnel server will be deleted if you delete your services or your Kubernetes cluster. For development I find it really quick and easy to use, however for production-quality tunnels, I prefer to set them up with inletsctl or even manually, so that the tunnel server VM will survive the cluster deletion.
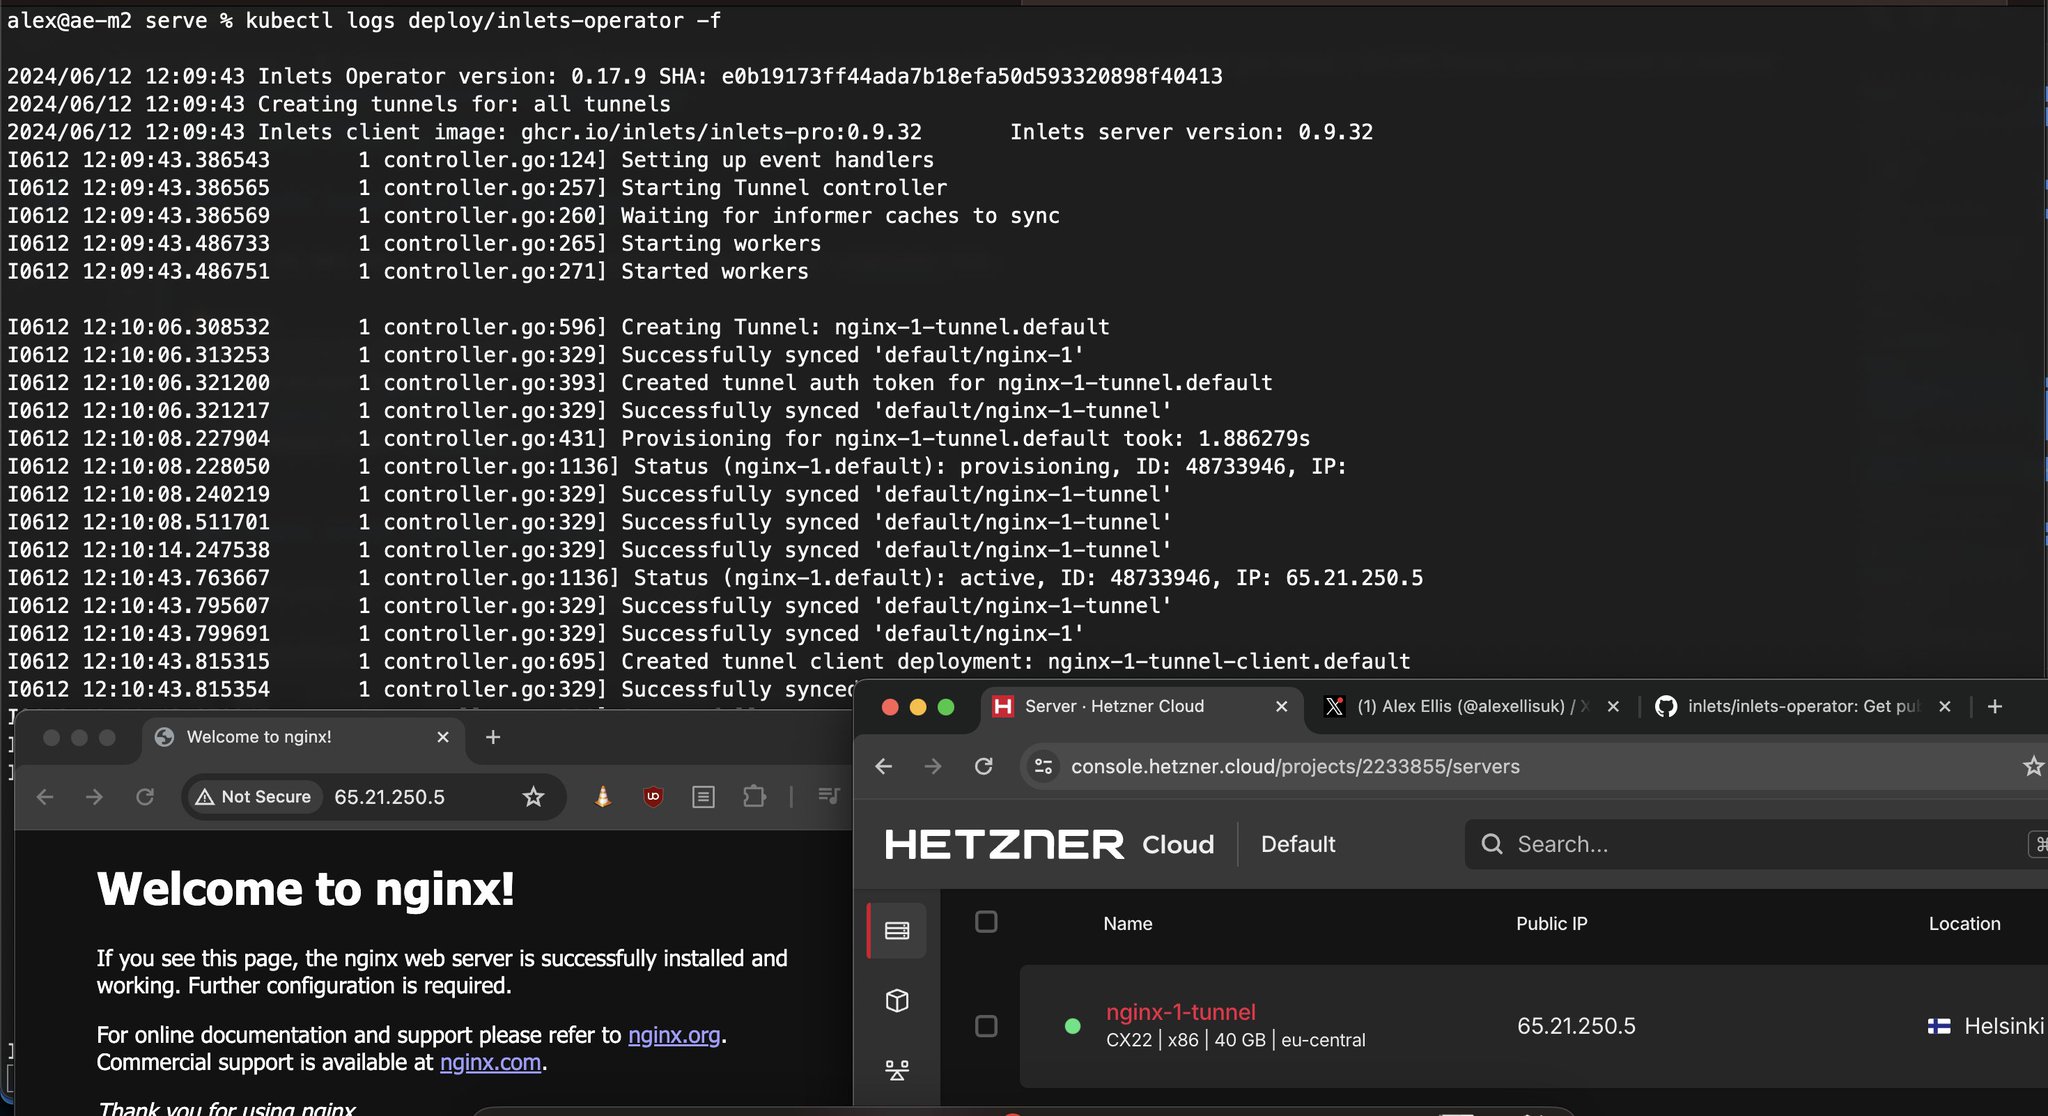
Pictured: It took around 30s to get a working Load Balancer using Hetzner cloud.
Subscribe for updates and new content from OpenFaaS Ltd.
By providing your email, you agree to receive marketing emails.