How to serve traffic to IPv6 users with inlets

Alex Ellis
Many users have no IPv6 stack available to them where they run their services, whether at home or in the datacenter. Learn how you can use inlets to serve traffic to IPv6 users
Introduction

This weekend an inlets Pro customer reached out and asked for a new feature in inlets:
Please can you add IPv6 support?
When I asked why, they told me that they were replacing their bespoke solution using Wireguard with inlets Pro. Everything worked as expected, but there was one missing piece. They were running an IPv6 proxy on the public VM so that users could access tunnelled services over IPv6.
After a little digging it transpired that because inlets and inlets Pro are written in Go, that IPv6 was already part of the package and already working. No patches were required, so I wanted to put this post together and show you how you can start exposing traffic to users over IPv6.
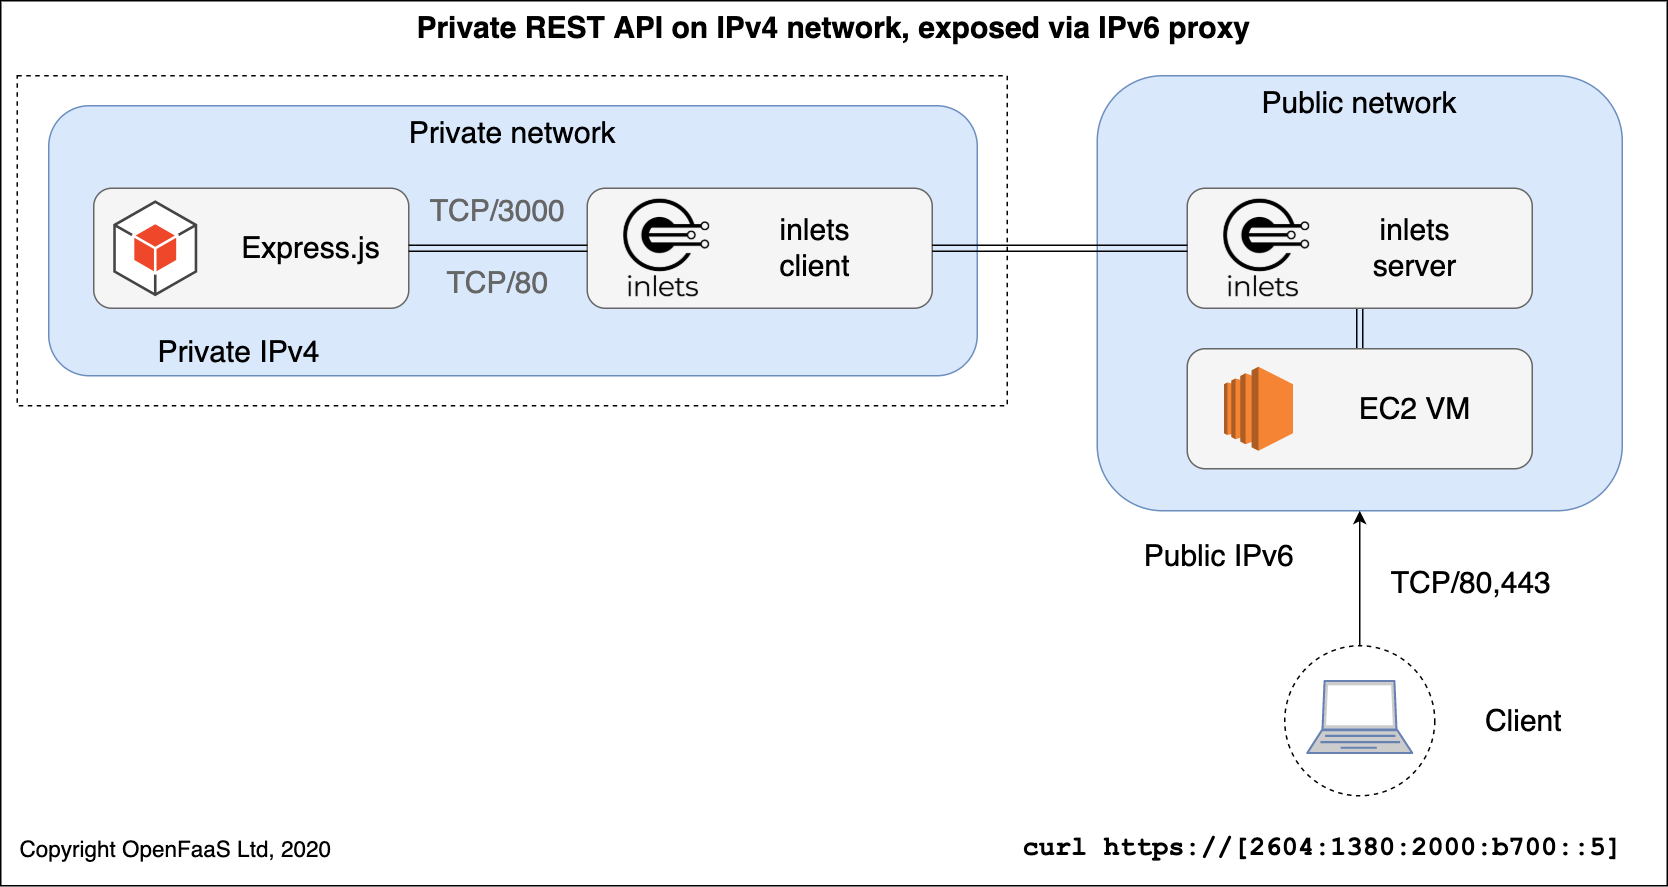
Conceptual diagram: an inlets exit-server running on a public EC2 instance, using its IPv6 networking stack.
Building your own IPv6 proxy
You can use inlets or inlets Pro for this setup. The key is that your exit-server must be on an IaaS or VPS which has IPv6 enabled.
Equinix Metal (Packet) is the easiest option available and has IPv6 fully configured in the host OS out of the box.
All versions of inlets come as static Go binaries, but it’s often easier to use some automation to install them on a cloud host, than to provision the host manually. inletsctl sets up a host, generates an auth token and installs a systemd unit file.
Did you know? inlets can also be used with Kubernetes and both the client and server components can be used as Pods. The easiest way to get started is with the inlets-operator.
Install inletsctl and download inlets to your client:
curl -SLs https://inletsctl.inlets.dev | sh
mv inletsctl /usr/local/bin/

sudo inletsctl download

inlets version
The user told me that DigitalOcean also has an IPv6 capability, but you need to click to enable it in the dashboard, then within your Operating System. See also: How to Enable IPv6 on Droplets
Go to your Equinix Metal dashboard and create an API Key, call it “inletsctl” and give it read/write permissions. Save it to a file: $HOME/api-token-packet.txt
Let’s run a server process for our IPv6 clients to connect to. You can run a HTTP or a TCP tunnel, both support IPv6 access.
Download the OpenFaaS watchdog which is described as a “Reverse proxy for HTTP microservices and STDIO”
Simply put, it’s an HTTP server which acts a little like cgi-bin. It will run a local command-line process to execute whenever a request comes in. You can also use it with streaming workloads like ffmpeg or HTTP servers like Express.js.
curl -o of-watchdog -SL https://github.com/openfaas/of-watchdog/releases/download/0.8.1/of-watchdog-darwin
chmod +x of-watchdog
You can also download for Windows and Linux here: watchdog binaries
Run of-watchdog so that every HTTP request that comes in triggers the cal command from bash.
mode=streaming fprocess=cal port=8080 ./of-watchdog
Test out the server on your local computer:
curl -s http://localhost:8080

   November 2020
Su Mo Tu We Th Fr Sa
 1  2  3  4  5  6  7
 8  9 10 11 12 13 14
15 16 17 18 19 20 21
22 23 24 25 26 27 28
29 30
Now create an exit-server with inlets and point it at your SimpleHTTPServer:
# Set from your dashboard (under "Project settings")
export PROJECT_ID="66ae0069-7d03-4db5-9af1-6b14036e380a"

inletsctl create --provider packet \
  --access-token-file $HOME/api-token-packet.txt \
  --project-id $PROJECT_ID
This command will create a t1.small.x86 instance in the ams1 region. You can override the region with --region.
You will see the IPv4 address printed out on the console along with connection info:
Using provider: packet
Requesting host: confident-hamilton3 in ams1, from packet
Host: 90078982-4490-4430-9915-54e7630a6cd0, status:
[1/500] Host: 90078982-4490-4430-9915-54e7630a6cd0, status: provisioning
[2/500] Host: 90078982-4490-4430-9915-54e7630a6cd0, status: provisioning
---
[40/500] Host: 90078982-4490-4430-9915-54e7630a6cd0, status: provisioning
[41/500] Host: 90078982-4490-4430-9915-54e7630a6cd0, status: active
inlets (2.7.4) exit-server summary:
  IP: 147.75.33.3
  Auth-token: da39a3ee5e6b4b0d3255bfef95601890afd80709KLOyx559efgzdITeAhgCHtaH74zysHZ

Command:
  export UPSTREAM=http://127.0.0.1:8000
  inlets tcp client --remote "ws://147.75.33.3:8080" \
        --token "da39a3ee5e6b4b0d3255bfef95601890afd80709KLOyx559efgzdITeAhgCHtaH74zysHZ" \
        --upstream $UPSTREAM

To Delete:
        inletsctl delete --provider packet --id "90078982-4490-4430-9915-54e7630a6cd0"
To get the IPv6 address, log into your host over SSH, or open the Equinix Metal dashboard.
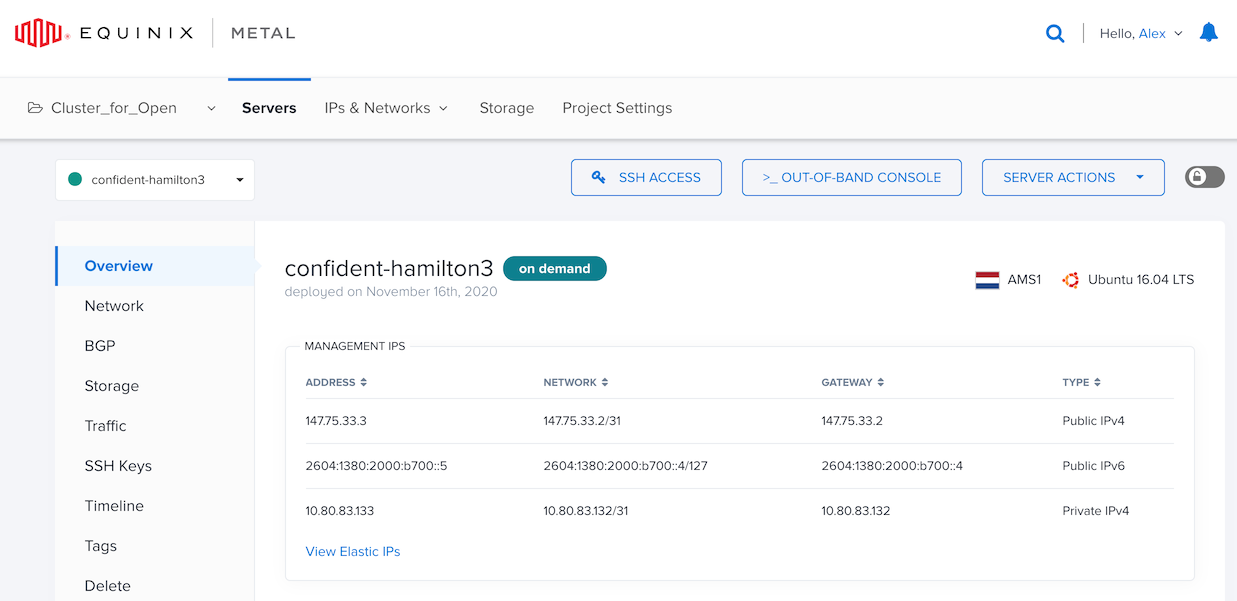
In my instance the address was: 2604:1380:2000:b700::5
Trying it out
Connect your inlets client:
export UPSTREAM=http://127.0.0.1:8080
inlets tcp client --remote "ws://147.75.33.3:8080" \
    --token "CnLgAxPkOw594ZbZ0nEfsbclpQUov9ZBFKLOyx559efgzdITeAhgCHtaH74zysHZ" \
    --upstream $UPSTREAM
You can use curl to test the IPv6 endpoint, however if your local network does not support IPv6, you’ll need to create another host and run the command there. Most clouds and IaaS platforms support IPv6 out of the box.
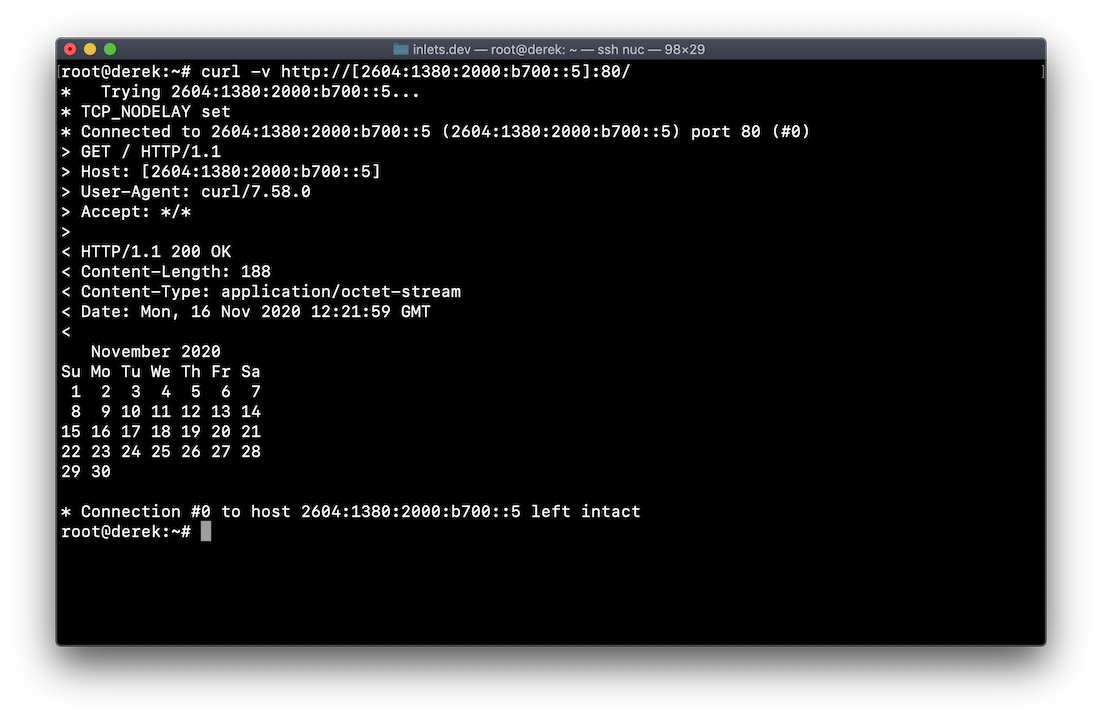
Note the brackets around the address:
curl -v http://[2604:1380:2000:b700::5]:80/
See how to set up TLS for the IPv6 proxy using Caddy and this guide: Expose your private Grafana dashboards with TLS.
Try stopping the of-watchdog process and changing the “fprocess” command to something else like wc:
curl -s http://[2604:1380:2000:b700::5]:80/ \
  --data-binary "How many characters is this\?"
       0       5      29
Try running node and a simple program to gather any input and print it back to the user:
Save app.js:
"use strict"

let getStdin = require('get-stdin');

let handle = (req) => {
   console.log(`Input was: "${req}"`);
};

getStdin().then(val => {
   handle(val);
}).catch(e => {
  console.error(e.stack);
});
Install dependenices
npm init -y
npm i get-stdin --save

mode=streaming fprocess=wc port=8080 ./of-watchdog
Invoke it:
curl -s http://[2604:1380:2000:b700::5]:80/ --data-binary "There are many proxies, but this one is mine"

Input was: "There are many proxies, but this one is mine"
The of-watchdog is just one component of OpenFaaS, and is designed to be used as part of a whole solution including metrics, auto-scaling, dashboards, and much more. If you’re interested in Functions as a Service, checkout the OpenFaaS project homepage to see what else it can offer.
Wrapping up
In this tutorial we exposed a local API endpoint on a network with an IPv4 networking stack to public clients to access over IPv6. The IPv6 rollout is coming, but is slow and in the meantime solutions like inlets provide a way for us to serve traffic clients and to patch the gaps.
inlets can be used to create a self-hosted tunnels, but what you’re tunneling can also be kept private by binding to a local ethernet adapter. You can then access your services from the remote LAN, instead of over the Internet. A recent example of that is the post by Johan Siebens where he runs MySQL on-premises on a private network and WordPress on a cloud Kubernetes cluster. Read more here
Subscribe for updates and new content from OpenFaaS Ltd.
By providing your email, you agree to receive marketing emails.