How to integrate Cloud Native Tunnels with Bare-Metal Cloud

Alex Ellis
Inlets was created to make tunnelling easy for Cloud Native practitioners. Learn three ways to deploy tunnels to Equinix Metal from your private network or Kubernetes clusters.
Introduction
From early on I’d played with SSH tunnels and Ngrok, and run into their various limitations from being completely blocked at enterprise companies, to the challenges of automating a technology first released 20 years ago. In 2019, Inlets was just supposed to be a Proof of Concept, to tunnel services without the legacy of prior art, or the limitations of a SaaS product. It was built to be run without rate-limiting, and to run over a web-socket so that it could be used with corporate HTTP proxies. It was built to run in containers, VMs, Kubernetes clusters, Raspberry Pis. It was built for Cloud Native practitioners like myself.
After the initial set of early-adopters came, new users arrived who expected to just run one command and have everything set up. The tool was easy to use, but required hosts to be set up to act as gateways or “exit-servers.” The exit-server is public-facing and loans its public IPv4 and IPv6 address to the other end of the tunnel, which runs inside a private network.
That’s how the inletsctl and inlets-operator projects came about. The idea was that they would provision the cheapest host available as quickly as possible to give a SaaS-like experience, but without the artificial limits put in place.
A Very early demo of inlets-operator from 2019 running on Equinix Metal (née Packet).
At the time, I picked Equinix Metal for the first provider because they had an easy to use API, very high performance hosts on offer, and had a history of being good citizens in the Open Source community.
- inletsctl creates an exit-server and prints out a command you can just run to connect a tunnel using
inlets client - inlets-operator integrates into Kubernetes (something which Ngrok didn’t offer at the time) and provides a LoadBalancer integration using the same approach
The previous --provider=packet provider name will be phased out in newer versions of the above tools, and users should move over to the new Equinix Metal name: --provider=equinix-metal. All the options, flags, and regions are the same.

Let’s look at three options for how to deploy inlets to Equinix Metal, for reliable, bare-metal performance.
Option 1 - an ad-hoc tunnel for development or collaboration
Let’s say you’re working on an API or web-page, and need to share it with a friend or colleague. Perhaps it’s a draft blog post, an OpenFaaS function, or you actually need a webhook from Stripe for the SaaS business you’re building?
- Create an API key for your Equinix Metal account and save it as ~/EM_API.txt
- Save your Project ID as ~/EM_PROJECT_ID.txt
inletsctl create --provider equinix-metal \
  --region ams1 \
  --access-token-file ~/EM_API.txt \
  --project-id $(cat ~/EM_PROJECT_ID.txt)
In a few moments you’ll find a *t1.small.x86` provisioned in your account which costs $0.07 / hour. That is Equinix Metal’s cheapest host, at the end of the tutorial I’ll show you how you can use the inlets Pro chart to setup multiple tunnels on the same host for efficiency and cost savings. Other options like VPS providers will cost around 5 USD / month in total.
inlets (2.7.4) exit-server summary:
  IP: 147.75.33.129
  Auth-token: 6KGTlWVeI0FUgGybXT7dujWW4wT8G5chqDBPWLYJ16CiEbbrxkcIhMab4lV1BFcT

Command:
  export UPSTREAM=http://127.0.0.1:8000
  inlets tcp client --remote "ws://147.75.33.129:8080" \
        --token "6KGTlWVeI0FUgGybXT7dujWW4wT8G5chqDBPWLYJ16CiEbbrxkcIhMab4lV1BFcT" \
        --upstream $UPSTREAM

To Delete:
        inletsctl delete --provider equinix-metal --id "d47743d1-7f90-446c-aa65-472878e9f119"
You’ll also get a connection string on your local machine which you can use to connect the tunnel.
If you’re exposing what’s running directly on your local machine then edit the port in UPSTREAM. If you were exposing Express.js, then you’d want port 3000 as per below:
export UPSTREAM=http://127.0.0.1:3000
Then run the inlets client command and access your service from the public IP on port 80, i.e. http://147.75.33.129/
You can also tunnel TCP services with inlets PRO like SSH and Postgresql.
Option 2 - expose a service from your Kubernetes cluster
Whether you’re using a Raspberry Pi with k3s, or a cluster on your local computer with KinD, minikube, microk8s, or k3d, you can get a public endpoint within a few moments.
The easiest way to install the inlets-operator is with helm or arkade. arkade is a portable Kubernetes marketplace that makes it easy to install charts and CLIs.
arkade install inlets-operator \
  --provider equinix-metal \
  --region ams1 \
  --token-file ~/EM_API.txt \
  --project-id $(cat ~/EM_PROJECT_ID.txt)
Do you notice how the flags are almost a direct match for inletsctl? That’s intentional, to make inlets easy to use and consistent between workflows.
Now when the inlets-operator is installed, it will print a help message with a sample deployment which you can expose. You can get this message back at any time with `arkade info inlets-operator.
kubectl run nginx-1 --image=nginx --port=80 --restart=Always
kubectl expose pod/ nginx-1 --port=80 --type=LoadBalancer
The operator will automatically create the exit-server for you, and then run an inlets client as a Deployment within your cluster. Whenever the public server receives a request, it will tunnel it to the ClusterIP of the nginx-1 service.
You can get the public IP address from your service, and you can find more information using the Tunnel CustomResource:
kubectl get svc nginx-1 -o wide
kubectl get svc nginx-1 -o wide -w
NAME      TYPE           CLUSTER-IP     EXTERNAL-IP   PORT(S)        AGE     SELECTOR
nginx-1   LoadBalancer   10.43.176.39   <pending>     80:30297/TCP   2m53s   app=nginx
nginx-1   LoadBalancer   10.43.176.39   147.75.33.201   80:30297/TCP   3m3s    app=nginx

kubectl get tunnel/nginx-1-tunnel
NAME             SERVICE   TUNNEL   HOSTSTATUS   HOSTIP          HOSTID
nginx-1-tunnel   nginx-1
nginx-1-tunnel   nginx-1            active       147.75.33.201   874176b8-c1e2-47f7-a614-d4ff9a1b0f11
Then you can access your nginx-1 service from the public Internet as if it were running locally:
curl -s http://147.75.33.201 | grep success
<p>If you see this page, the nginx web server is successfully installed and
To remove the exit-server, simply delete the service:
kubectl delete svc/nginx-1
The inlets-operator also supports inlets Pro which can be used to expose TCP services like an IngressController’s port 80 and 443 to make it fully functional and to receive TLS certificates. Another popular use-case is to expose a database, or SSH over the Internet.
Option 3 - using a Kubernetes cluster and Pods for exit-servers
You can also use a Kubernetes cluster for exit-servers, running as Pods. This saves on money and is more efficient when you have many different clients needing tunnels. It also allows you to choose whether you want to expose services or keep them private within the public cluster.
The helm chart for inlets-pro has a client and server portion, if you deploy the server chart, you can do that any number of times, once for each service you want to tunnel in.
In the example below VSHN.ch provides a SaaS OpenShift service to regulated institutions through the use of inlets run as a Pod.
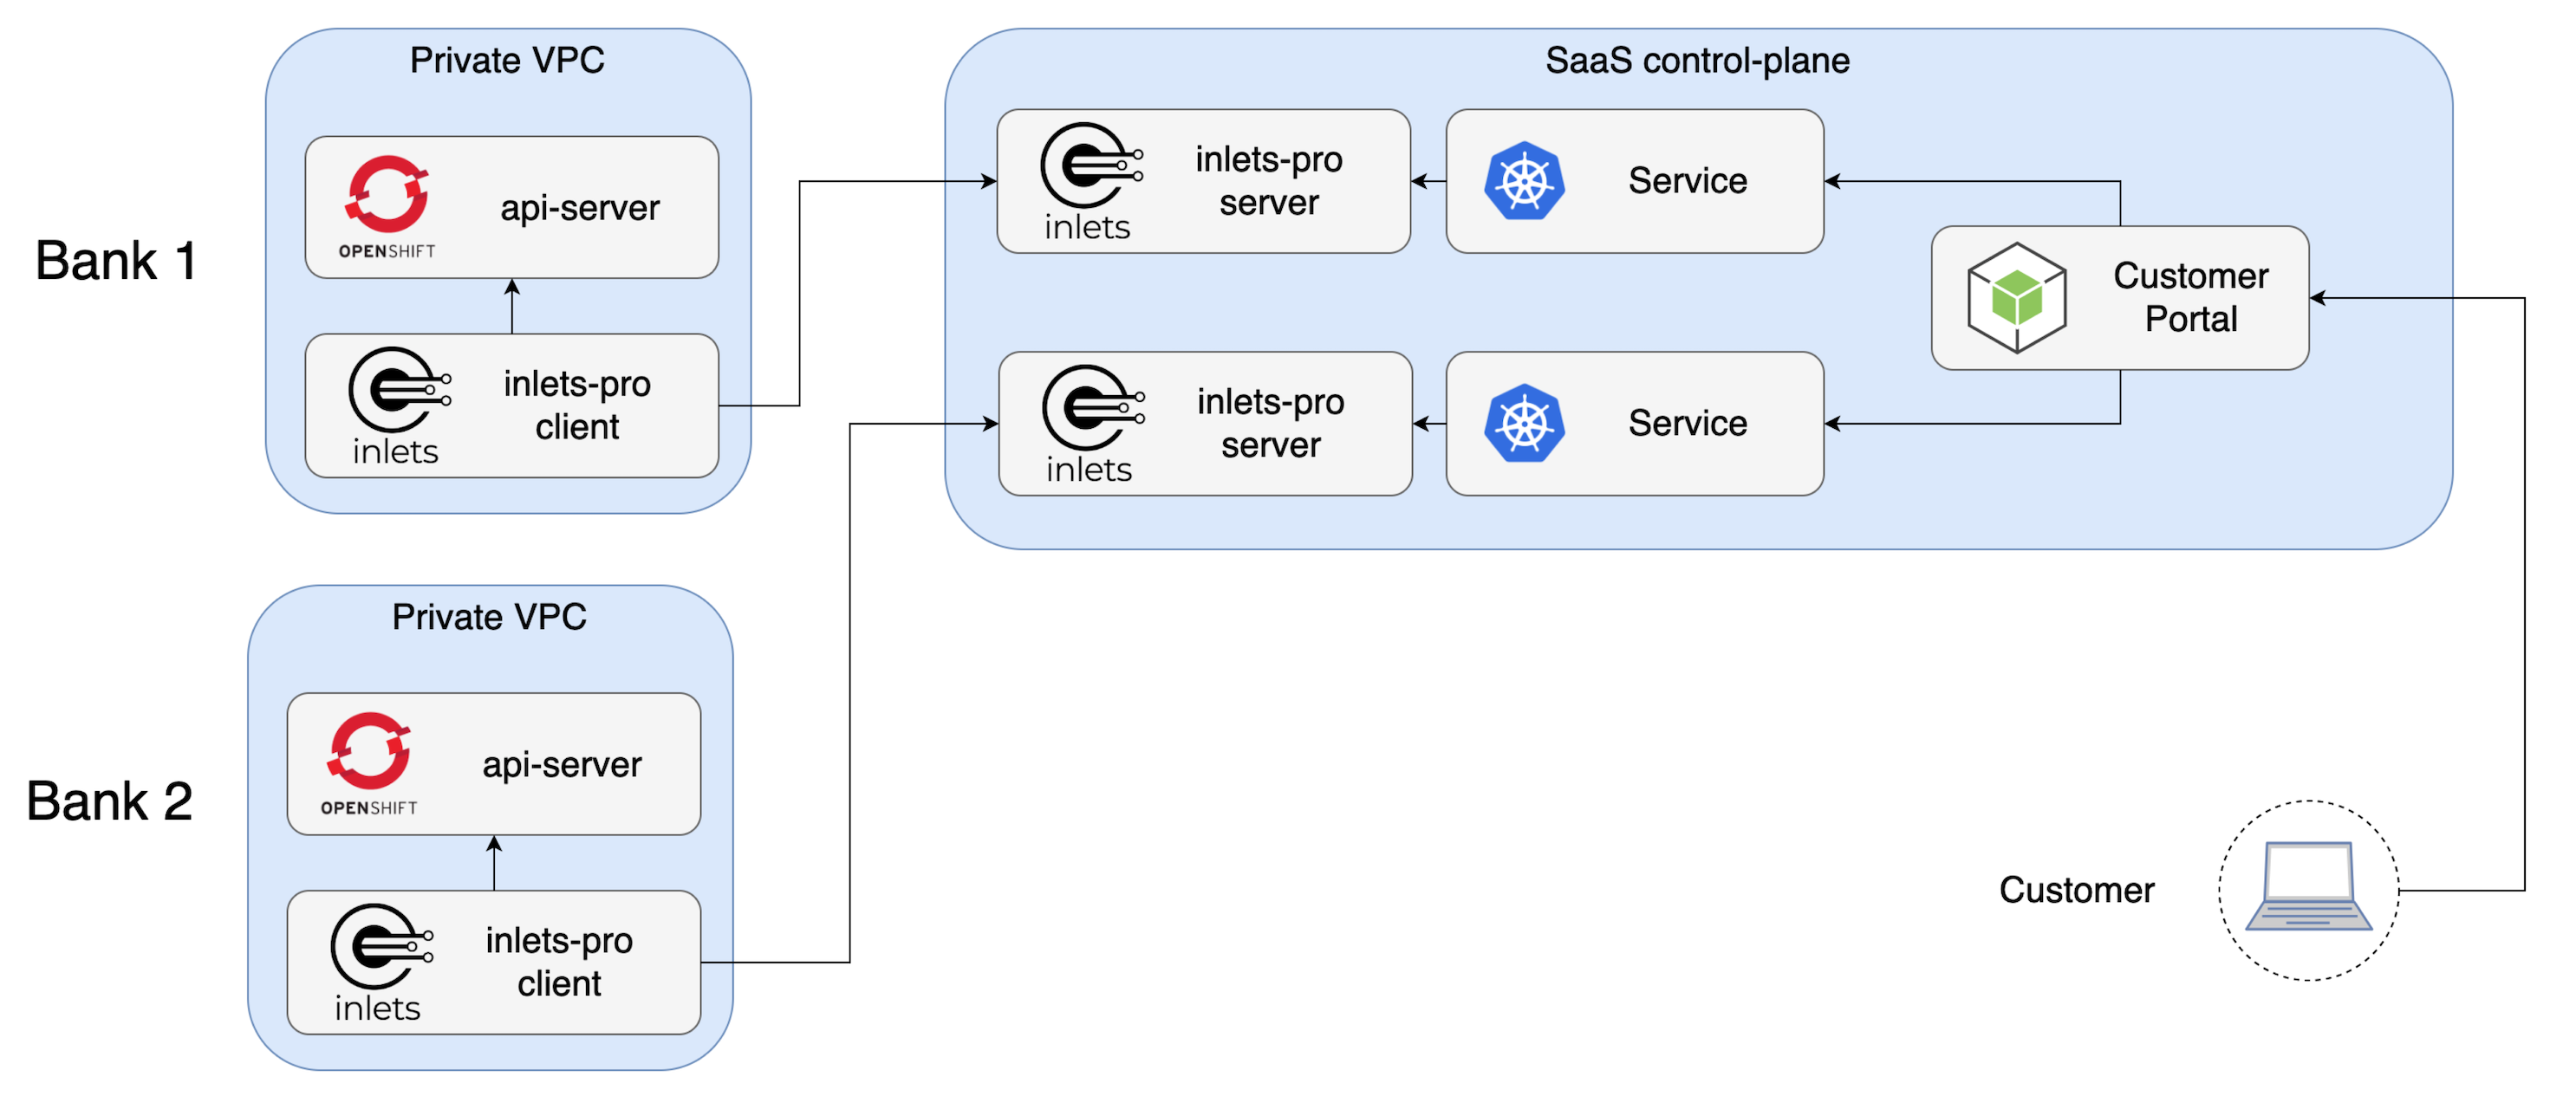
This is useful for running a SaaS and connecting to customers, or for managing many clients.
If a Pod fails, or a Node goes down, then Kubernetes will restart it automatically.
See also: inlets Pro server chart
Summing up
I wanted to show you how easy it is to use Equinix Metal to set up a tunnel for development from your network, or from a Kubernetes cluster. TLS is enabled by default on these connections for anything that goes over the tunnel.
You can also expose your IngressController or any other TCP service within the cluster.
We currently have provisioners for several clouds such as digitalocean, equinix-metal, ec2, scaleway, civo, gce, azure, linode and hetzner. You can suggest new provisioners and see the source code here.
Find out more about inlets and use-cases in the inlets docs
Going further - hybrid-cloud use-cases and replacing a VPN
Whilst inlets was created with the original problem of exposing an internal or private service, it’s since developed to offer an easier and more scalable alternative to a VPN. You can read more about how to use inlets for hybrid cloud in this post: Connect your on-premises databases to Kubernetes in the cloud.
See an example:
Subscribe for updates and new content from OpenFaaS Ltd.
By providing your email, you agree to receive marketing emails.