When Your ISP Won't Give You A Static IP

Alex Ellis
Learn what to do when your ISP won’t give you a static IP, or when you’re behind NAT or a firewall.
Introduction
Why would you want a static IP? The primary reason is so that you can connect to services and computers within your home network from anywhere in the world, over the Internet. It might be that you self-host a number of websites or services, or it might just be for remote access and administration. Some people just enjoy building and maintaining a homelab, I think I’d put myself in that category, but I also self-host a number of OpenFaaS functions to serve web portals and handle webhooks.
Traditionally, users would purchase a static IP from their Internet Service Provider (ISP) for a set amount of money like 10-30 USD / month. You may even be able to buy a whole IP block, and have that routed to your home.
Serving traffic with a Static IP
The challenge with a static IP address is that you then need to set up port forwarding, so that your router knows where to send traffic for each port that you want to open.
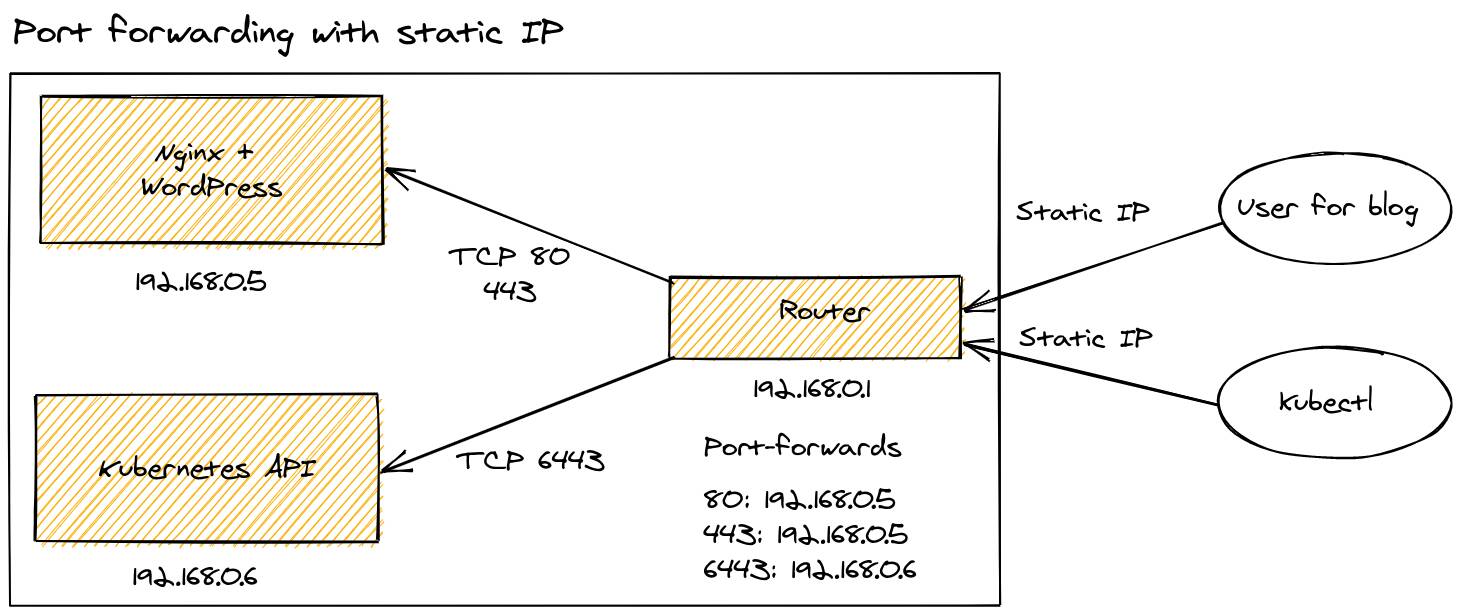
A static IP and port-forwarding
To use your static IP, you’ll need to configure port-forwarding on your router. Here, you tell each port where its traffic needs to go on your private network. If the IP of the private services changes, then you’ll have to update these rules again. Most of the time editing these rules means downtime on your Internet connection whilst the router reboots.
You’ll also find that you cannot map the same port such as 22 (SSH) or 6443 (Kubernetes) to two different hosts within your home network, because you only have one IP address. This can lead to you having to use some esoteric port numbers like 6444 for your second Kubernetes cluster that needs to accept traffic.
A number of ISPs will also block common ports such as 22, 80 and 443, meaning you’ll need to find another solution.
Additionally, exposing a public IP means that anyone in the world can find out where you live, and who your ISP is. The granularity may vary, but it could be within a few hundred meters or kilometers from your home.
Serving traffic with a Dynamic IP
Not all ISPs will offer you a Static IP, so you may have a public IP address that is reachable, but changes often. The workaround here is for you to install software on your router, or on a PC in your home to continually update a DNS record. In this way, you can point your users at your DNS entry, instead of at your IP address.
I used this technique in the past to host a Ghost blog and used Namecheap. Unfortunately my router didn’t support Namecheap, so I had to buy a Raspberry Pi to run a regular cron job and update the address. Occasionally, this will fail and you may be away from home, wanting to access your network over SSH, but will have no way to do so.
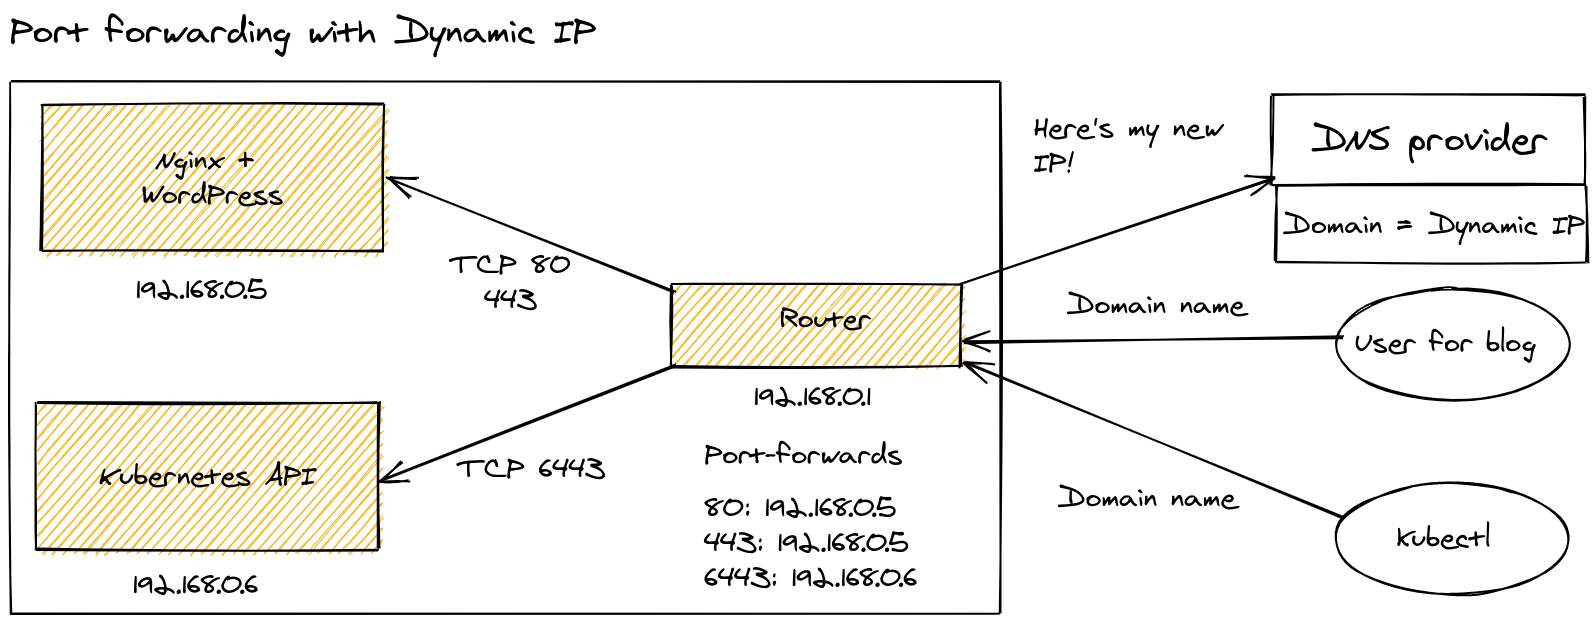
The configuration is similar to above. It still exposes your location, and is still limited on port mappings.
Things can get worse than this, if your provider uses Carrier Grade NAT (CGNAT), then you will not have an IP address that is publicly accessible. The same would be true if you wanted to host a dashboard or API within an office network, university halls, a hotel, or when connected to a public WiFi network of some kind.
Serving traffic with an inlets tunnel
Tunnels can provide an alternative which works in all of the scenarios above, but with fewer downsides.
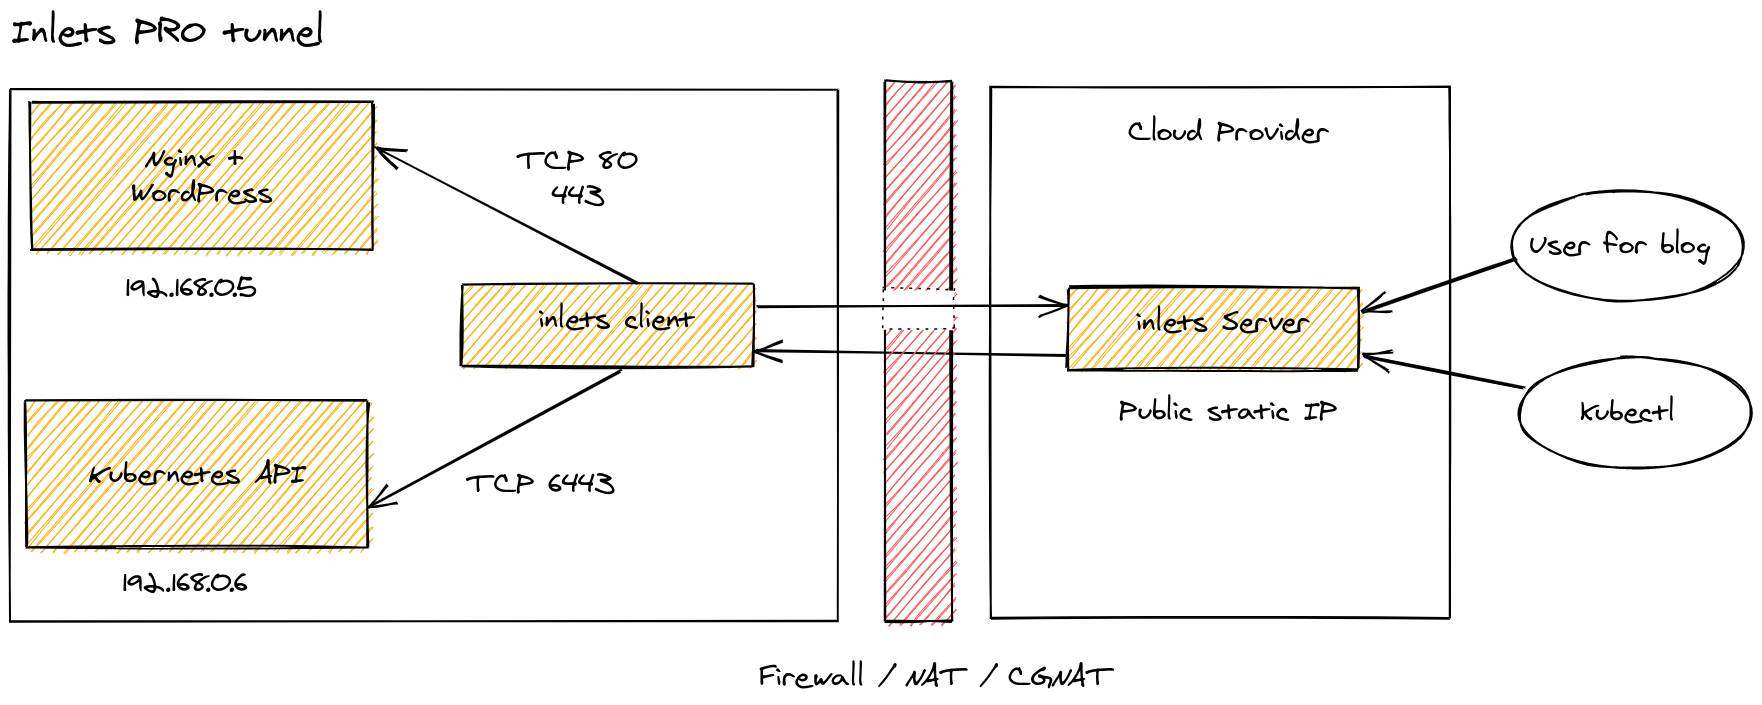
A static IP issued by inlets using a cloud VM
With a tunnel you can solve the privacy problem. Your users will see that your IP address is from DigitalOcean or AWS, and whilst I would recommend you chose a region close to where you live, you could host a service in the UK and have an exit-VM in New York, if you wanted.
Rather than just getting one dynamic IP, or paying for a Static IP, using inlets you can get as many IPs as you like. There’s no restriction on what ports you can use, and so if you have those two Kubernetes clusters, both could host an IngressController and serve traffic on port 80 and 443, without conflicting.
Each exit server is a cloud VM which comes with its own static public IP address and usually costs 3 EUR or 5 USD / month. If you’re on a budget, and like tinkering, you can even use a single exit-server for many different inlets clients or services.
You can provision an exit-server for pure TCP traffic such as databases, TLS and SSH using inletsctl:
inletsctl create \
  --provider digitalocean \
  --region lon1 \
  --access-token-file ~/.secrets/access-token
After the provisioning has completed, you’ll be given a connection string that you can type in. Then any packets that hit the exit-server’s IP will be forwarded onto the upstream location within your private network.
Then connect your client on the computer where you are hosting the HTTP endpoint. If you’re using Kubernetes, then you can automate all of this using the inlets-operator or the inlets Pro helm chart.
If you want to serve traffic from a HTTP endpoint, it’s easier to setup an exit-server with automatic TLS from Let’s Encrypt:
export DOMAIN=tunnel.example.com

inletsctl create \
  --letsencrypt-domain $DOMAIN \
  --letsencrypt-issuer prod \
  --provider digitalocean \
  --region lon1 \
  --access-token-file ~/.secrets/access-token
Then connect your client on the computer where you are hosting the HTTP endpoint. You can also specify --letsencrypt-domain more than once and have multiple endpoints exposed over the same tunnel like: OpenFaaS and Grafana or Wordpress and Plex.
Wrapping up
We have now looked at a few of the options for self-hosting and for remote access to services within your home. The primary challenges we saw were: privacy, port mapping and conflicts, and steps our ISPs take to prevent us hosting services. A tunnels solution like inlets Pro has a modest cost, but overcomes all of the challenges we mentioned. We recently took a stopwatch to see how long it took to get a public IP on Hetzner Cloud - it was just 15 seconds. If you’ve ever used AWS, then you’ll know it can take several minutes just to get an Application LoadBalancer.
inlets tunnels also allow us to do more than just expose traffic publicly. You can use inlets for multi-cloud and hybrid-cloud configurations where you want to federate your private network with a public network, but don’t want to expose services to the Internet. Read more: hybrid cloud with inlets
You can try inlets Pro for free for 14 days. We have dozens of use-cases, tutorials and videos waiting for you, and I’d be happy to answer any questions you may have, if you’d like to get in touch.
Taking things further
Subscribe for updates and new content from OpenFaaS Ltd.
By providing your email, you agree to receive marketing emails.