Serve traffic through a private tunnel

Alex Ellis
Learn how to serve traffic from your local network over a private tunnel.
Introduction
At the end of this tutorial, you’ll have a a secure TLS public endpoint using your own DNS and domain, which you can use to access your internal services or webpages.
I’ll show you how to:
- automate a tunnel server on a public cloud provider with inlets pre-loaded onto it,
- how to connect a client from your home or private network
- how to tunnel one or more services
- and what else you can do
In a previous article, I explained some of the differences between SaaS and self-hosted tunnels.
Create your tunnel server
With a private tunnel like inlets, you need to create a tunnel server. It has a public IP address that you can use to accept traffic and proxy it into your private network.
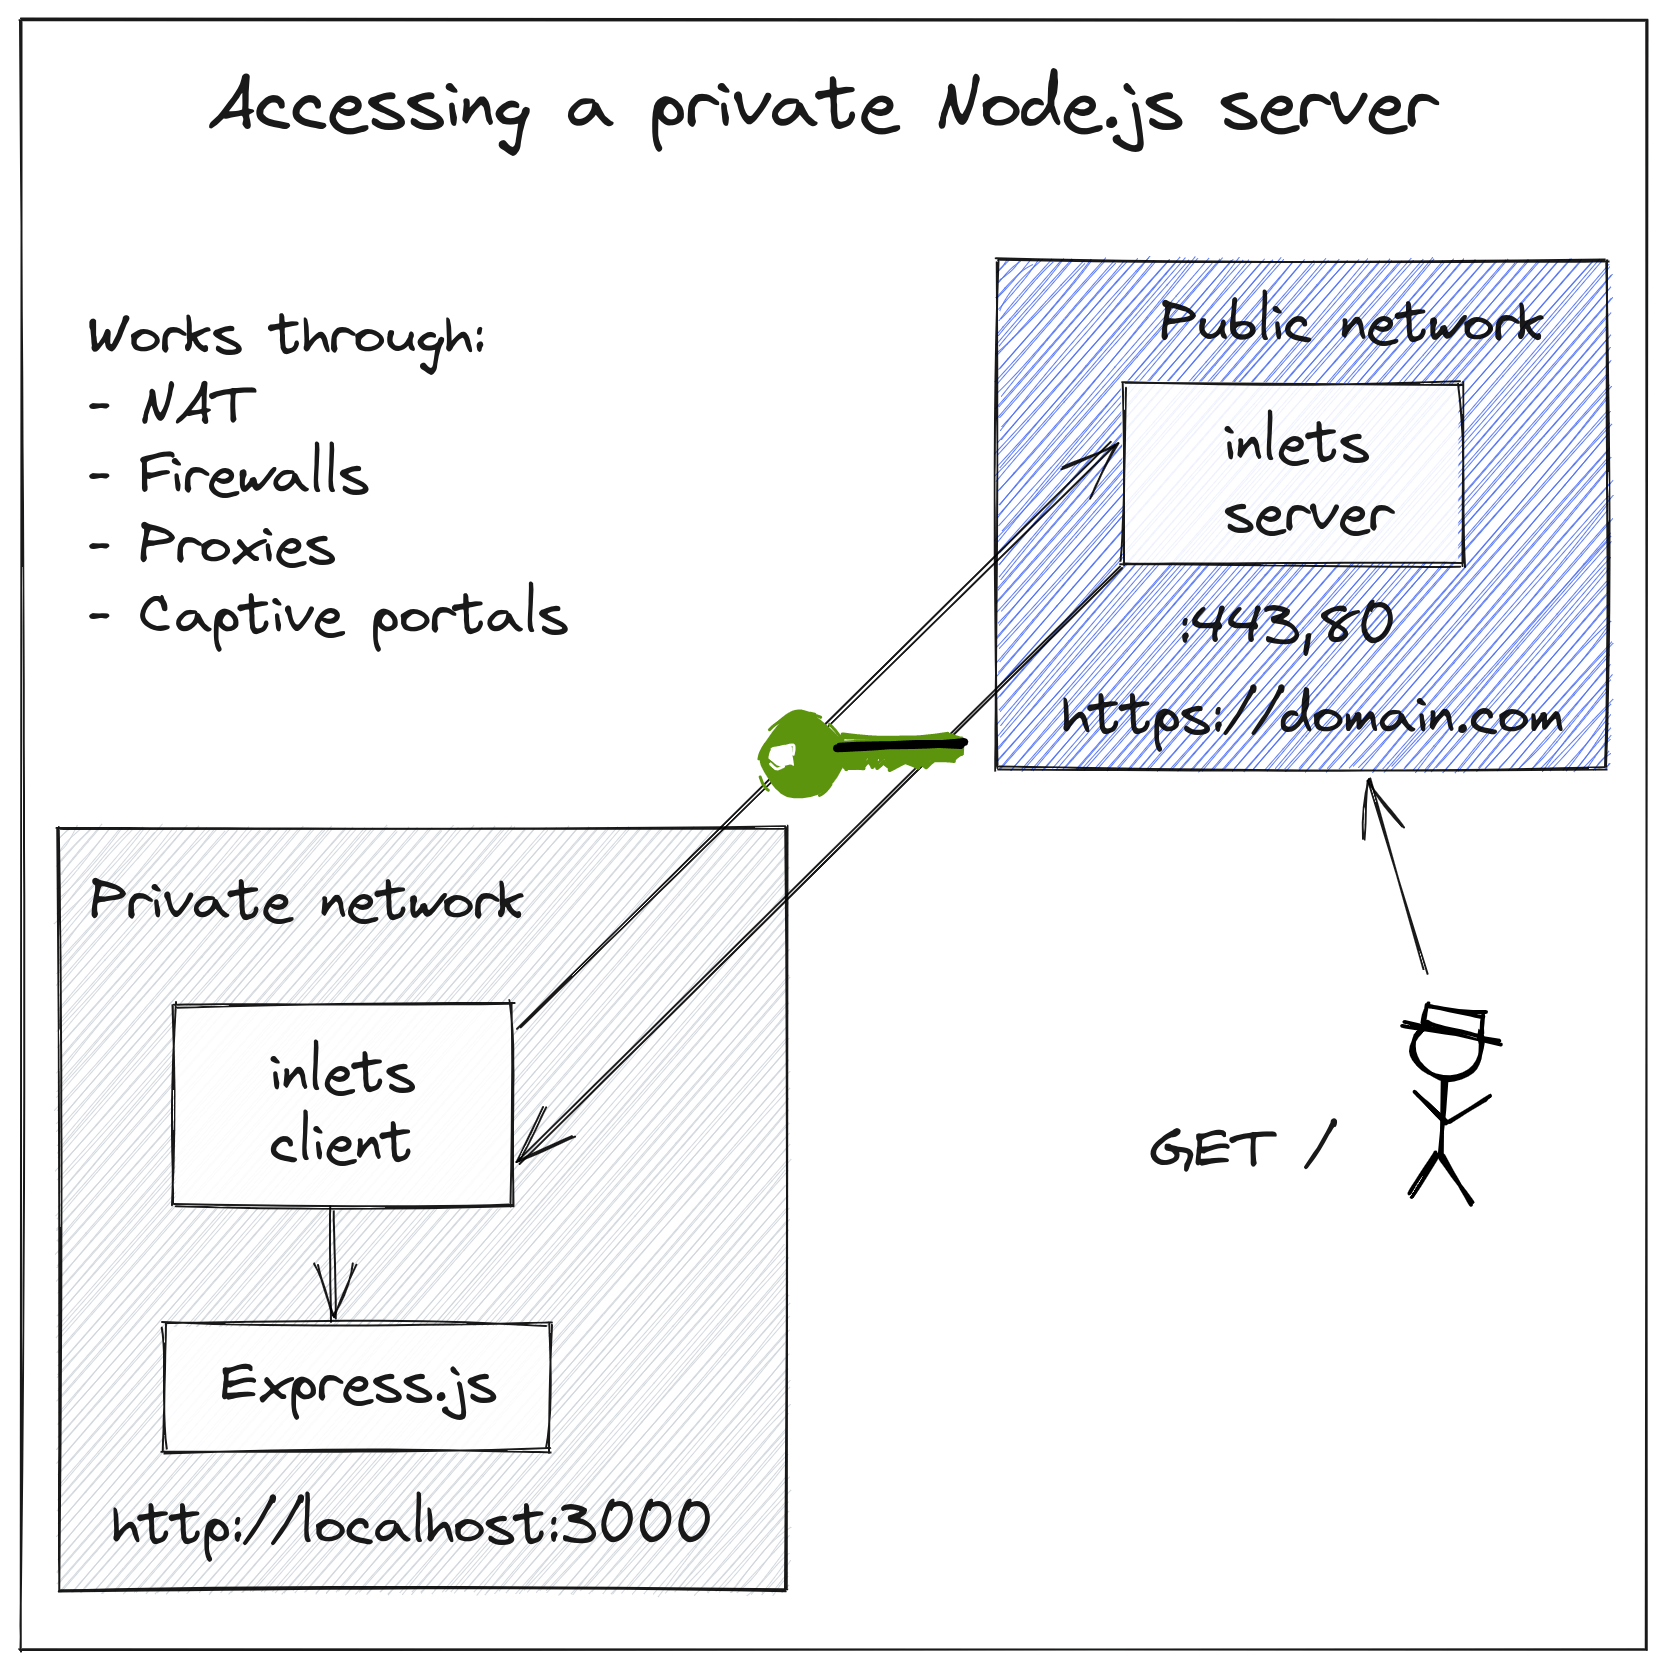
Pictured: Inlets Conceptual architecture
The simplest way to do this is to use the inletsctl tool, which supports around a dozen clouds. The alternative is to set up a VPS or install inlets-pro onto a server you already have set up, and then add a systemd unit file so that it restarts if the tunnel or server should crash for any reason.
To see a list of supported clouds run:
inletsctl create --help
For instructions on how to create an API key or service account for each, feel free to browse the docs.
inletsctl create \
 --region lon1 \
 --provider digitalocean \
 --access-token-file ~/digital-ocean-api-key.txt \
 --letsencrypt-domain blog.example.com
A VM will be created in your account using the cheapest plan available, for DigitalOcean this costs 5 USD / mo at time of writing.
You can also run your tunnel server in the free tier of GCP, Oracle Cloud or on Fly.io at no additional cost.
Once the tunnel server has been created, you will receive:
- The IP address
- An endpoint for the inlets client to connect to
- A token for the inlets client to use when connecting
Take a note of these.
Now create a DNS “A” record for the IP address of the tunnel server on your domain control panel.
Personally, I’m a fan of Google Domains and the .dev domains, but DigitalOcean can also manage domains through their CLI:
export IP=""
export SUBDOMAIN="blog.example.com"

doctl compute domain create $SUBDOMAIN \
  --ip-address $IP
How does the TLS encryption work?
The inlets server process will attempt to get a TLS certificate from Let’s Encrypt using a HTTP01 Acme challenge.
What if I have multiple sites?
You can pass a number of sub-domains, for instance:
 --letsencrypt-domain blog.example.com \
 --letsencrypt-domain grafana.example.com
Connect your tunnel client
The tunnel client can be run as and when required, or you can generate a systemd unit file so that you can have it running in the background. You can run the tunnel on the same machine as the service that you’re proxying, or you can run it on another computer. It’s entirely up to you.
So you could have a Raspberry Pi which just runs Raspberry Pi OS Lite and an inlets client, and nothing else. In this way you’re creating a kind of router appliance.
Let’s imagine you’ve run a Node.js express service on your computer:
$ git clone https://github.com/alexellis/alexellis.io \
  --depth=1
$ cd alexellis.io/
$ npm install
$ npm start

alexellis.io started on port: http://0.0.0.0:3000
inlets also has its own built-in file-server with password protection and the ability to disable browsing for sharing private links. You can expose the built-in file-server when you want to share files directly, without having to upload them first: The simple way to share files directly from your computer
You can download the inlets client using the inletsctl tool:
$ sudo inletsctl download
Now you can start the tunnel client and start serving a test version of my personal homepage alexellis.io:
$ export URL=""
$ export TOKEN=""

$ inlets-pro http client \
  --url $URL \
  --token $TOKEN \
  --upstream blog.example.com=http://127.0.0.1:3000
What if my services are running on different computers?
If they are all within the same network, then you can run the client in one place and have it point at the various internal IP addresses.
$ inlets-pro http client \
  --url $URL \
  --token $TOKEN \
  --upstream blog.example.com=http://127.0.0.1:3000 \
  --upstream grafana.example.com=http://192.168.0.100:3000
If they are on different networks, you can simply run multiple clients, just change the --upstream flag on each client.
How can I run the client in the background?
For Linux hosts, you can generate a systemd unit file for inlets by using the --generate systemd flag to the client or server command.
Then simply copy the resulting file to the correct location on your system and install it:
$ export URL=""
$ export TOKEN=""

$ inlets-pro http client \
  --url $URL \
  --token $TOKEN \
  --upstream blog.example.com=http://127.0.0.1:3000 \
  --license-file=$HOME/.inlets/LICENSE \
  --generate=systemd > inlets.service

$ sudo cp inlets.service /etc/systemd/system/
$ sudo systemctl enable inlets
You can then check the logs or service status:
$ sudo journalctl -u inlets
$ sudo systemctl status inlets
Access your website over the tunnel
You can now access your local website being served at http://127.0.0.1:3000 over the tunnel by visiting the domain you created:
https://blog.example.com/
Checking the status of the tunnel server
You can check the status of your tunnel server with the inlets-pro status command:
$ export URL=""
$ export TOKEN=""

$ inlets-pro status \
  --url $URL \
  --token $TOKEN
Example output:
Server info:
Hostname: creative-pine6
Started: 1 day
Mode:           http
Version:        0.8.9-rc1
Connected clients:
Client ID                        Remote Address     Connected Upstreams
4e35edf5c6a646b79cc580984eac4ea9 192.168.0.19:34988 5 minutes example.com=http://localhost:8000, prometheus.example.com=http://localhost:9090
A Grafana dashboard can be set up to monitor your tunnel server itself, plus any services that you expose get metrics collected automatically.
See also: Monitoring and metrics
Your IP goes where you go
You can close the lid on your laptop, and open it again in Starbucks or your favourite local independent coffee shop. As soon as you reconnect the client, your local server will be available over the tunnel at the same IP address and domain: https://blog.example.com/
I used this technique to test a live demo for the KubeCon conference. I then took a flight from London to San Diego and was able to receive traffic to my Raspberry Pi whilst tethering on a local SIM card.
Tethering my Raspberry Pi with K3s in San Diego
Wrapping up
In a very short period of time we created a private tunnel server on a public cloud of our choice, then we created a DNS record for it, and connected a client and accessed our local website.
You can get started with inlets through a monthly subscription, or save on a yearly plan.
When would you need this?
- If you’re self-hosting websites, you already have some equipment at home, so it can work out cheaper.
- If you’re running a Kubernetes cluster or K3s on a Raspberry Pi, it can be much cheaper over the course of a year.
- But it’s also incredibly convenient for sharing files and for testing APIs or OAuth flows during development.
Ben Potter at Coder is writing up a tutorial on how to access a private VSCode server from anywhere using a private tunnel. If you would like to learn more, follow @inletsdev for when it gets published.
Andrew Meier put it this way:
“I prefer to play around with different projects without having to worry about my costs skyrocketing. I had a few Raspberry Pis and wondered if I could use them as a cluster. After a bit of searching #k3s and inlets gave me my answer”
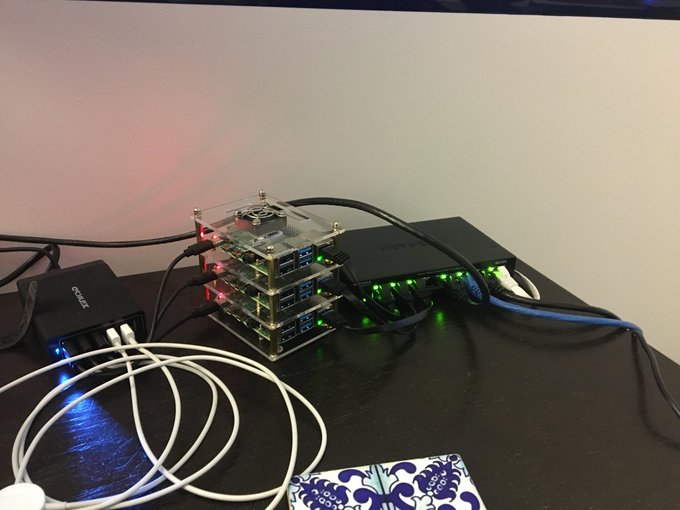
Andrew’s K3s cluster, with inlets
Read his blog post: Personal Infrastructure with Inlets, k3s, and Pulumi
You may also like
Subscribe for updates and new content from OpenFaaS Ltd.
By providing your email, you agree to receive marketing emails.