Restrict your tunnels with IP allow lists

Alex Ellis
IP address allow lists aka IP whitelists can be used to restrict your tunnel servers to only a set list of IP addresses or CIDRs.
Introduction
inlets is a network proxy and service tunnel that was built from the ground up to work well in containers and Kubernetes. You can find out more about inlets use-cases on the homepage and how to get started.
The concept of restricting which IP addresses can access your services is a common request from commercial users of software, despite it being not entirely bulletproof. Let’s look at how to configure it with inlets and what else you’ll need.
As of 0.9.1, when the inlets server receives a connection, it can inspect the remote address to see whether it is allowed to connect. This change covers any HTTP or TCP tunnel servers that you might run, along with the built-in HTTP fileserver.
The new flags can take one or more IP addresses, or an entire range through the concept of a Classless Inter-Domain Routing (CIDR).
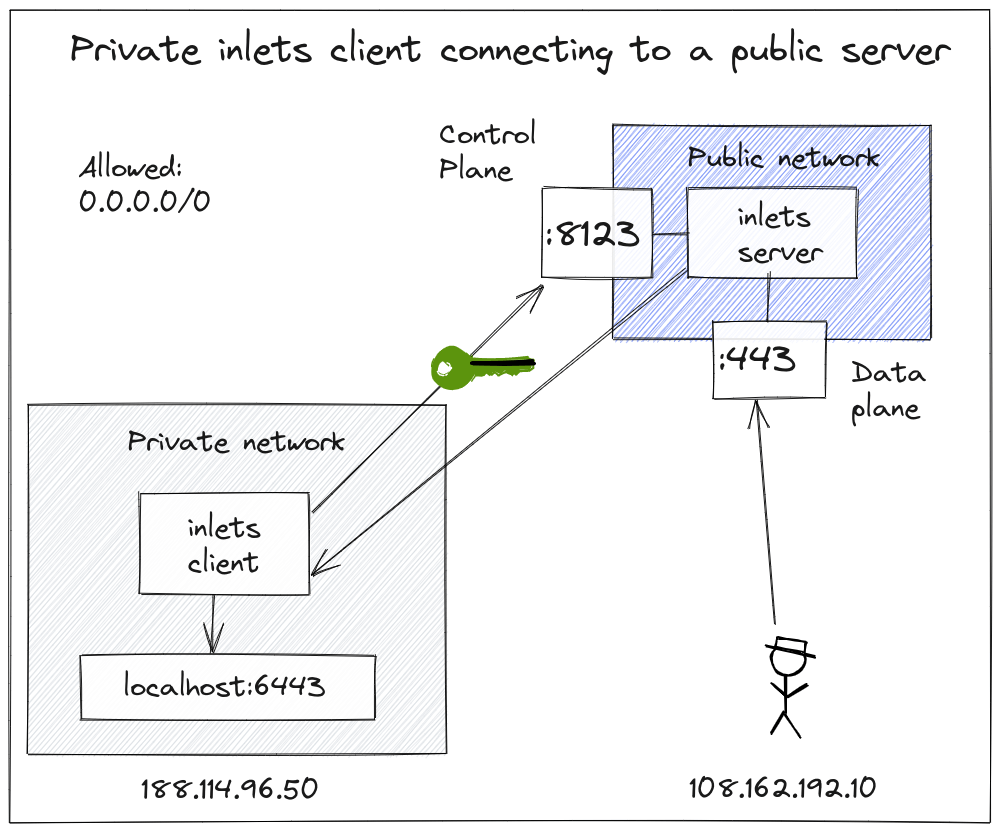
The default behaviour allows any client to connect using the global address range
0.0.0.0/0
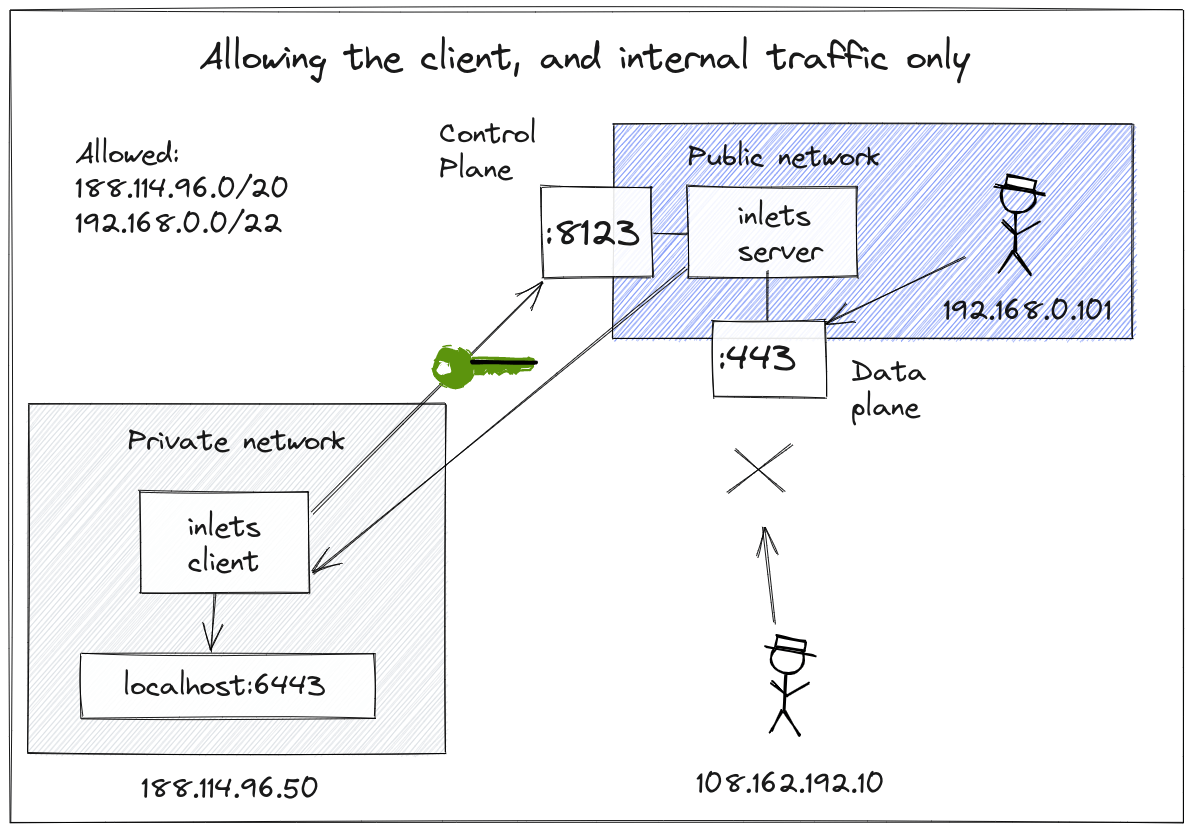
Only allow connections from the client, and the local network on the server i.e.
192.168.0.0/24
In this setup, we want to expose our local service on the tunnel server’s remote network only, so only local clients can access forwarded services. So we allow the client’s IP CIDR range and the local network adapter’s IP range.
Examples
Here’s how I’d allow connections from a machine on my local network (192.168.0.35):
I’d run this on 192.168.0.33:
inlets-pro http server \
 --token-file token.txt \
 --allow-ips 192.168.0.35 \
 --auto-tls-san 192.168.0.33
The default ports opened are: 8123 for the control-plane and 8000 for the data plane.
Then if I run an inlets client and connect to --url wss://192.168.0.33 from my 192.168.0.35 machine, it will allow the connection.
If I ran a client on my 192.168.0.15 machine:
inlets-pro http client \
  --url wss://192.168.0.33:8123 \
  --token-file token.txt \
  --upstream http://127.0.0.1:3000

curl http://192.168.0.33
It would be rejected immediately since it didn’t match the allowed list. The same would be true, if I used curl to access the data plane, port 8000.
If I wanted to grant access to every machine on my network, I could use multiple IP addresses such as:
inlets-pro http server \
 --token-file token.txt \
 --allow-ips 192.168.0.35 \
 --allow-ips 192.168.0.15 \
 --auto-tls-san 192.168.0.33
However, this could become cumbersome, and I may just want to allow an entire IP range or CIDR:
inlets-pro http server \
 --token-file token.txt \
 --allow-ips 192.168.0.0/24
 --auto-tls-san 192.168.0.33
Now any IP address on the 192.168.0.0 network could connect.
By default, you’ll see the help message shows a CIDR of 0.0.0.0/0 for allowed IP addresses. If you haven’t seen this address before, it corresponds to any valid IP address, so it means: “allow any IP address to connect”
The built-in fileserver is useful for sharing files with friends, colleagues and even yourself. It also has the new flag:
inlets-pro fileserver \
 --allow-browsing
 --allow-ips 192.168.0.0/24
 --webroot /tmp/share
Why would you use this instead of Dropbox or Email? There’s no waiting. As soon as you start a tunnel, whoever you give access to, can download files without you needing to wait for a secret shared URL, or for an email to upload and be sent through the Internet. It’s also a live representation of whatever webroot folder you share, so it’s going to be easy to update a file multiple times without any waiting.
See a tutorial for the fileserver: The simple way to share files directly from your computer
The TCP server is useful for forwarding traffic to reverse proxies, SSH, RDP, VNC and generally anything that doesn’t correspond to HTTP or REST.
inlets-pro tcp server \
 --token-file token.txt \
 --allow-ips 192.168.0.0/24
 --auto-tls-san 192.168.0.33
If we connect a client to expose port 2222 for SSH, that will also be subject to the same IP address allow list as the control plane on port 8123.
inlets-pro tcp client \
 --url wss://192.168.0.33:8123 \
 --ports 2222 \
 --upstream raspberrypi.local
Wrapping up
You’ll notice that I used the --token-file or --token flag and the --auto-tls-san flags in the examples, these are important and must be used with the IP allow list, even if you are using a local network.
The token is a shared secret between the client and the server, to prevent unauthorized clients from connecting to your tunnel server.
The --auto-tls-san flag is part of the automatic TLS feature that encrypts your control plane, so connections cannot be intercepted and read by a third party.
Finally, the IP allow list is a kind of belt and braces that you’ll find used even on high profile products like AWS EC2. Inlets now makes it available to you also.
Note: if you run your tunnel server in a container, Kubernetes Pod, you may need to implement your IP allow list elsewhere, such as in your Ingress Controller. The same would apply if you were to use a third-party reverse proxy such as Nginx or Caddy, both of which also have this feature and are compatible with inlets servers.
If you’d like to keep in touch and find out more connecting to remote networks, subscribe with your email address using the form below.
Subscribe for updates and new content from OpenFaaS Ltd.
By providing your email, you agree to receive marketing emails.