Access your local cluster like a managed Kubernetes engine

Alex Ellis
Do you need to access your local cluster, just like a managed Kubernetes engine from a public cloud?
Getting to kubectl from anywhere
You may be wondering how you can run kubectl against a private cluster when you’re not on the same local network as that cluster.
Public clouds have this down to a fine art. You enter your credit card details into their dashboard, hit a button with the size of the cluster you want, and you’ll get a magic “Download Kubeconfig” button a few minutes later.
What tends to happen, with offerings like DigitalOcean Kubernetes, AWS EKS, Civo K3s and Linode Kubernetes Engine is that they set up some infrastructure for you behind the scenes.
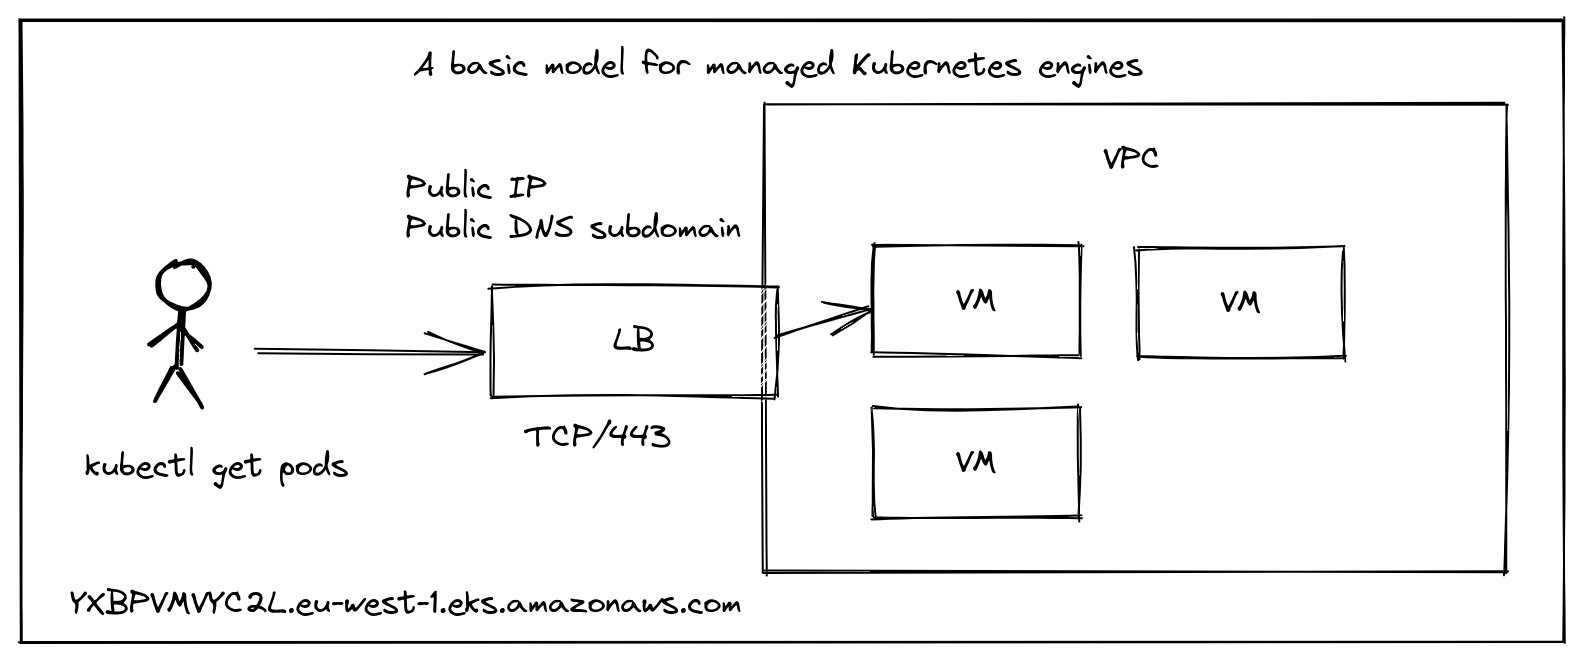
Conceptual diagram of a managed Kubernetes service
If you’re an EKS customer, then your kubeconfig may look a little like this:
apiVersion: v1
clusters:
- cluster:
    certificate-authority-data: Y2VydGlmaWNhdGUtYXV0aG9yaXR5LWRhdGE6Cg==
    server: https://YXBPVMVYC2L.eu-west-1.eks.amazonaws.com
Notice that the URL for the server was generated automatically using a kind of base64 hash.
The data in the server field corresponds to the public address of the Kubernetes API server. Since Kubernetes uses TLS for authentication and encryption, you’ll also find that the address YXBPVMVYC2L.eu-west-1.eks.amazonaws.com is in the TLS SAN field of the certificate for the endpoint.
There are probably three main options for getting access to the API server from the Internet:
1) Set up a VPC between your Kubernetes cluster and your home or work network 2) Port-forwarding from your router or a firewall rule 3) Use a TCP network tunnel solution like inlets or similar
A fourth option that is out of scope for this tutorial would be specialist tools for remote access like Google Cloud’s IAP proxy and similar tooling. These combine option 3 (a TCP tunnel) with an Identity Provider (IdP) for more advanced use-cases.
See also:
VPNs
For the first option, a VPN, you will need to join any and every device that could ever need to access the cluster to your VPN.
That means each of your GitHub Actions runners, any public SaaS services that you use which access your cluster’s API, and any workstations or servers that you own that will need to operate to access the cluster. VPNs range from simple to complex, and SaaS-style, managed VPN solutions are usually charged based upon the number of devices connected to a network.
You’ll need to pay very careful attention to your Access Control Lists (ACLs), and think whether you really want to join all those nodes to your private VPN.
Pros: granular access, reliable Cons: ongoing management, setup time and cost per device for SaaS-style VPNs
Port-forwarding
Let’s have a quick look at the second option, port-forwarding or firewall rules.
If you’re running a cluster at home, then you can potentially set up a port-forwarding rule on your router to the IP of the host where Kubernetes is running, if it’s already accessible on your local network.
If your internal IP was 192.168.0.100 and the port for Kubernetes was 443, you’d just set up a forwarding rule and then create a DNS record to match the IP. But beware, home IP address ranges often change over time, so you’ll be playing catch-up unless you pay for a static IP.
If you have Carrier Grade NAT (CGNAT), then you probably can’t use this option.
If your cluster is running within a container or VM, it may not have an address that you can enter into your firewall or port-forwarding solution.
Pros: cheap for hobbyists Cons: management overhead, can’t be automated, brittle when internal IPs change, inaccessible when external IPs change
See also:
TCP tunnels
An inlets TCP tunnel, you can expose a single internal IP address on the Internet, along with a list of ports on a remote server.
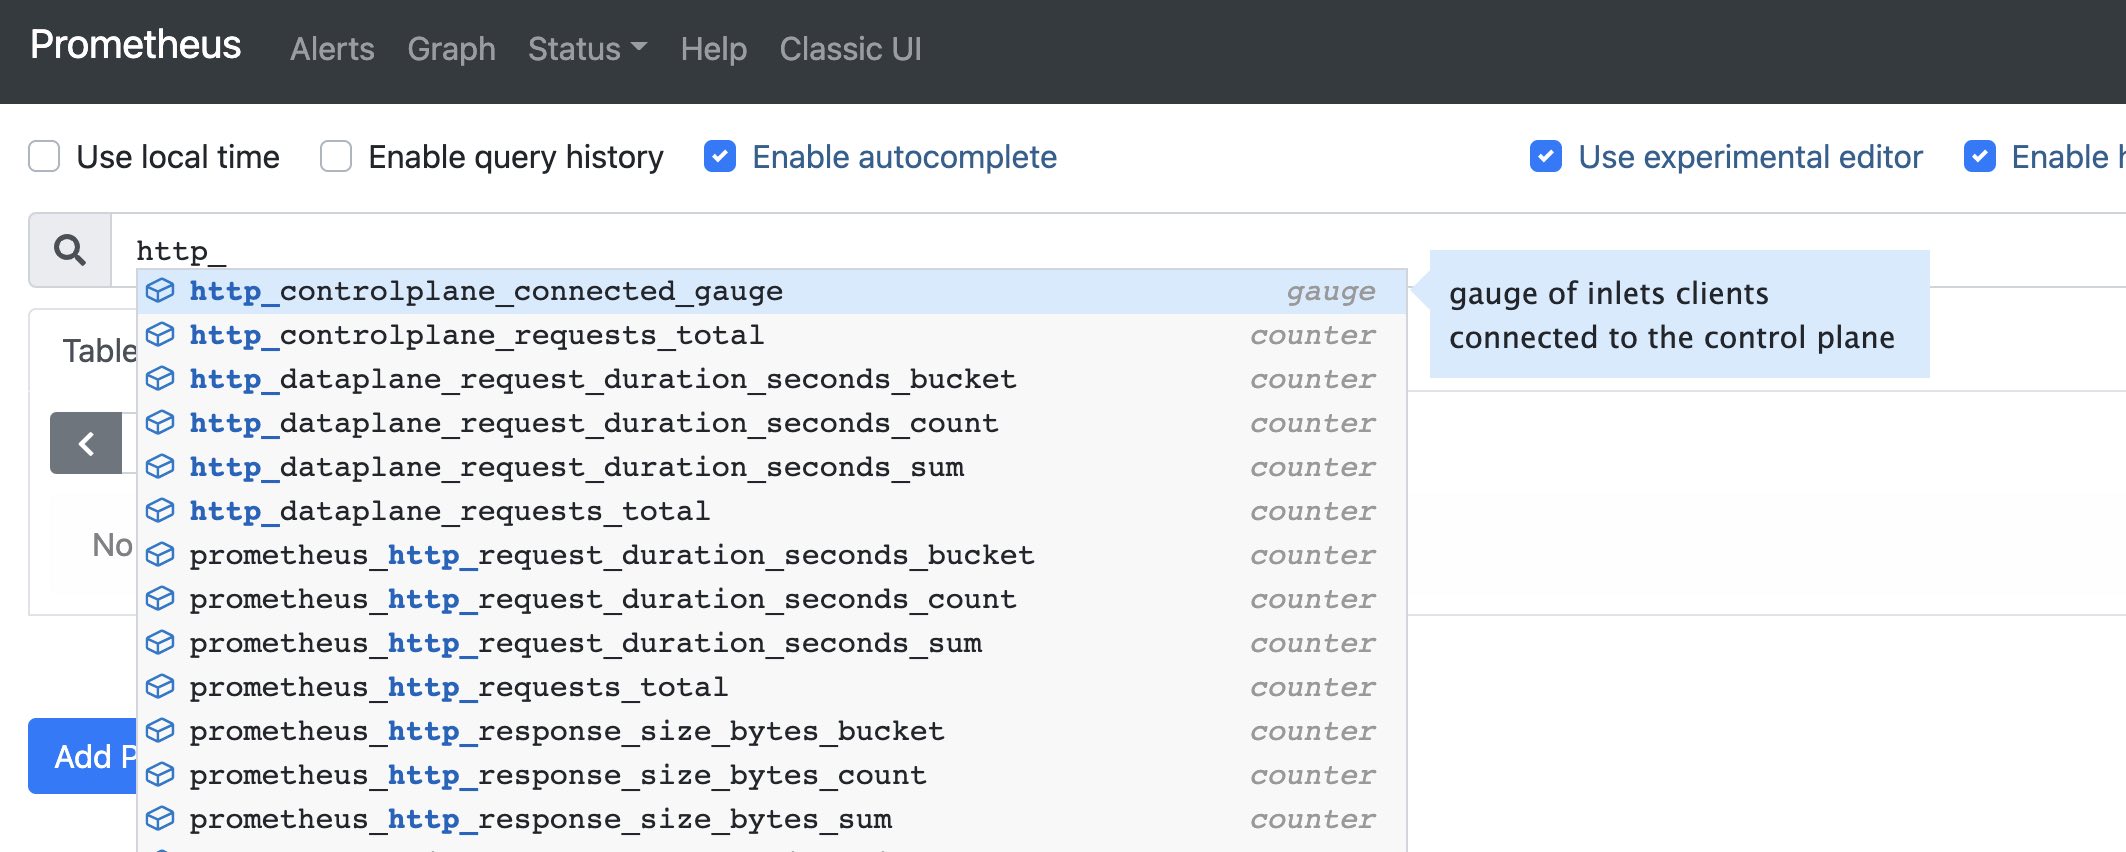
Once connected, you can gather metrics with Prometheus and run the inlets-pro status command to see uptime and reliability:
export TOKEN="f2cXtOouRpuVbAn4arVvdSMx//uKD3jDnssr3X9P338"

inlets-pro status --url "wss://139.160.201.143:8123" \
  --token "$TOKEN"

inlets server status. Version: 0.9.3 - 8e96997499ae53c6fb2ae9f9e13fa9b48dcb6514

Server info:
Hostname:       localhost
Process uptime: 15 minutes ago
Mode:           tcp
Version:        0.9.3 8e96997499ae53c6fb2ae9f9e13fa9b48dcb6514

Connected clients:
Client ID                        Remote Address        Connected  Upstreams
5309466072564c1c90ce0a0bcaa22b74 192.168.1.101:16368 43 seconds kubernetes.default.svc:443, kubernetes.default.svc:6443
Cloud native by default with built-in monitoring
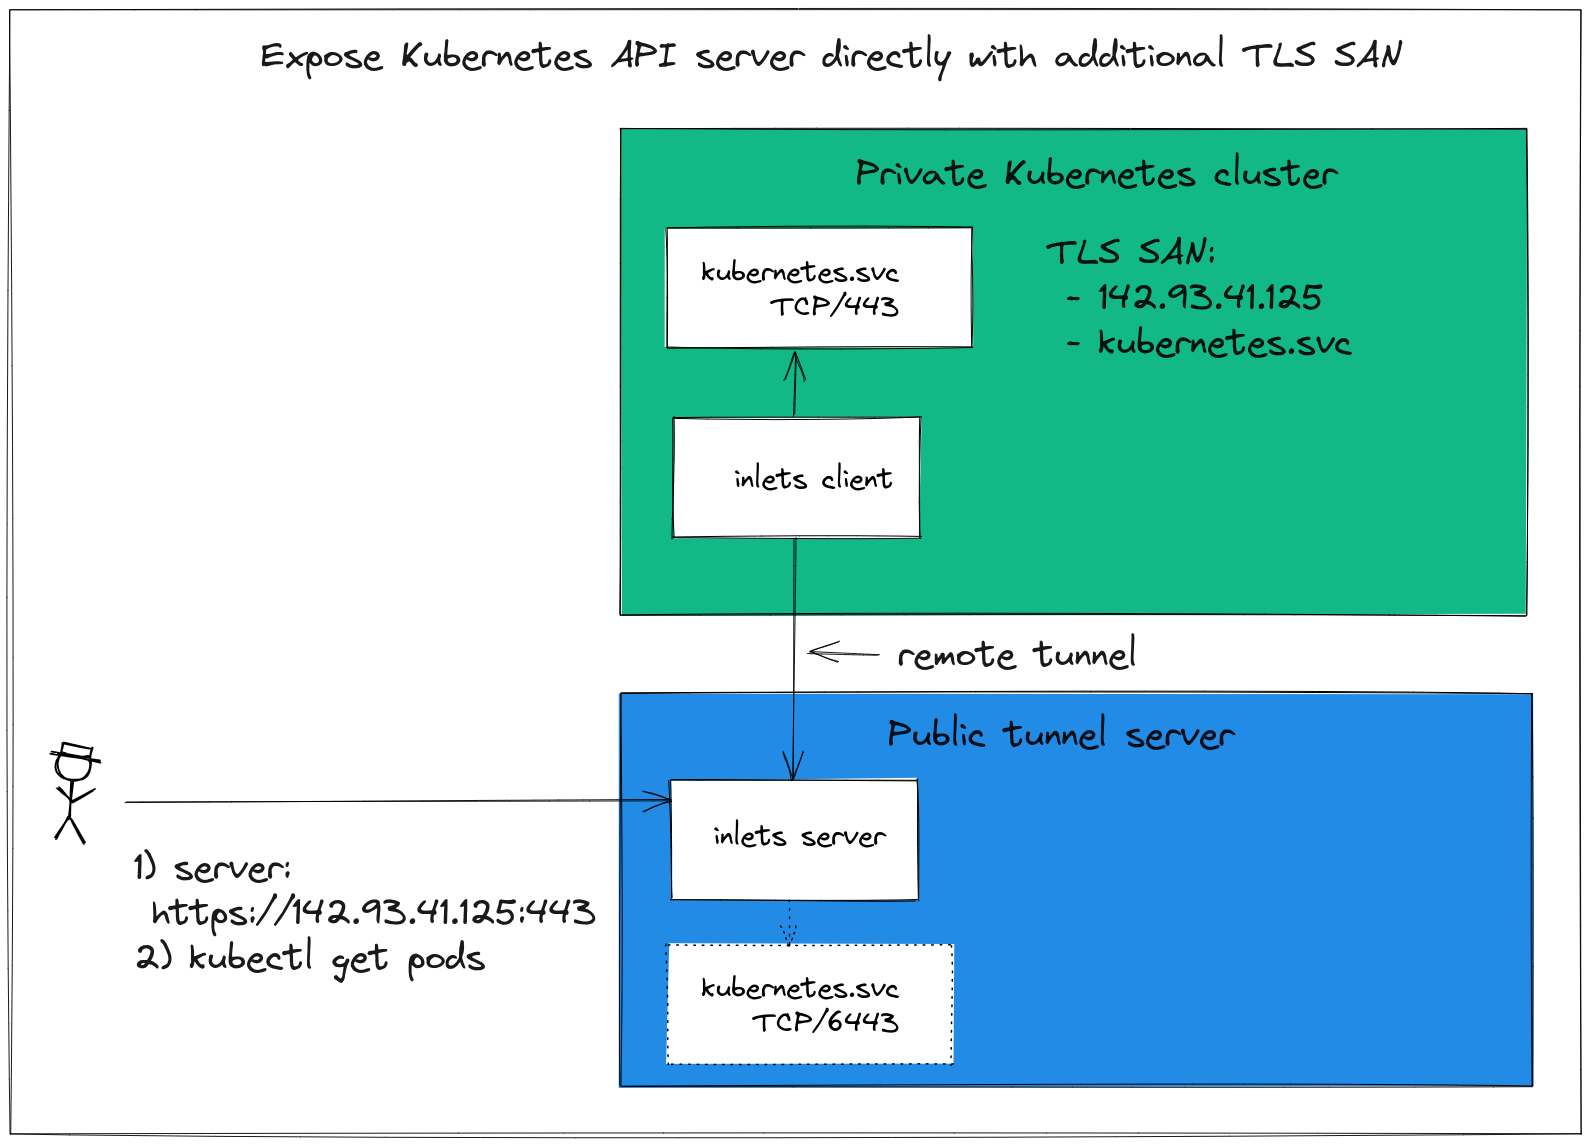
Instead of a Load Balancer provisioned by a managed cloud provider, we provision a single Virtual Machine (VM) and use its public IP address to access our cluster.
The inlets server runs on the public VM and will forward any TCP packets to any connected inlets clients, so it works with TLS and the Kubernetes API server.
Kubernetes on tour - get access to your cluster from anywhere, without having to resort to complex tooling like VPNs.
You can try it out with a tutorial. It’ll probably take you around 15-30 minutes, after which you are unlikely to need to run the commands again and your tunnel will reconnect if there’s a disruption.
Tutorial: Expose a local Kubernetes API Server
Pros: fast & lightweight, no need to manage a VPN Cons: exposing the API server may need additional settings
Unlike port-forwarding, you can run an inlets tunnel on your laptop, walk out of your home and open the lid in a coffee shop. The tunnel will reconnect and your cluster will be accessible again.
inlets-operator brings a Service LoadBalancer with public IP to any Kubernetes cluster i.e. minikube/k3d/KinD/kubeadm
— Alex Ellis (@alexellisuk) October 18, 2019
I set up @openfaascloud on my laptop at home, when I got to a coffee shop it reconnected with the same public IP from @digitalocean😱https://t.co/PanfWfMRlT pic.twitter.com/hHCeMRW7z2
Wrapping up
Before you go ahead and expose a Kubernetes API server on the Internet, make sure you have checked the documenation for the distribution that you’re using. The KinD docs suggest that additional settings are required, but tooling like K3s and kubeadm are designed to run on the public Internet.
We explored three options, each of which have their own pros and cons.
-
A VPN carries the highest level of management overhead, every host that accesses the cluster needs to join the network and have its address and membership managed, but it does offer remote access to only a set group of machines.
-
Port-forwarding is the pea-soup option, cheap, but potentially time consuming with your internal and external IPs likely to change and break the setup. On the plus side, if you’re time rich, you could spend your time instead of your money.
-
Inlets provides a lightweight TCP tunnel to put one or more services on the Internet. You’ll need to check that your Kubernetes distribution is suitable for exposing publicly, but it’s generally going to be very stable - reconnecting as necessary and using very little resources on your machine.
Find out more about inlets vs VPNs: inlets FAQ
You can try out inlets for free using the tutorial below:
Tutorial: Expose a local Kubernetes API Server
Inlets can also be used for HTTP tunnels to serve a number of different domains, or for TCP tunnels for Kubernetes services themselves, like an IngressController.
- Tutorial: Expose a local IngressController with the inlets-operator - host one or more domains on the Internet with Kubernetes
- Automated HTTP tunnel server - host one or more domains on the Internet without Kubernetes
- Custom reverse proxy with Caddy - expose Caddy from your home network for self-hosting
Questions, comments & suggestions
If you’d like to chat, feel free to reach out to us via our contact page
Subscribe for updates and new content from OpenFaaS Ltd.
By providing your email, you agree to receive marketing emails.