How to access and manage remote Kubernetes clusters with inlets uplink

Alex Ellis
Learn how to access and manage remote Kubernetes clusters securely with inlets uplink.
What’s the use-case?
We launched a version of inlets specifically for service providers who need to access or manage services in remote customer networks.
It’s also ideal for SREs and DevOps leads who need to manage applications across multiple clouds or clusters.
A few days ago, Cody Hill reached out to me when working on a customer project. His client needed a way to securely reach the Kubernetes API in up to 10,000 remote clusters.
In the past, I’ve shown how you can expose your own Kubernetes API server on the Internet, so that you can update your kubeconfig and manage the cluster just like a managed service:
Access your local cluster like a managed Kubernetes engine
But Cody’s customer doesn’t want to make these clusters public. They want to manage them securely, they want to do it at scale and to access them from within their own central Kubernetes cluster.
We’re going to focus on Cody’s use-case here, but we have a separate blog post covering ArgoCD for a Hub and Spoke configuration. This is ideal for managing multiple clusters from a central GitOps repository.
See also: Learn how to manage apps across multiple Kubernetes clusters
How does it work?
The primary use-case for inlets is to help you expose your own services to the Internet, but it can also be used to expose services into other networks, a bit like a VPN, but only without the arduous configuration, open firewall ports and for only what you need, instead of entire subnets or hosts.
inlets uplink
Inlets Uplink is based upon the original work of inlets, but has its own commands within the CLI.
See also: Inlets Uplink overview
Just like inlets, the client can be run in systemd, as a Docker container, as a Kubernetes Pod, or as a binary on MacOS, Windows or Linux.
For this use-case, the end-customer will run a Kubernetes Pod within their own cluster, and the service provider will install the inlets uplink management solution along with the tunnel servers within their central cloud cluster.
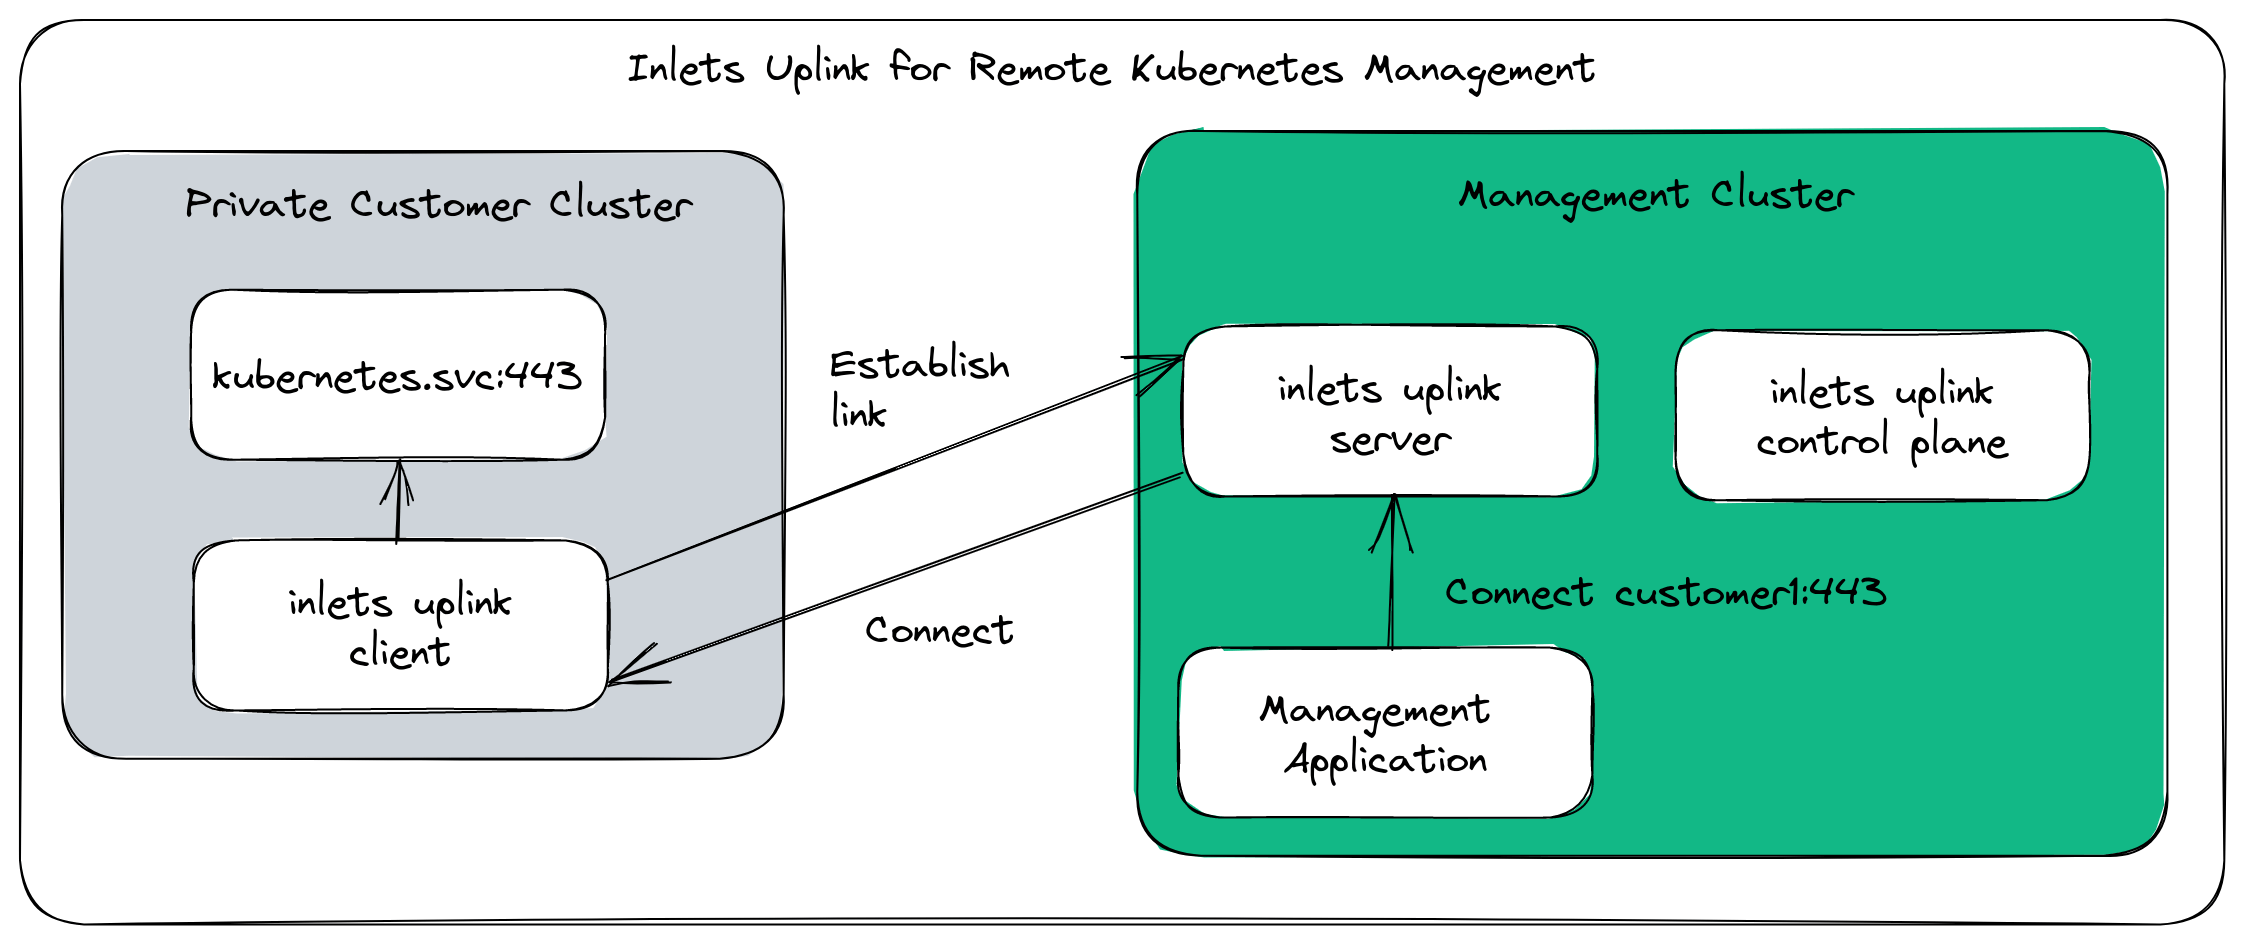
Inlets Uplink conceptual architecture
In the diagram, there is a single remote cluster connected, however you can connect as many as you like.
Each remote cluster will require a Tunnel Custom Resource, which in turn creates a lightweight Pod that runs the inlets server process.
Does it scale?
We’ve observed the server process taking around < 10MB of RAM, and it has low CPU usage.
That means you can deploy thousands of tunnels. In general, a Kubernetes node can run around 100 Pods, although with Google Kubernetes Engine and some other hosted clouds, you can pack more in. This shouldn’t be something you worry about, since you can use smaller nodes to keep costs down.
What about security?
Each tunnel has its own token which can be revoked or rotated as required, we recommend using a separate Kubernetes namespace for each customer.
All traffic is tunneled over a websocket with TLS enabled, you can terminate the TLS using either Ingress or an Istio Gateway.
And if you want to enable Istio for mutual TLS, for in-cluster traffic, you can do that too, and it’ll work fine.
Read more in the inlets FAQ
Trying it out
Before we get started with the exercise, set up inlets uplink on your central cluster on the public cloud.
Create a new namespace for the customer:
kubectl create namespace customer1
Copy your license into the new namespace:
export NS="customer1"
export LICENSE=$(kubectl get secret -n inlets inlets-uplink-license -o jsonpath='{.data.license}' | base64 -d)

kubectl create secret generic \
  -n $NS \
  inlets-uplink-license \
  --from-literal license=$LICENSE
Then create a Tunnel custom resource that will be used to create the tunnel server Pod:
kubectl apply -f - <<EOF
apiVersion: uplink.inlets.dev/v1alpha1
kind: Tunnel
metadata:
  name: kubernetes
  namespace: customer1
spec:
  licenseRef:
    name: inlets-uplink-license
    namespace: tunnels
  tcpPorts:
  - 6443
EOF
The port for the Kubernetes API server is 443, however we can avoid some additional configuration by using a higher port number, such as 6443.
Verify it was created as expected:
kubectl get -n customer1 tunnel.uplink.inlets.dev -o wide
NAME         AUTHTOKENNAME   DEPLOYMENTNAME   TCP PORTS   DOMAINS
kubernetes   kubernetes      kubernetes       [6443]
Now, get the inlets uplink management CLI, and use it to generate a Kubernetes Deployment definition for the customer to install:
inlets-pro plugin get tunnel

inlets-pro tunnel connect \
    kubernetes \
    --namespace customer1 \
    --domain uplink.example.com \
    --upstream 6443=kubernetes.default.svc:443 \
    --format k8s_yaml
Replace uplink.example.com with the domain you used when you installed the management solution.
Here’s what I got:
apiVersion: apps/v1
kind: Deployment
metadata:
  name: kubernetes-inlets-client
spec:
  replicas: 1
  selector:
    matchLabels:
      app: kubernetes-inlets-client
  template:
    metadata:
      labels:
        app: kubernetes-inlets-client
    spec:
      containers:
      - name: kubernetes-inlets-client
        image: ghcr.io/inlets/inlets-pro:0.9.14
        imagePullPolicy: IfNotPresent
        command: ["inlets-pro"]
        args:
        - "uplink"
        - "client"
        - "--url=wss://uplink.example.com/customer1/kubernetes"
        - "--token=qZlfHhOmnHGXf+r8DjMlgFJf978rfuo93VstNzM7kKI="
        - "--upstream=6443=kubernetes.default.svc:443"
Switch over to the customer’s Kubernetes cluster and apply the YAML you got from the inlets-pro tunnel connect command.
Note: do not copy and past the YAML from the blog post, as it’s just a sample.
We can see that my tunnel is already connected and ready to be accessed in the central cluster:
kubectl logs deploy/kubernetes-inlets-client -f

               ___       __
  __  ______  / (_)___  / /__
 / / / / __ \/ / / __ \/ //_/
/ /_/ / /_/ / / / / / / ,<
\__,_/ .___/_/_/_/ /_/_/|_|
    /_/

inlets (tm) uplink client. All rights reserved OpenFaaS Ltd (2022)
time="2023/03/29 10:47:32" level=info msg="Connecting to proxy" url="wss://uplink.example.com/customer1/kubernetes"
time="2023/03/29 10:47:32" level=info msg="Connection established" client_id=2ec666d6530d40eabd28de3dd9df259f
Go back to the context of the control plane cluster.
Run an Alpine Linux Pod in the customer’s namespace:
kubectl run --rm -n customer1 -t -i k8s --image=alpine:3.17.2 --restart=Never -- sh
Install curl, then use it to access the Kubernetes API server:
apk add --no-cache curl

curl -k https://kubernetes:6443/api/v1/namespaces/default/pods
You should see a 403, because you haven’t provided a token or a Kubeconfig file:
{
  "kind": "Status",
  "apiVersion": "v1",
  "metadata": {},
  "status": "Failure",
  "message": "pods is forbidden: User \"system:anonymous\" cannot list resource \"pods\" in API group \"\" in the namespace \"default\"",
  "reason": "Forbidden",
  "details": {
    "kind": "pods"
  },
  "code": 403
}
Congratulations - you’ve now accessed a customer’s Kubernetes API server remotely, without exposing it on the Internet.
This can be scaled to tens, hundreds or thousands of customers, using the approach we went through above:
- Create a namespace for each customer
- Create a Tunnel Custom Resource for each customer
- Generate the Deployment YAML file, and pass it over to the customer
- The customer applies the YAML file to their cluster
- You can run a workload inside the cluster and with an appropriate access token you can access the Kubernetes API server
In my example, the control-plane cluster is running on Linode using K3s.
The customer cluster is a KinD cluster running on an Intel NUC on my home network.
I can get the KUBECONFIG from the KinD cluster by opening the $HOME/.kube/config file on the NUC.
I then need to edit the server URL, and optionally, if the tunnel name doesn’t match `kubernetes.default.svc, I can pass in a TLS Server name override.
apiVersion: v1
clusters:
- cluster:
    certificate-authority-data: REDACTED
    server: https://127.0.0.1:35543
  name: kind-openfaas
contexts:
- context:
    cluster: kind-openfaas
    user: kind-openfaas
  name: kind-openfaas
current-context: kind-openfaas
kind: Config
preferences: {}
users:
- name: kind-openfaas
  user:
    client-certificate-data: REDACTED
    client-key-data: REDACTED
Change:
server: https://127.0.0.1:35543to:server: https://kubernetes:6443- Then add:
tls-server-name: kubernetesto the same section.
-   server: https://127.0.0.1:35543
+   server: https://kubernetes:6443
+   tls-server-name: kubernetes
Note that we do not need tls-insecure-skip-verify: true because we can either use the original TLS name, or we can provide it in the config file.
cd $HOME

mkdir -p .kube/

# After running this command, paste in the edited KUBECONFIG
# then hit Control + D
cat > .kube/config
Now download kubectl using arkade:
curl -sLS https://get.arkade.dev | sh

arkade get kubectl@v1.25.1

mv /root/.arkade/bin/kubectl /usr/local/bin/
Next try to run kubectl:
~ # kubectl get node
NAME                     STATUS   ROLES           AGE   VERSION
openfaas-control-plane   Ready    control-plane   20h   v1.25.3
~ #
As you can see, it’s working with the updated kubeconfig file.
The same approach can be used to access the tunneled Kubernetes API server from any other Pod deployed in the cluster.
For instance, you may want to build your own Kubernetes Operator which connects to the remote cluster using the updated Kubeconfig file.
Ideally, you should ask your end-customer to provide a limited scope token, which can only be used to access what you need, rather than an admin token.
It’s also worth exploring OIDC authentication, which can be used to authenticate users and applications to the Kubernetes API server instead of sharing a long-lived token.
Wrapping up
In a very short period of time, we set up the inlets uplink management solution on a central cloud cluster.
Then, we were able to make a secure, authenticated connection to a remote Kubernetes cluster without having to expose it to the Internet.
In the exercise, we used an Alpine Linux shell, where we installed kubectl and copied in an updated kubeconfig file. You can take the same approach to access the remote cluster from your own applications deployed in the central cluster.
Even Argo CD can be installed in the central cluster to manage a set of different environments from one place.
See also: Learn how to manage apps across multiple Kubernetes clusters
Customer feedback
Cody had a working session where he demoed the above to his end-client, they were very impressed with the solution.
Kubiya.ai have developed a DevOps virtual assistant with conversational AI. Tell it what you need to happen, and it’ll go and do it for you, without manual steps.
The team were using NATS JetStream, but ran into issues with managing keys and certificates for customers, reliability issues with the servers, and having to use pub/sub over direct access to OpenFaaS functions.
We met with Kubiya’s team, and after a few days of testing the new solution they wrote to us:
“Just wanted to let you know that the Inlets-pro works amazing! Thank you for your help! “For tunnel creation, I tried both the inlets-pro cli and yaml files. It’s brilliant, I don’t know what to say!”
Constantin Paigin - Head of DevOps & IT
If you’d like to talk to our team about inlets uplink or remote service management for customers, please get in touch.
Subscribe for updates and new content from OpenFaaS Ltd.
By providing your email, you agree to receive marketing emails.