The only tunnel you'll need for your homelab

Alex Ellis
You can now expose SSH, HTTPS and Kubernetes through a single tunnel from your homelab. I’ll show you how.
Introduction
Do you know how sometimes a strength can also be a weakness? That’s sometimes how people view inlets. It’s so versatile, that it can be run in many different ways.
You can expose SSH, HTTPS for various domains, Nginx or Traefik as a reverse proxy, even the Kubernetes API. I’d say that a regular HTTPS tunnel for a custom domain is the most common, but with with all those options, sometimes folks just don’t know where to start.
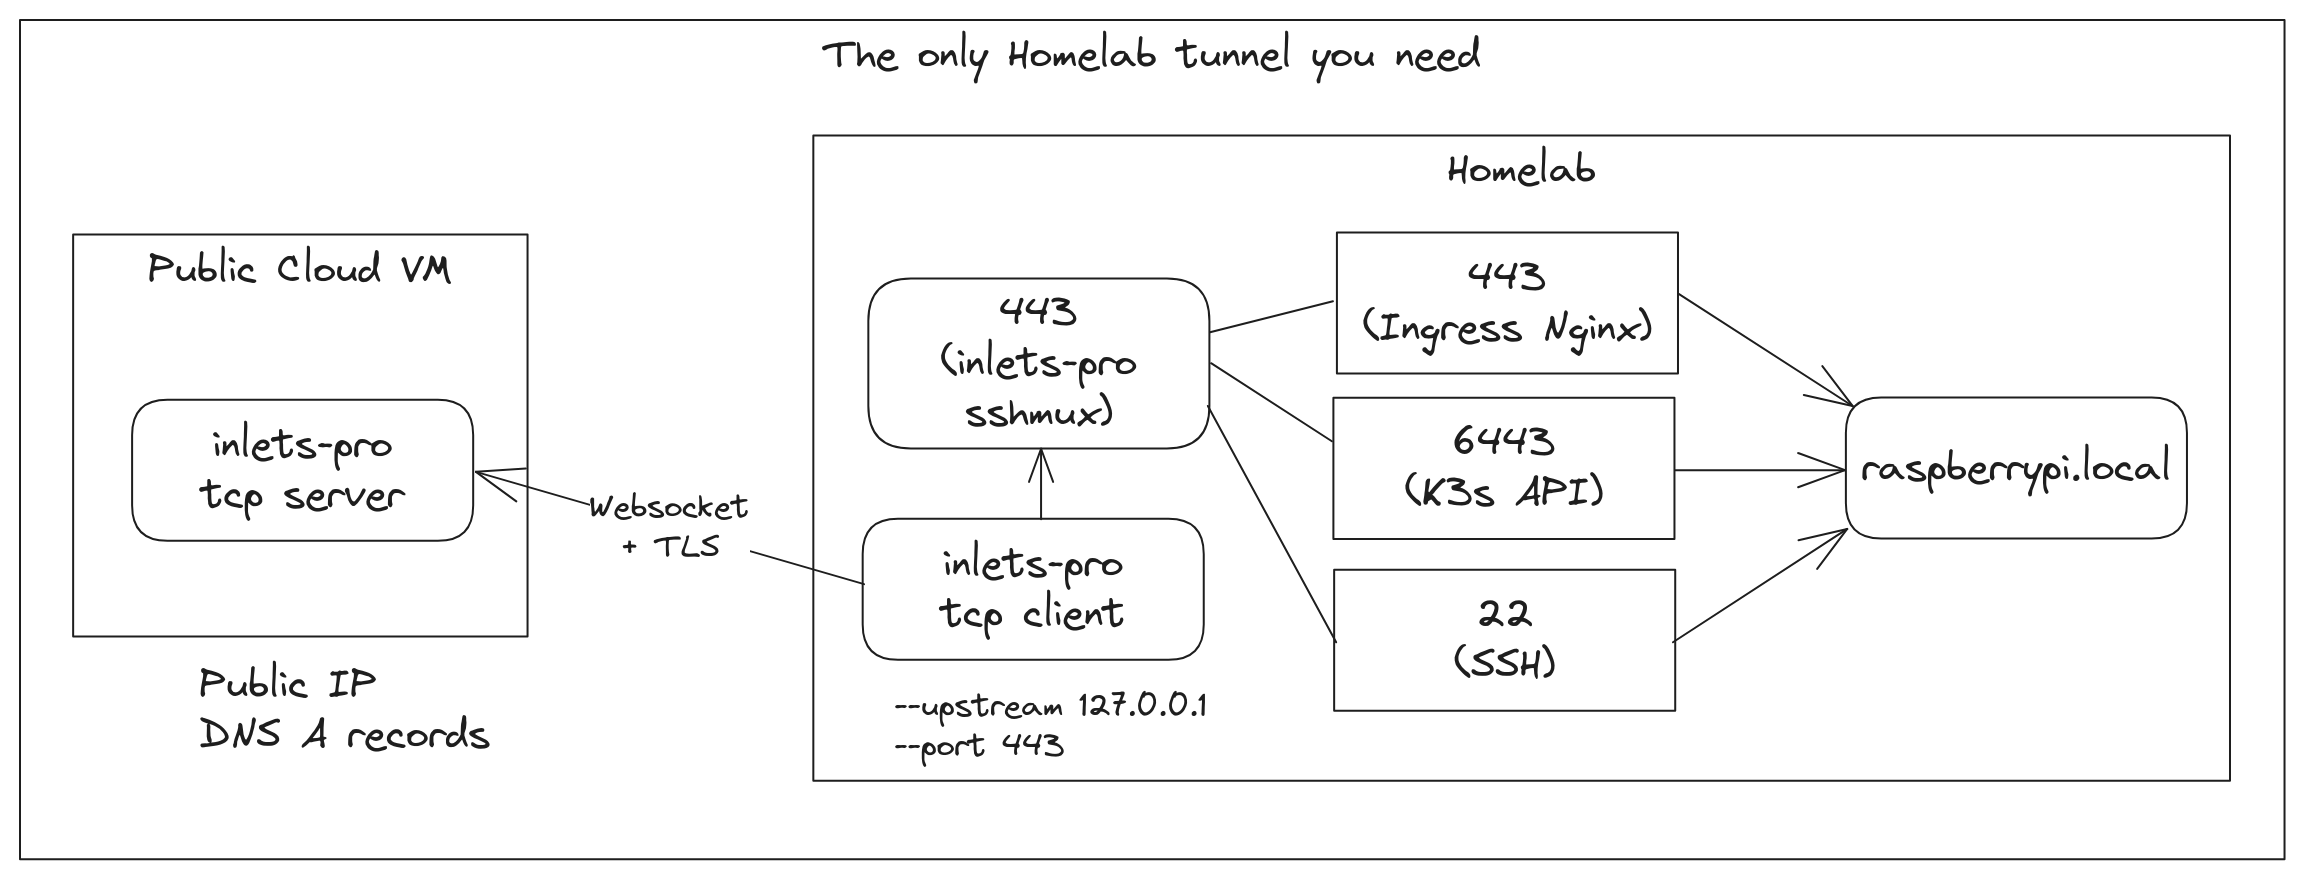
One tunnel is all you need to expose SSH, HTTPS via an IngressController and the Kubernetes API server for kubectl
Well, now you can have everything set up and exposed through a single tunnel. Who would want to do that? Probably someone building or running a Raspberry Pi cluster or a homelab. So if that’s you, read on.
What’s involved:
- Create a TCP tunnel server on a public cloud VM
- Define which servers will be accessed via SSH
- Define which domains will be accessed via HTTPS
- Define which Kubernetes clusters will be accessed via kubectl
- Update your SSH config, kubeconfig and DNS records for the HTTPS domains
- Start the
sshmuxon a computer in your network, and aninlets-pro tcptunnel client
As a bonus, I’ll also include full instructions to get a HTTPS domain for OpenFaaS over the tunnel, so that you have something interesting to test out before moving on to customising the setup for your own applications.
A quick preamble on tunnels vs VPNs
A VPN is a way to bridge networks, usually on a low layer of the OSI model, we’re talking about hosts being able to reach each other over IP, on all ports, with no restrictions. They can be tricky to set up and manage, and require every host to be fully enrolled onto the VPN, every device needs run run the VPN client, usually with elevated privileges to manage TUN/TAP devices.
A network tunnel can be used in a similar way to a VPN, like we do here for SSH and kubectl, but it’s primarily designed for Ingress from the public Internet.
You don’t get Ingress from the public Internet with a VPN, and you do not want it either.
Some VPNs are operated on a SaaS model, which makes them particular intrusive and centrally controlled. Tunnels can also be bought on this basis, but come with stringent rate limits, you have to pay for every domain you want to use, and you’re locked into a single provider. For instance, Ngrok and Cloudflared only have their own Kubernetes Ingress Controllers, with inlets, you can use any IngressController you like including Istio or Caddy.
Your mileage may vary, some people will love self-managed VPNs, some adore “free” SaaS VPNs, others can just about get away with the rate limits and restrictions of a SaaS tunnel.
Inlets is for those of us who want to run their own tunnels, with no rate limits, and no restrictions.
Find out more in the Inlets FAQ.
A single tunnel VM
So let’s create a TCP tunnel VM using our cloud of preference and a region close by. DigitalOcean, AWS and GCE are all quite quick to provision, have a good selection of regions and are relatively cost effective.
I’m going to use DigitalOcean for this example, but you can use any cloud you like.
The inletsctl tool can automate the VM creation and installation of the inlets-pro server for you. But if you like to do things the hard way, there’s also instructions for that.
inletsctl create --provider digitalocean \
  --region lon1 \
  --access-token-file $HOME/do-access-token \
  --tcp \
  lab-tunnel
Notice how I’ve added --tcp to specify that we want to create a TCP tunnel.
Next, we will write a config file that specifies which services we want to expose, it was added recently under the sshmux sub-command, but it can actually mux more than just SSH, including TLS and the Kubernetes API.
Adding access to SSH
Here’s how you can add SSH which directs itself to a raspberrypi.local pn port 22:
# config.yaml
upstreams:
- name: raspberrypi.inlets
  upstream: raspberrypi.local:22
If you have additional hosts like an Intel NUC, you can add it too:
- name: nuc.inlets
  upstream: 192.168.0.100:22
Now edit ~/.ssh/config and add the following:
Host *.inlets
    HostName %h
    Port 443
    ProxyCommand /home/alex/go/bin/inlets-pro sshmux connect EXIT_TUNNEL_IP:%p %h
Change EXIT_TUNNEL_IP to the IP address of the VM created in the first step.
Add access for kubectl
Next, let’s add the Kubernetes API, served on the same host:
- name: k3s.inlets
  upstream: raspberrypi.local:6443
  passthrough: true
If you have multiple clusters, that’s no problem, just add them with different name values. The passthrough: true option is used to indicate that the tunnel should not terminate or unwrap the TLS connection, but instead pass it through to the upstream server.
Now log into your K3s servers, and modify the /etc/systemd/system/k3s.service file.
If you haven’t installed K3s yet, then you can just use k3sup’s install command and pass along the --tls-san flag to get the same effect.
ExecStart=/usr/local/bin/k3s \
    server \
+        '--tls-san' \
+        'k3s.inlets' \
The --tls-san flag is used to add a Subject Alternative Name to the TLS certificate, and it’s used to match the hostname in the config.yaml file, so in this case, it’s going to be k3s.inlets.
Next, edit kubeconfig, and change the local IP address you had such as https://raspberrypi.local:6443 to the tunnel server IP address.
-   server: https://raspberrypi.local:6443
+   server: https://EXIT_SERVER_IP:443
+   tls-server-name: k3s.inlets
  name: rpi
Add access for HTTPS
The following instructions assume a Kubernetes IngressController paired with cert-manager, and one of their supported DNS01 issuers.
Caddy will also work with the approach outlined below using a DNS01 challenge (uses a DNS TXT record) or an TLS-ALPN challenge (only uses port 443). Han from the inlets team has a separate write-up that might be worth checking out if you only want to host HTTPS domains: How to expose multiple domains on a single server with Caddy and inlets.
You could create a separate tunnel VM in HTTPS mode, which can use a HTTP01 challenge (the simplest) to obtain a certificate from Let’s Encrypt.
In order to expose HTTPS through this tunnel, we are limited to HTTPS only, so we’ll need to use cert-manager’s DNS01 challenge. It’s a little bit of a pain the first time you set it up, but then it just works after that.
First, we’ll assume you’ve installed ingress-nginx, Istio, or Traefik within your K3s cluster, that it’s listening on port 443 on each server in the cluster.
Next, for each domain you want to expose, add an entry to the config.yaml file:
- name: openfaas.example.com
  upstream: raspberrypi.local:443
  passthrough: true
- name: grafana.example.com
  upstream: raspberrypi.local:443
  passthrough: true
Create your DNS A records for each domain to point to the tunnel server’s IP address.
So openfaas.example.com and grafana.example.com would both point to the tunnel server’s IP address.
Once you have set up the above, you’ll need to install cert-manager in your cluster and then follow the guide for a DNS01 challenge. DigitalOcean, Cloudflare, Google Cloud DNS and AWS Route53 are all supported and relatively cheap to run.
I said that HTTP01 challenges are the simplest, they work by having a file served on port 80 over insecure HTTP, and then Let’s Encrypt checks for the file and issues a certificate.
In contrast, the DNS01 challenge uses an API key to create a TXT record in your DNS zone, and then cert-manager will check for the record and issue a certificate.
DNS01 challenges can be used to issue individual certificates for each domain, or a single wildcard certificate for all subdomains of a domain. It’s up to you which you prefer. I’d suggest that individual certificates are easier to get started with.
I often use a DNS01 challenge with DigitalOcean, I won’t repeat all the details here because you’ll have your own applications and Helm charts that you want to expose, but if you do need help, there’s a free Discord link you’ll be sent when you sign up for an inlets-pro subscription and you can chat with the community there.
A quick recipe for OpenFaaS
Here’s a quick setup for the OpenFaaS gateway, you could adapt it for anything you need like Grafana, GitLab, or your own charts.
Install the base packages using arkade:
arkade install openfaas
arkade install cert-manager
arkade install ingress-nginx
Create a secret for the DigitalOcean API key:
kubectl create secret generic \
  -n openfaas digitalocean-dns \
  --from-file access-token=$HOME/do-api-token
Then use cert-manager’s “ingress-shim” and a Staging issuer from Let’s Encrypt to get started:
apiVersion: cert-manager.io/v1
kind: Issuer
metadata:
  name: faas-example-com
  namespace: openfaas
spec:
  acme:
    email: webmaster@o6s.io
    preferredChain: ""
    privateKeySecretRef:
      name: faas-letsencrypt-staging
    server: https://acme-staging-v02.api.letsencrypt.org/directory
    solvers:
    - dns01:
        digitalocean:
          tokenSecretRef:
            key: access-token
            name: digitalocean-dns
---
apiVersion: networking.k8s.io/v1
kind: Ingress
metadata:
  annotations:
    cert-manager.io/common-name: faas.example.com
    cert-manager.io/issuer: letsencrypt-staging
  name: faas-example-com
  namespace: openfaas
spec:
  ingressClassName: nginx
  rules:
  - host: faas.example.com
    http:
      paths:
      - backend:
          service:
            name: gateway
            port:
              number: 8080
        path: /
        pathType: ImplementationSpecific
  tls:
  - hosts:
    - faas.example.com
    secretName: faas-letsencrypt-staging
Make sure you create a DNS A record between the domain and the tunnel server’s IP address.
Given that the domain is being served with a staging certificate, you can use faas-cli with --tls-no-verify to bypass the certificate verification.
$ arkade get faas-cli

$ export OPENFAAS_URL=https://faas.example.com

# Populate $PASSWORD via `arkade info openfaas`

$ echo -n $PASSWORD | faas-cli login --tls-no-verify --password-stdin

$ faas-cli store deploy --tls-no-verify figlet

Deployed. 202 Accepted.
URL: https://faas.example.com/function/figlet

$ whoami | faas-cli invoke --tls-no-verify figlet

       _
  __ _| | _____  __
 / _` | |/ _ \ \/ /
| (_| | |  __/>  <
 \__,_|_|\___/_/\_\
Start up the sshmux on a computer in your network
You now need to start the sshmux and have it listen on port 443. This component will act like a router and receive all incoming connections and then send them off to the correct upstream server.
inlets-pro sshmux \
    --port 443 \
    config.yaml
You could also create a simple systemd unit file to run the sshmux and keep it running, monitored, and restarted if you reboot or it crashes for some reason.
When binding to port 443, you may need to run as sudo, or allow the unprivileged user to bind to a low port with setcap.
sudo setcap 'cap_net_bind_service=+ep' /usr/local/bin/inlets-pro
Connect the tunnel client to expose the lab
This is the final part, just run the inlets-pro tcp client and make the upstream 127.0.0.1 exposing port (443) which is where the sshmux is running.
inlets-pro tcp client \
    --url wss://TUNNEL_SERVER_IP:8123 \
    --upstream 127.0.0.1:443 \
    --ports 443 \
    --token TOKEN
The values for TUNNEL_SERVER_IP and TOKEN were given to you when you created the TCP tunnel server.
You can run the tunnel permanently with a systemd unit file, perhaps dig out an old Raspberry Pi with Ethernet and run it there?
Just add --generate systemd to the inlets-pro tcp client command and it will give you a systemd unit file that you can use to run the tunnel client.
Try it all out
Now you can run ssh nuc.inlets or ssh raspberrypi.inlets and you’ll be able to connect to your servers.
You can run kubectl get pods and you’ll be able to see the pods in your K3s cluster, run helm, k9s, or arkade install.
And your HTTPS domains will be ready to be viewed by yourself or your users over the public Internet, being served by a production grade IngressController like Nginx, Traefik or Istio.
IP ACLs
You can further restrict access by using IP Access Control Lists (ACLs) on the tunnel server. This is a feature of inlets-pro and can be used to restrict access to the tunnel server to only your home IP address, or a range of IP addresses.
See also: Restrict your tunnels with IP allow lists
Monitoring
Everyone knows that it’s not really a homelab unless you’re monitoring everything with Grafana.
At any point, you can check the status of the TCP tunnel with:
inlets-pro status \
    --url wss://TUNNEL_SERVER_IP:8123 \
    --token TOKEN
This is what I see for mine:
inlets server status. Version: 0.9.25 - 742af8ab29f9f1278cb2d536ce26e690f9dc6370

Server info:
Hostname:       naughty-lederberg9
Process uptime: 1 day ago
Mode:           tcp
Version:        0.9.27-9-gcded3b9 cded3b9720f44c4f46220f934987722084d7e657

Connected clients:
Client ID                        Remote Address       Connected  Upstreams
bdc9ba67ba0d49c2b7f12635a3d9600c 140.121.227.39:48012 28 seconds 127.0.0.1:443
Then you can find connected tunnels, throughput and various other metrics using the monitoring page.
TCP tunnels are agnostic, and look at L4 data, but a HTTPS tunnel runs at L7 and would provide more detailed metrics like Rate, Error & Duration (RED) of individual HTTP requests served over a tunnel.
Wrapping up
You now have a single tunnel server that can expose multiple HTTPS domains to your Kubernetes IngressController, SSH to any host you like, and even the Kubernetes API so that you can manage the cluster with kubectl from the coffee shop, a mobile hotspot, KubeCon Paris, or just about anywhere you like.
We also took a look at a sample application with OpenFaaS, so that if you had nothing to hand, you could test each part. But it’s absolutely fine if you’re not a Kubernetes user, and just want to use sshmux for SSH on its own. That’s what we covered in the previous post: Introducing sshmux - connect to any of your private servers with a single tunnel VM
What if you just want a HTTPS tunnel as quick as possible?
Did you think that setting up a DNS01 challenge with cert-manager and Kubernetes was too hard? If you’re just looking to expose a simple HTTPS tunnel, with automated Let’s Encrypt, then follow this tutorial: Automate a HTTP tunnel server.
You just create a tunnel server telling it which domains to get certificates for, and then connect your client.
Subscribe for updates and new content from OpenFaaS Ltd.
By providing your email, you agree to receive marketing emails.