SSH Into Any Private Host With Inlets Cloud

Alex Ellis
When you’re away from home it’s not only convenient, but often necessary to connect back to your machines. This could be to connect to a remote VSCode instance, run a backup, check on a process, or to debug a problem. SSH can also be used to port-forward services, or to copy files with scp or rsync.
In this post I’ll show you how to use inlets cloud to get SSH access to any host on your network without needing a VPN, and without having to host a tunnel server. You’ll be able to expose one or more machines over a single tunnel, using DNS names to route traffic.
What is inlets cloud?
inlets cloud is a SaaS hosted version of inlets-pro servers, and it makes for a convenient way to share local webservices, APIs, and endpoints like a blog, database server, Ollama endpoint, or a Kubernetes cluster. The client for inlets cloud uses TCP passthrough, so when your service uses SSH or TLS, there’s no way for our infrastructure to decrypt the traffic.
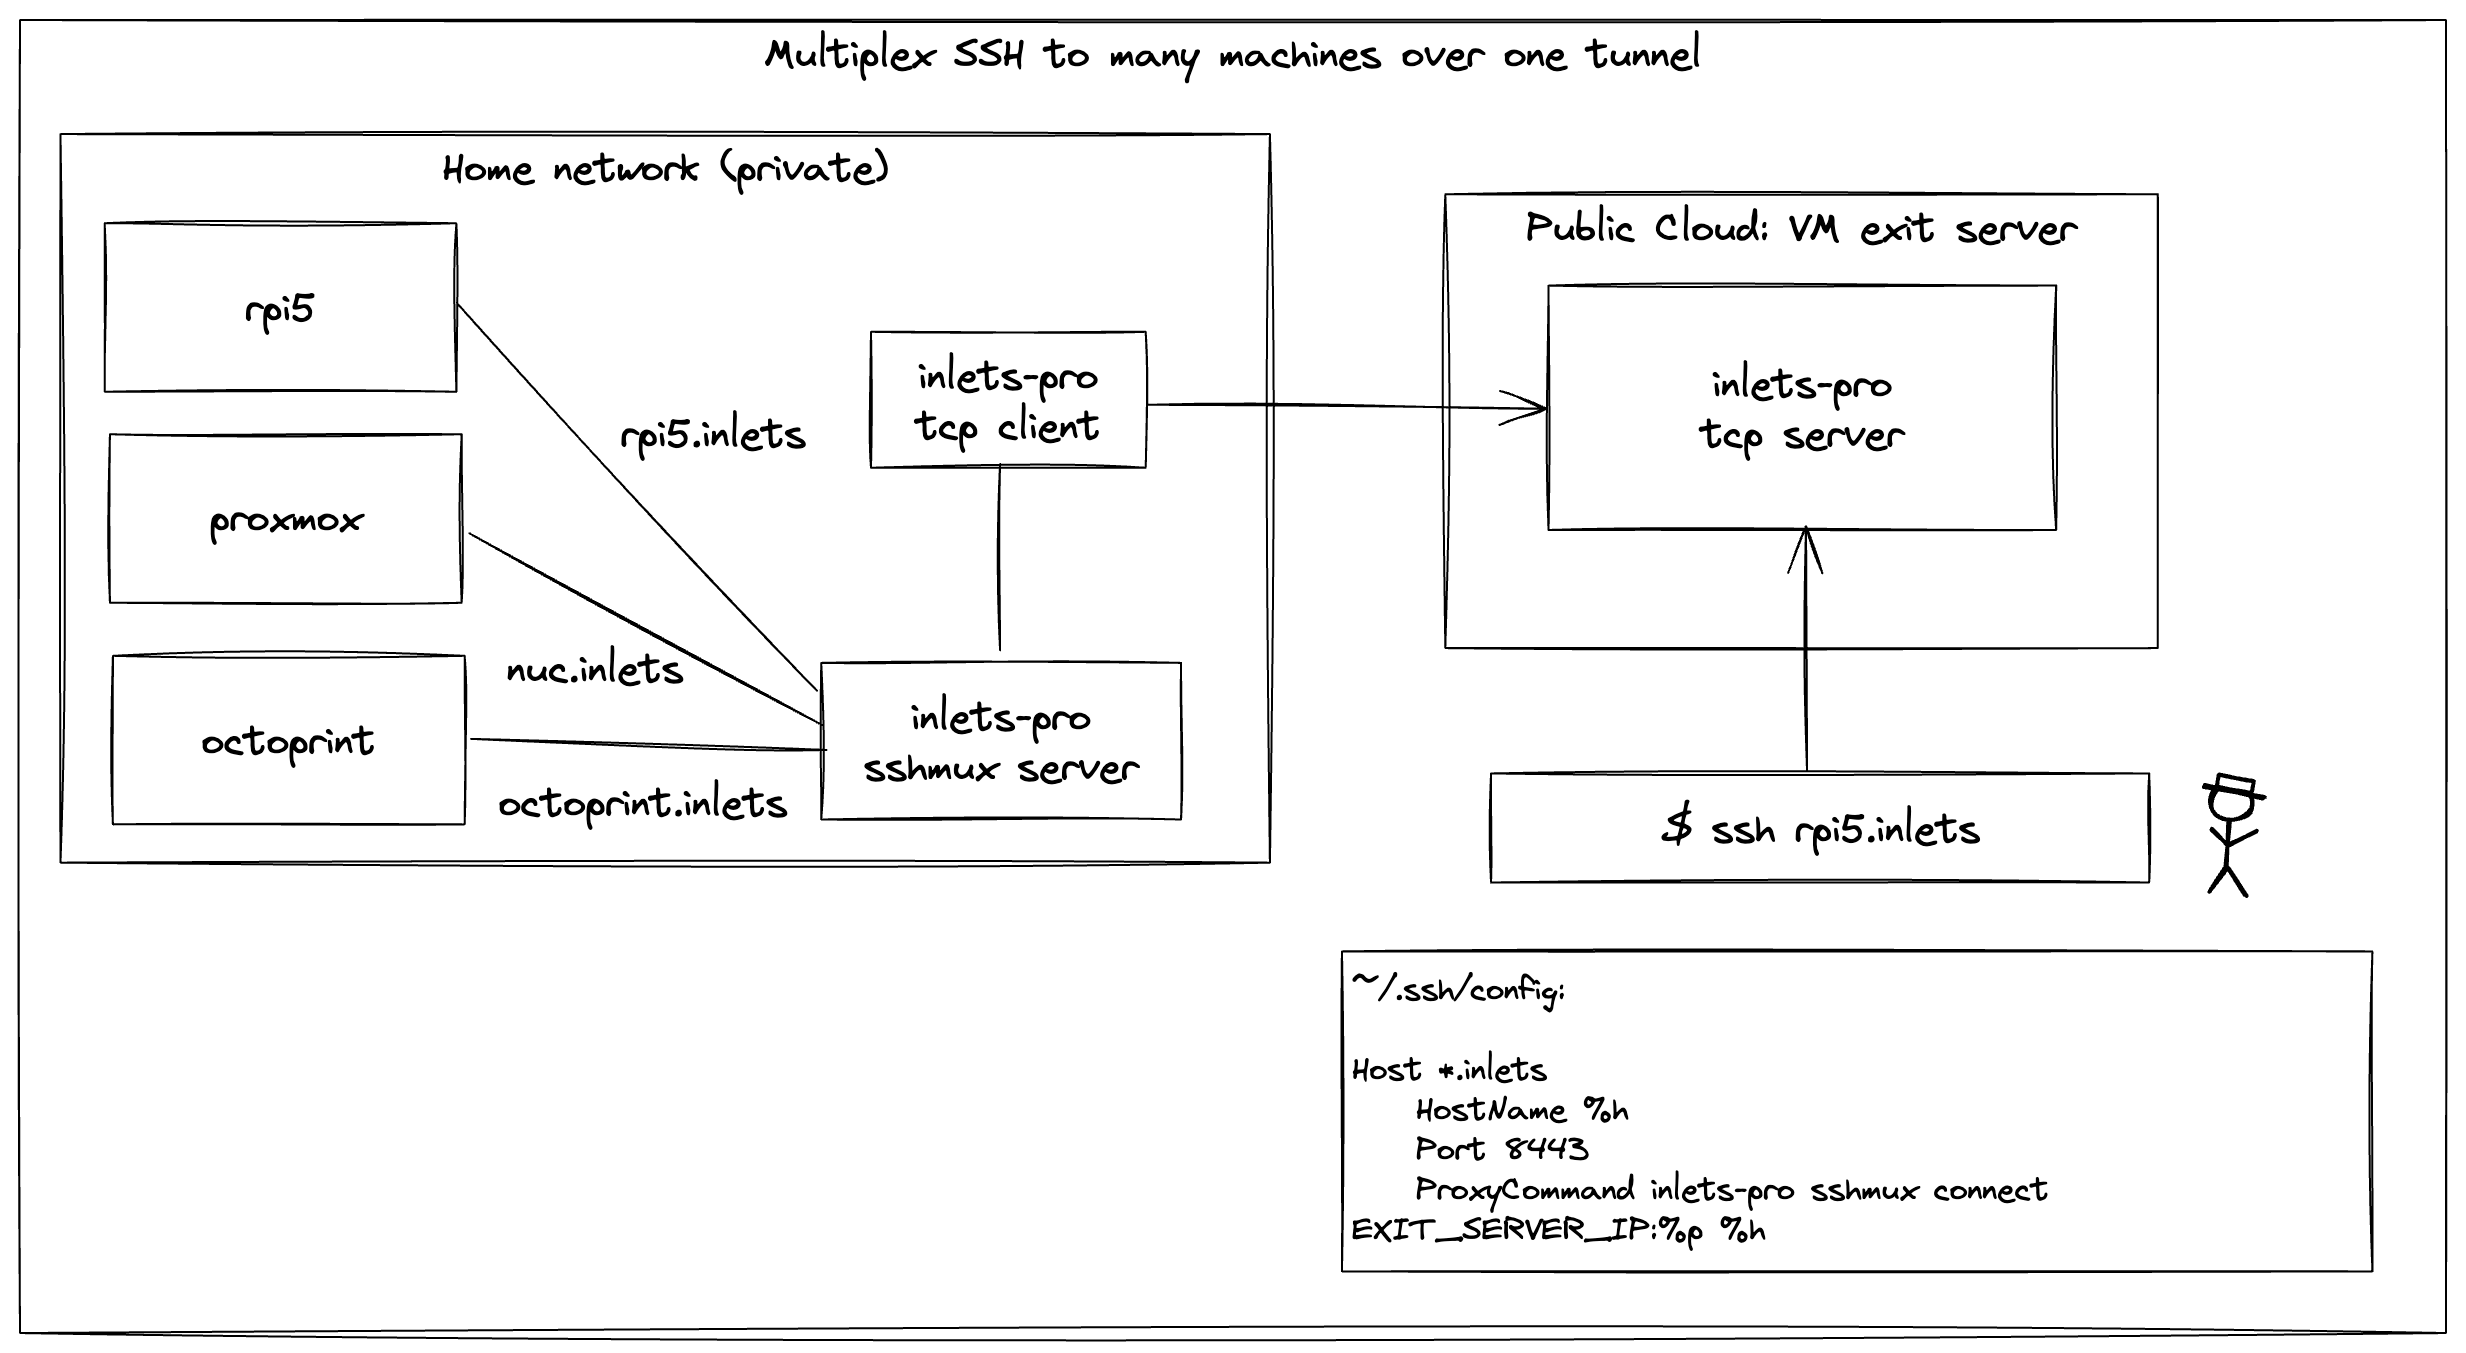
You can already use a self-hosted tunnel server to expose SSH for a single host, or for many with sshmux:
But in this tutorial, we’re going to do it with inlets-cloud, without having to host, maintain or even consider any infrastructure. There are two regions for the beta - the EU and USA.
Traditionally, SSH had to be exposed on a public IP address using port-forwarding rules, or a random TCP port using a SaaS tunnel, or perhaps using a complex SaaS VPN solution.
SSH is a simple technology that is designed to be exposed to the public Internet, the main issue is that it’s hard to multiplex multiple hosts over a single port.
We built sshmux into inlets to solve this problem, and now you can use it with inlets-cloud.
The diagram below shows sshmux with a self-hosted tunnel server, but in this tutorial, we’ll be using inlets-cloud to provide the hosting instead.

sshmux is a simple way to expose multiple SSH backends over a single port, using a DNS name to route traffic. Just create a wildcard domain entry, or add one entry per host, and then configure sshmux to direct traffic accordingly.
You will of course need to follow the general security advise on hardening SSH, which is easy to find on the Internet, or via a brief chat with ChatGPT.
Prerequisites
- You’ll need a domain name, and the ability to create CNAME or A records, you’ll create one entry per host that you want to access.
- OpenSSH set up on one or more machines in your private network, follow the usual security precautions like disabling Root access and Password authentication
- An inlets cloud account, you can sign up for free at cloud.inlets.dev
Install the inlets-pro client
Since the inlets-pro tunnel server will be hosted for us, we only need to download the inlets-pro client.
If you haven’t already, install the inlets-pro client:
curl -sLSf https://get.arkade.dev | sudo sh

arkade get inlets-pro
Alternatively, download the binary from the inlets-pro releases page.
Create a tunnel on inlets-cloud
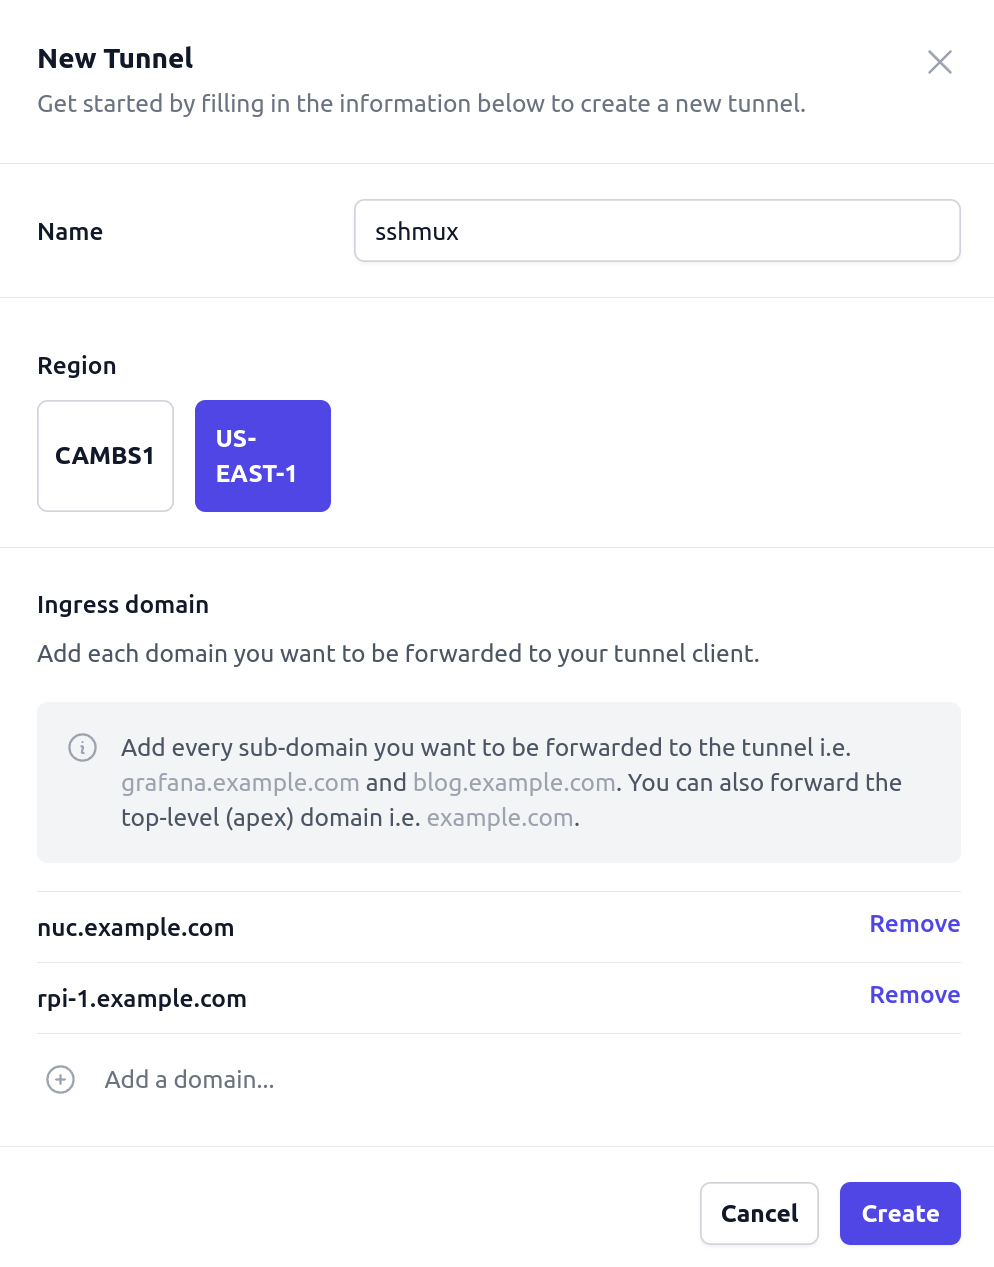
Create a new tunnel, the name is not important, but the list of sub-domains is, this is where you add one entry for each host you want to access.
You can add more after creating the tunnel, so feel free to start with one, if that’s easier.

Create any CNAME entries in your DNS provider as directed, and verify the top-level domain with a TXT record.
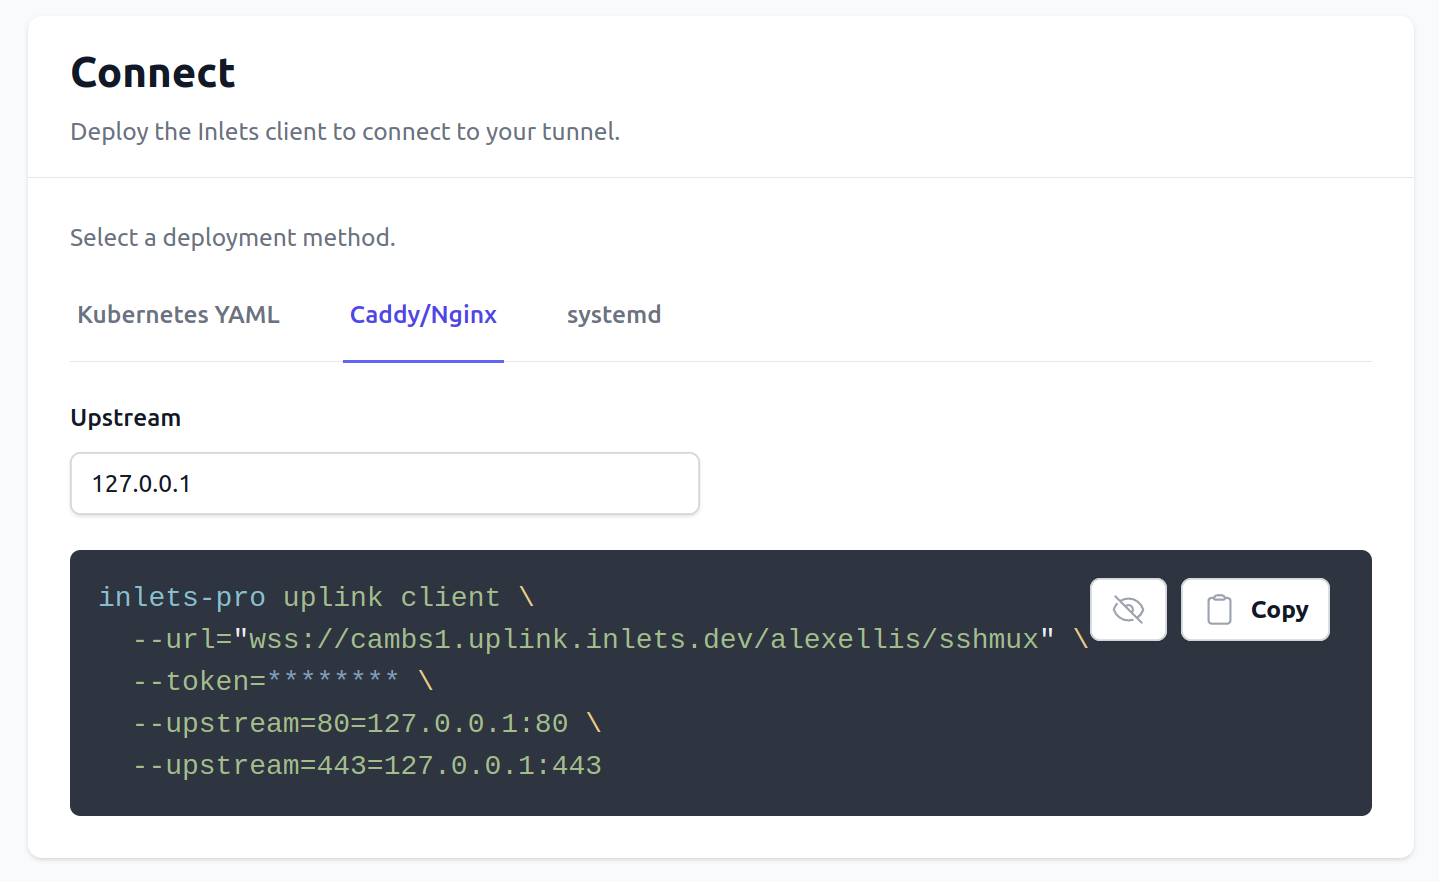
Then navigate back to the tunnel details page, and copy the text under “Caddy/Nginx”:

We want to adjust it slightly, so that we can use it with sshmux instead of Nginx or Caddy. We’ll be directing in SSH traffic, not TLS traffic for webservers.
inlets-pro uplink client \
  --url="wss://cambs1.uplink.inlets.dev/alexellis/sshmux" \
  --token=******** \
-  --upstream=80=127.0.0.1:80 \
+  --upstream=443=127.0.0.1:8443
We remap any incoming requests to the hosted server on port 443, to port 8443, which is the default port for sshmux.
Run the command to start the tunnel, when connected, you’ll see the text: “Connection established”.
Start sshmmux
sshmux is an SSH multiplexer that can expose multiple SSH backends over a single port, using a DNS name to route traffic.
Typically, other solutions will require you to use a different port for each host, and then you have to memorise random numbers, or resort to clever SaaS-based VPNs.
Create a config.yaml file:
upstreams:
  - name: nuc.example.com
    upstream: 192.168.0.200:22
  - name: nas.example.com
    upstream: 10.0.0.2:2222
Then start sshmux:
inlets-pro sshmux server \
    --port 8443 \
    config.yaml
Now switch to a machine you’ll use to connect to the SSH services. This can be the same host for the sake of testing, but would probably be your laptop.
SSH does not support using a SNI header, or a TLS hostname, so we use sshmux to wrap the traffic with this header.
You can use the openssl tool for this, or our convenience command inlets-pro sshmux connect.
Edit .ssh/config:
Host *.example.com
    HostName %h
    Port 443
    ProxyCommand inlets-pro sshmux connect cambs1.uplink.inlets.dev:%p %h
The text cambs1.uplink.inlets.dev is the DNS entry you used for the CNAMES in the previous step, so if you’re using a different region, use that value here instead.
All this does is to tell SSH to use the inlets-pro sshmux connect command to connect to the remote host, and to pass the hostname and port number to the command.
Connect to one of your hosts
Now you can connect to one of your hosts:
ssh nuc.example.com
You can also use the -L flag to forward ports or services running on the remote host to your local machine.
For instance, if you were running a Node.js application on port 3000 on the remote host, you could forward it to your local machine like this:
ssh -L 3000:127.0.0.1:3000 nuc.example.com
If you have a Kubernetes cluster on the remote machine, you can port-forward services from it to your local machine, whilst on a different network. For instance, if the remote cluster is running OpenFaaS CE, and you wanted to access its Prometheus dashboard, you could do this:
ssh -L 9090:127.0.0.1:9090 nuc.example.com
# kubectl port-forward -n openfaas svc/prometheus 9090:9090
Then open a browser to http://localhost:9090 to access the Prometheus dashboard.
You can specify multiple hosts and ports, i.e. for both Prometheus and the OpenFaaS gateway:
ssh -L 9090:127.0.0.1:9090 \
    -L 8080:127.0.0.1:8080 \
    nuc.example.com
# kubectl port-forward -n openfaas svc/prometheus 9090:9090 &
# kubectl port-forward -n openfaas svc/gateway 8080:8080 &
Of course you can also copy files with scp or use rsync over the SSH connection.
Copy a single remote file to your host:
scp nuc.example.com:~/debug.log .
Rsync the code for k3sup, that you’re hacking on to the remote computer:
rsync -av -r -e "ssh" ~/go/src/github.com/alexellis/k3sup .
The port override for 443 is not necessary since the .ssh/config file will handle this, but you can explicitly add the flag if you want. ssh uses -p and scp uses -P.
Conclusion
You’ve now got a secure way to access any host on your network, without needing to host a tunnel server, or to set up a VPN. This is a great way to access your home network, or to provide support to friends and family.
Adding extra hosts
Any time you want to add or remove a host, you can do so via the inlets-cloud dashboard, by navigating to the “Tunnels” page and editing the list of domains. Then make sure you have an entry in your sshmux config file, and restart it with the new configuration.
Access is completely private, there is no way to decrypt the SSH traffic, and it gets passed directly on to your own machine inside your local network.
IP filtering/allow list
For taking things further, sshmux also supports an IP allow list, which is available for inlets-cloud and self-hosted tunnels.
If the IP for your mobile hotspot was 35.202.222.154, you could write the following to restrict access to nuc.example.com to only yourself:
upstreams:
  - name: nuc.example.com
    upstream: 192.168.0.120:22
    allowed:
    - 35.202.222.154
Then just add a --proxy-protocol argument to the inlets-pro sshmux command before restarting the command. You can use v1 or v2 as the argument, just make sure it is the same as the one you selected for the tunnel server.
Watch a video walk-through of this tutorial:
Subscribe for updates and new content from OpenFaaS Ltd.
By providing your email, you agree to receive marketing emails.