How we scaled inlets to thousands of tunnels with Kubernetes

Johan Siebens
Learn how to run and manage hundreds and thousands of secure inlets tunnels on a single Kubernetes cluster with the ability to scale for more.
Introduction
In a previous blog post, How to monitor multi-cloud Kubernetes with Prometheus and Grafana, we demonstrated how we could use the inlets Pro Helm Charts to bring multiple Prometheus instances into a single remote Kubernetes cluster, giving us a single plane of glass for monitoring all of them. The Helm Charts proved to be very useful for setting up both the server part as the client part of an inlets tunnel. In the use case explained, we only tunnelled a couple of services, though.
What if we want to bring a lot of services or applications into the cluster? For example, a large organisation that has one cluster per tenant instead of a shared cluster. Or a service provider offering a SaaS or IoT solution, where all the customers connect their devices to a central management pane with an inlets Pro tunnel.
Are the Helm Charts able to assist is us? What do you need to know to scale to hundreds and thousands of inlets tunnels?
We’ll first review how we set up inlets Pro servers in Pods to enable multi-cluster. Then we’ll show you how you can add hundreds of tunnels through automation. To conclude, we’ll introduce you to inlets-cloud, a self-hosted system for managing thousands of tunnels through REST or kubectl.
Reviewing the multi-cluster use-case
First, let’s recap what we did in the previous post to run multiple inlets Pro server processes on a single Kubernetes cluster.
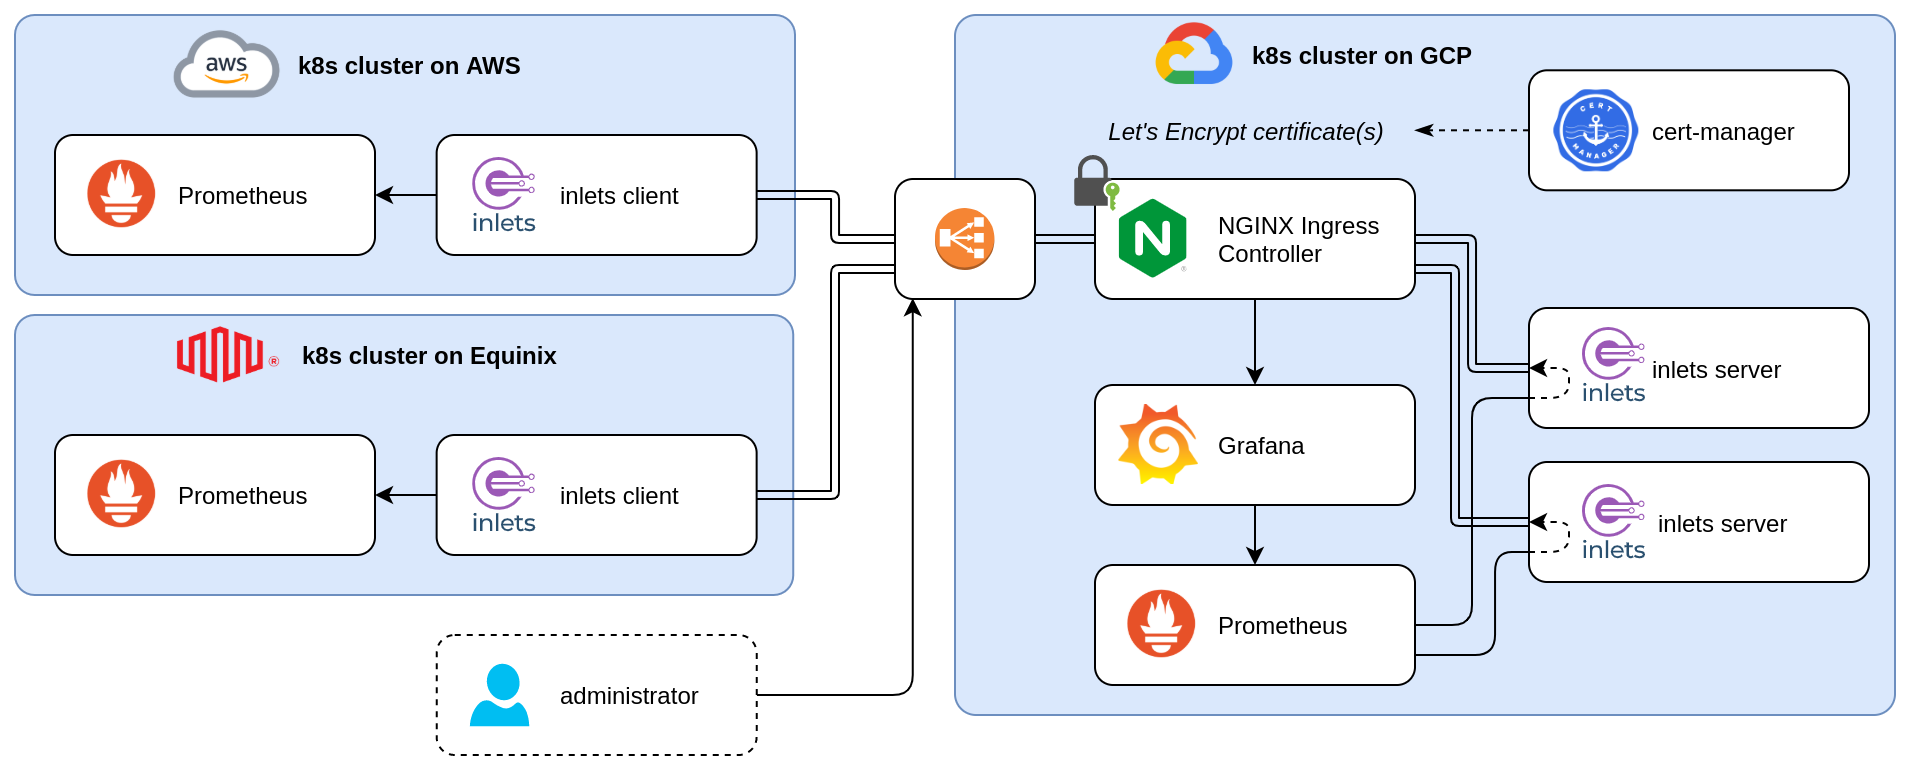
Kubernetes multi-cluster monitoring with Prometheus, nginx ingress controller, cert-manager and inlets Pro
By using the Helm chart, an inlets Pro exit server is created for each tunnel. Those tunnels’ control planes are securely exposed using an ingress and a Let’s Encrypt certificate created by cert-manager. Besides that, the data plane is only available from within the Kubernetes cluster.
With this setup, every time we add another tunnel, cert-manager will create a new certificate with Let’s Encrypt for the specific subdomain. For a couple of services, that’s ok, but if we want to scale to hundreds and thousands of tunnels, perhaps this can become an issue because of Let’s Encrypt’s rate limits.
Because all our tunnels will be using the same domain, a wildcard certificate can help us here. If you have already such a certificate available, we can put that in place and otherwise, we can let cert-manager issue a wildcard certificate with the proper DNS01 Challenge Provider.
If you want to know more about the differences between HTTP01 and DNS01 challenges, have a closer look here and here
Next, I’ll explain what pieces of the puzzle need to be adapted when using the Helm Charts to scale to hundreds and thousands of inlets tunnels.
Pre-requisites
- Some Kubernetes clusters running in different locations, e.g. on a public cloud (e.g. GKE, AKS, EKS, DOKS, …) or on a Raspberry Pi in a private home-lab
kubectl, configured to connect to the clusterkubectx, optionally, but useful to manage the different clusterarkade- portable Kubernetes marketplace- A domain and access to your DNS admin panel to create a sub-domain
Preparing the cluster
Install the nginx ingress controller and cert-manager with arkade:
arkade install ingress-nginx --namespace ingress-nginx
arkade install cert-manager --namespace cert-manager
It can take some time until the nginx pods and loadbalancer is ready, but when everything is available, add the DNS records to connect your domain. Because we will create multiple tunnel for different applications, the easiest way to go forward is to configure a wildcard DNS record (e.g. *.inlets.example.com). If you don’t like wildcard records, create a record for each application pointing to the same public IP address (e.g. grafana.inlets.example.com, keycloak.inlets.example.com, …).
Next, create an Issuer, or ClusterIssuer, to use Amazon Route53 to solve DNS01 ACME challenges.
A detailed explanation on how to prepare the issuer can be found here
export EMAIL="you@example.com"
export ACCESS_KEY_ID="AKIAIOSFODNN7EXAMPLE"
export REGION="eu-central-1"

cat > issuer.yaml <<EOF
apiVersion: cert-manager.io/v1
kind: Issuer
metadata:
  name: letsencrypt-prod
spec:
  acme:
    server: https://acme-v02.api.letsencrypt.org/directory
    email: $EMAIL
    privateKeySecretRef:
      name: letsencrypt-prod
    solvers:
    - dns01:
        route53:
          region: $REGION
          accessKeyID: $ACCESS_KEY_ID
          secretAccessKeySecretRef:
            name: prod-route53-credentials-secret
            key: secret-access-key
EOF
Apply the file with kubectl apply -f issuer.yaml
Finally, create a wildcard Certificate resource with a reference the issuer created earlier:
export DOMAIN=inlets.example.com

cat > certificate.yaml <<EOF
apiVersion: cert-manager.io/v1
kind: Certificate
metadata:
  name: inlets-tls
spec:
  secretName: inlets-tls
  issuerRef:
    name: letsencrypt-prod
    kind: Issuer
  commonName: '*.$DOMAIN'
  dnsNames:
  - '*.$DOMAIN'
EOF
Apply the file with kubectl apply -f certificate.yaml, wait a few minutes until cert-manager obtained a certificate and it is ready to use.
$ kubectl get certificate inlets-tls -o wide
NAME         READY   SECRET       ISSUER             STATUS                                          AGE
inlets-tls   True    inlets-tls   letsencrypt-prod   Certificate is up to date and has not expired   14m
Now everything is ready to create a first tunnel.
Creating the first exit-node
Before we start our first tunnel, we need to know what variables or values of the Helm chart we have to configure.
At the moment of writing, the Helm chart will have to following properties by default:
- the default data plane port is set to 9090
As not all applications are listening on port 9090, this has to be changed to the correct port.
- the inlets token is read from the secret named
inlets-pro-secret
Here we can take two different approaches; either we create a single token that every tunnel will use, or we create a different token for each tunnel which will improve security as the same token should not need to be shared. For this tutorial, we chose the latter.
- the ingress has cert-manager annotation to create a certificate automaticly with the HTTP01 challenge solver
- the certifcate is available in a secret with a name like
<domain>-tls-secret
Because we have already a wildcard certificate available, we need to overwrite those settings as well. Otherwise cert-manager will still issue a certificate for the particular subdomain.
Let’s say the first tunnel we would like to create is for making our on premise Keycloak available from anywhere.
Get the inlets-pro helm chart, generate a token for the inlets server and install the chart for the Keycload service:
helm repo add inlets-pro https://inlets.github.io/inlets-pro/charts/
helm repo update

kubectl create secret generic inlets-keycloak-token \
  --from-literal token=$(head -c 16 /dev/random | shasum|cut -d" " -f1)

helm upgrade --install keycloak inlets-pro/inlets-tcp-server \
  --set tokenSecretName=inlets-keycloak-token \
  --set ingress.annotations=null \
  --set ingress.secretName=inlets-tls \
  --set ingress.domain=keycloak-tunnel.inlets.example.com \
  --set dataPlane.ports[0].port=8080 \
  --set dataPlane.ports[0].targetPort=8080
What is the result of installing this chart:
- a Pod with the inlets Pro server is running
- a Control Plane service of type ClusterIP is created, exposing port 8123
- an Ingress is created with the wildcard certificate, making the Control Plane service available in a secure manner
- a Data Plane service of type ClusterIP is created, exposing port 8080
This means that a inlets Pro client can connect to the Control Plane using the proper domain name, e.g. wss://keycloak-tunnel.inlets.example.com, and can punch out port 8080, making it accessible from only within this cluster, because of type ClusterIP.
Scaling inlets Pro tunnels with the Helm chart
Now that we have created a first tunnel, it is time to add all the other required tunnel. As demonstrated, the Helm chart is more convenient than creating and managing individual virtual machines to get everything up and running and can be installed many times to create different tunnels. Every time an exit-node is created, the control-plane is available on a specific subdomain, allowing you to connect hundreds and thousands of services.
Put all the command above in a single script and name it create-exit-server.sh:
#!/bin/bash

NAME=$1
PORT=$2

kubectl create secret generic inlets-$NAME-token \
  --from-literal token=$(head -c 16 /dev/random | shasum|cut -d" " -f1)

helm upgrade --install $NAME inlets-pro/inlets-tcp-server \
  --set tokenSecretName=inlets-$NAME-token \
  --set ingress.annotations=null \
  --set ingress.secretName=inlets-tls \
  --set ingress.domain=$NAME-tunnel.inlets.example.com \
  --set dataPlane.ports[0].port=$PORT \
  --set dataPlane.ports[0].targetPort=$PORT
This little script is very convinient to add other tunnels in an easy way, some examples:
./create-exit-server.sh grafana 3000
./create-exit-server.sh prometheus 9090
./create-exit-server.sh jenkins 8080
./create-exit-server.sh jekyll 4000
As a result, all the tunnels are ready to use:
$ kubectl get pods,service,ingress
NAME                                         READY   STATUS    RESTARTS   AGE
pod/grafana-inlets-pro-787d6dc495-68s2h      1/1     Running   0          7m55s
pod/jekyll-inlets-pro-cf78f8d78-xgds7        1/1     Running   0          42s
pod/jenkins-inlets-pro-7c4776d84-m5kx2       1/1     Running   0          7m44s
pod/keycloak-inlets-pro-7d85cb8854-kkbsj     1/1     Running   0          11m
pod/prometheus-inlets-pro-69979fc846-jzrph   1/1     Running   0          9m17s

NAME                                          TYPE        CLUSTER-IP       EXTERNAL-IP   PORT(S)    AGE
service/grafana-inlets-pro-control-plane      ClusterIP   10.245.133.7     <none>        8123/TCP   7m55s
service/grafana-inlets-pro-data-plane         ClusterIP   10.245.201.236   <none>        3000/TCP   7m55s
service/jekyll-inlets-pro-control-plane       ClusterIP   10.245.7.115     <none>        8123/TCP   42s
service/jekyll-inlets-pro-data-plane          ClusterIP   10.245.18.240    <none>        4000/TCP   42s
service/jenkins-inlets-pro-control-plane      ClusterIP   10.245.36.230    <none>        8123/TCP   7m44s
service/jenkins-inlets-pro-data-plane         ClusterIP   10.245.183.200   <none>        8080/TCP   7m44s
service/keycloak-inlets-pro-control-plane     ClusterIP   10.245.86.171    <none>        8123/TCP   11m
service/keycloak-inlets-pro-data-plane        ClusterIP   10.245.199.249   <none>        8080/TCP   11m
service/kubernetes                            ClusterIP   10.245.0.1       <none>        443/TCP    4d23h
service/prometheus-inlets-pro-control-plane   ClusterIP   10.245.13.47     <none>        8123/TCP   9m17s
service/prometheus-inlets-pro-data-plane      ClusterIP   10.245.185.148   <none>        9090/TCP   9m17s

NAME                                              CLASS    HOSTS                                  ADDRESS           PORTS     AGE
ingress.networking.k8s.io/grafana-inlets-pro      <none>   grafana-tunnel.inlets.example.com      178.128.139.153   80, 443   7m55s
ingress.networking.k8s.io/jekyll-inlets-pro       <none>   jekyll-tunnel.inlets.example.com       178.128.139.153   80, 443   42s
ingress.networking.k8s.io/jenkins-inlets-pro      <none>   jenkins-tunnel.inlets.example.com      178.128.139.153   80, 443   7m44s
ingress.networking.k8s.io/keycloak-inlets-pro     <none>   keycloak-tunnel.inlets.example.com     178.128.139.153   80, 443   11m
ingress.networking.k8s.io/prometheus-inlets-pro   <none>   prometheus-tunnel.inlets.example.com   178.128.139.153   80, 443   9m17s
Have a look at the created services, every control plane is listening on port 8123 and every data plane has the custom port in use.
Want more tunnels?! Put it in a good ol’
bashfor-loop, and before you know it, you have hundreds of tunnels available, all with their own authentication token.#!/bin/bash for i in {1..50} do n=`printf %03d $i` ./create-exit-server.sh "app-$n" 8080 & done wait
Connecting the client
Now that the server part of the tunnel is ready, connect a client to bring an application into the remote cluster.
First, grab the token of the target tunnel:
export TOKEN=$(kubectl get secrets inlets-keycloak-token --template={{.data.token}} | base64 -d)
echo $TOKEN > $HOME/.inlets/token
Now connect your inlets client to the inlets server:
--url: the secure websocket url--auto-tls=false: don’t get the certificate from the control plane, a valid Let’s Encrypt certificate is in use--upstreamand--port: the target host and port--license-file: a valid inlets Pro license
inlets-pro tcp client \
  --url wss://keycloak-tunnel.inlets.example.com \
  --auto-tls=false \
  --upstream=localhost \
  --port=8080 \
  --token-from=$HOME/.inlets/token \
  --license-file=$HOME/.inlets/license
The command above will start the client in the foreground, which is great to test if everything is working correctly, but you probably want the client to run as a service. Luckily, the inlets-pro CLI has a command to generate a systemd service file for us:
inlets-pro tcp client \
  --url wss://keycloak-tunnel.inlets.example.com \
  --auto-tls=false \
  --upstream=localhost \
  --port=8080 \
  --token-from=$HOME/.inlets/token \
  --license-file=$HOME/.inlets/license \
  --generate systemd > /etc/systemd/system/inlets.service

systemctl enable inlets
systemctl start inlets
If your services are running in a Kubernetes cluster, you can always use the client Helm chart to create the client side of the tunnel.
Exposing the data plane
By default, the data plane is only reachable from within the Kubernetes cluster. This could be enough for many use case like the Prometheus monitoring setup, or when you’re building a SaaS platform and you want your client to make a service on-premise available in your platform.
But what if you want to expose this application to the outside world as well? What options do we have?
You could change the service type of the data plane to a LoadBalancer, but this will create extra cloud resources for each tunnel you want to expose. Not only will it create extra costs, but there are also limits in place when creating hundreds or thousands of such load balancer.
In the current set up, nginx ingress controller and cert-manager is already installed, so if the application is HTTP based, like Keycloak, Wordpress or Jenkins, an extra ingress could expose the service to the public. E.g:
apiVersion: networking.k8s.io/v1
kind: Ingress
metadata:
  name: keycloak-data-plane
spec:
  rules:
  - host: keycloak.inlets.example.com
    http:
      paths:
      - backend:
          service:
            name: keycloak-inlets-pro-data-plane
            port:
              number: 8080
        path: /
  tls:
  - hosts:
    - keycloak.inlets.example.com
    secretName: inlets-tls
Wrapping up
In this post we started by creating a single inlets Pro exit server in a Kubernetes cluster with the Helm chart, but instead of using the default ingress and cert-manager configuration we issued a wildcard certificate to support multiple tunnels. We created a first tunnel with a little utility script, making it easy to configure some settings like the data plane port and the authentication token. Next, we used the same script to add more and more tunnels.
The aim of the post was to show you how you can scale to 10 or 100 tunnels with relative ease using existing tools like the Helm chart for inlets Pro. You could even install these Helm Charts using a tool like ArgoCD or Flux, and use a GitOps approach to management.
But what if you wanted to scale to thousands of tunnels? In the post Advanced Cloud Pattern with inlets, Alex introduced inlets-cloud, which allows users to manage tunnels programatically through kubectl using a CRD, or through a REST API. inlets-cloud makes management easier than using Helm, especially at scale, and allows your team to run their own secure tunnel capability for multiple clients.
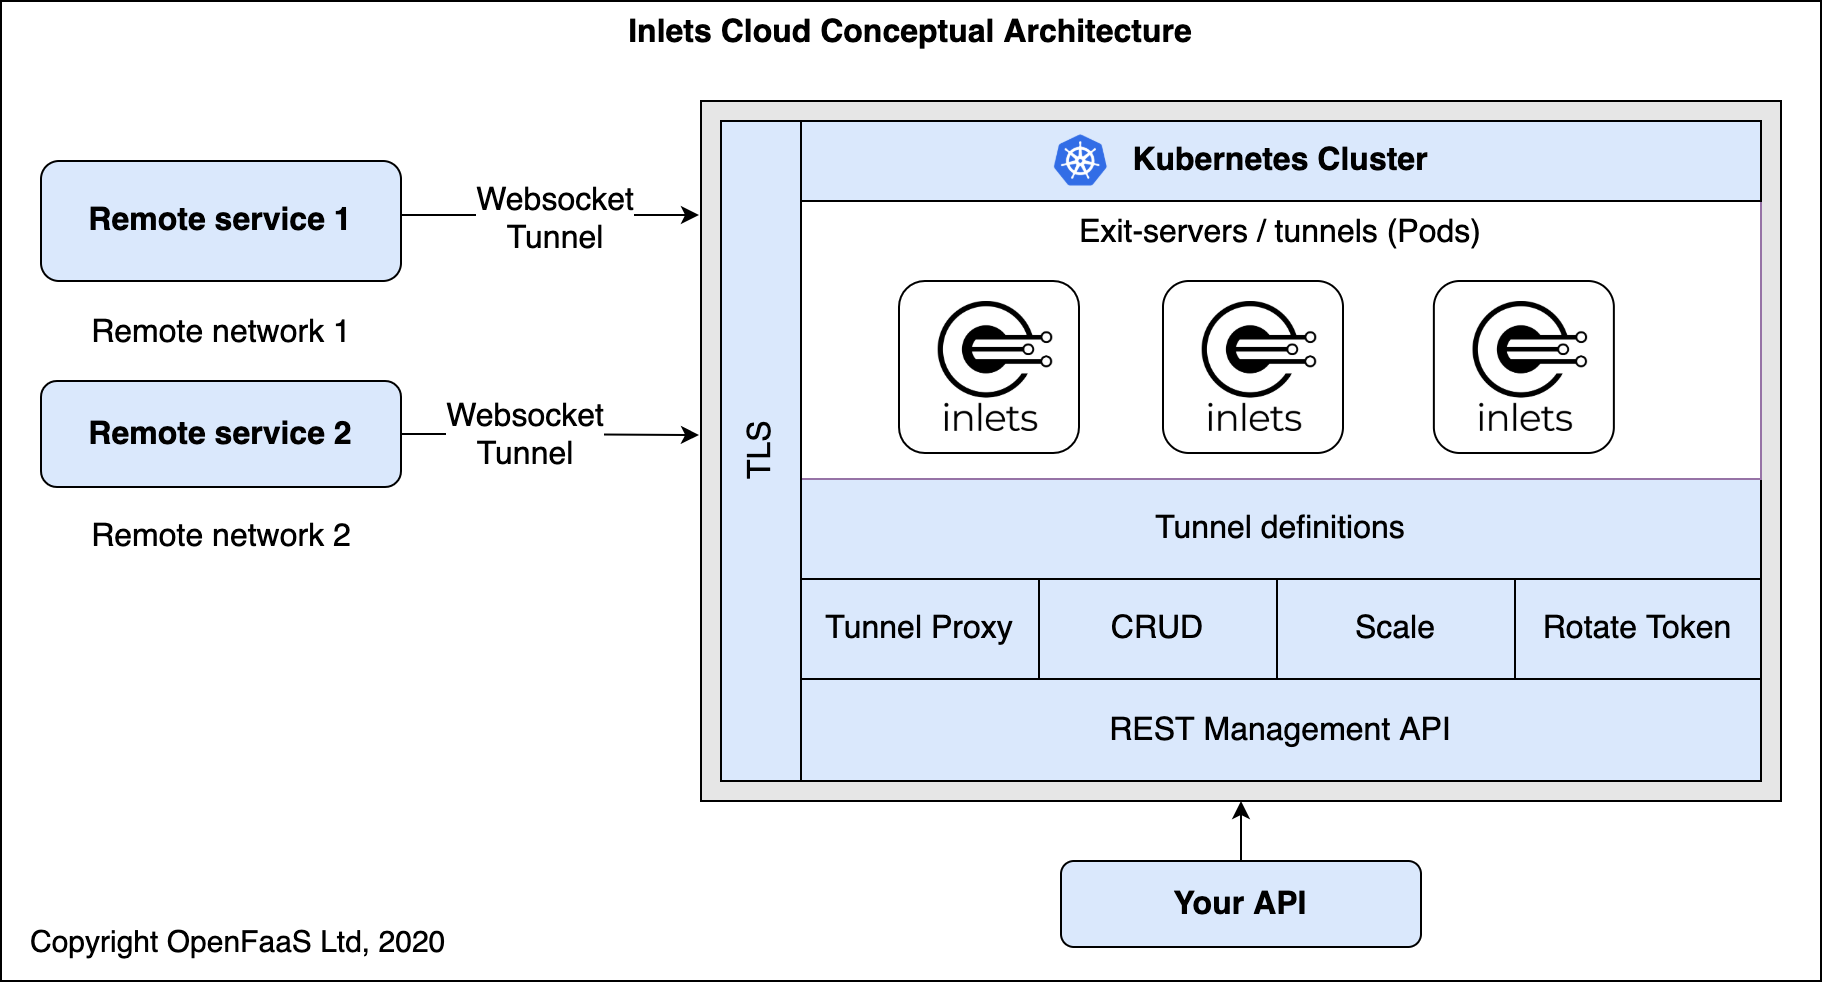
Conceptual diagram: inlets-cloud can be installed by our team on your existing infrastructure.
If you’d like to know moreabout inlets-cloud, or try a demo, then get in touch at: contact@openfaas.com
Want to try inlets Pro for yourself?
Did you know that the personal license can now be used at work? inlets Pro has two options for licensing - either a personal license or a commercial license. You can learn more about the options on the pricing page.
Use-cases:
- Expose your local OpenFaaS functions to the Internet with inlets
- How to integrate with GitHub the right way with GitHub Apps
- Save Money by Connecting Your Local Database to the Public Cloud
Further resources:
Subscribe for updates and new content from OpenFaaS Ltd.
By providing your email, you agree to receive marketing emails.