Managing remote hosts at the edge with Kubernetes and SSH

Alex Ellis
Alex will show you how to manage a fleet of hosts at the edge using Kubernetes and SSH.
One size doesn’t fit all
There are a number of tools that can be used to manage a fleet of hosts, however they each involve significant redesign of your system. Not all of them are going to slot easily into an existing estate of infrastructure tooling.
After a recent call with a customer, who is using inlets tunnels to manage remote appliances for customers, I wanted to show you what this looks like, and a sample architecture with Kubernetes.
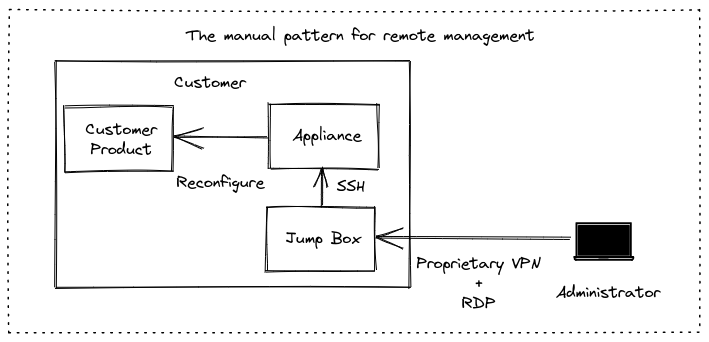
The customer had a number of different customers around the world who were running an appliance to provide a managed server. He offers a managed service, so needs to connect to the appliance to run OS updates, and to perform management tasks within the client’s network. He explained that he was using SSH for this, but often needed a mixture of RDP, VNC, proprietary VPNs and hardware tokens.

The existing manual approach means managing a number of different private keys, VPN hardware tokens, RDP and VNC clients
The aim of using inlets is to:
- Provide a single way to connect to remote appliances via SSH
- To be able to run some tasks in an automated fashion, i.e. using cron, Ansible, etc.
- To be able to connect on-demand to support remote hosts at the edge
- To make it easy to manage the various inlets tunnels and have them reconnect
Building a new architecture

The automated model
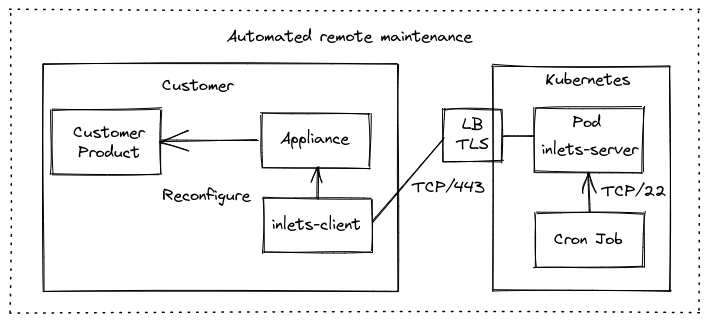
In the automated model, we have removed the administrator from the diagram. An inlets client is deployed on the appliance running in a container or with systemd, or alongside it in a VM.
The inlets client makes an outbound connection to the Kubernetes cluster over an encrypted websocket. Eavesdropping is prevented by using TLS, unauthorized access is prevented through the use of a strong API token, and the SSH service of the appliance is never exposed on the Internet.
So how do we access SSH of the appliance? The inlets data plane is exposed as a ClusterIP, which means it’s only accessible from within the cluster, therefore we can run a cron job, deploy a pod or some other prcoess, and have it reach out to the tunnel directly.
For the Kubernetes cluster
The easiest way to get Kubernetes set up is to use a managed service from a public cloud such as EKS, GKE or AKS.
The cluster will run an inlets-pro TCP server per client in a pod, with a corresponding Cluster IP service.
The only part that gets exposed on the Internet is the control-plane of the tunnel, the control plane can only be connected to by an inlets-client with a valid token, and is encrypted.

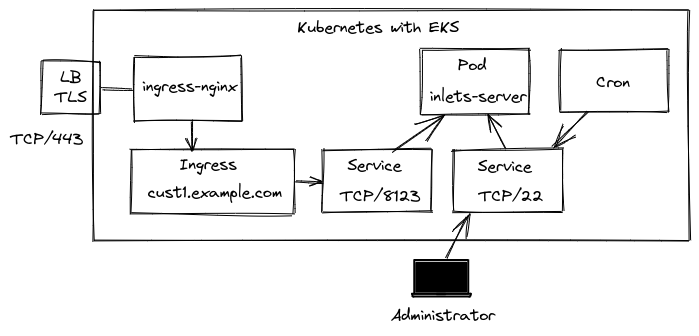
A detailed diagram of the architecture on Kubernetes
An Ingress definition is set up for each client we want to connect i.e. tunnel-customer1.example.com, this corresponds to the tunnel’s control plane port: TCP/8123 using a service of type ClusterIP.
A second service of type ClusterIP is used to connect to the SSH service on the appliance. The administrator can port-forward this for a temporary connection using kubectl, but it will be used primarily to run automated maintenance.
Any cron job or other process within the cluster can connect over SSH to any of the remote hosts.
There are several ways to set up the inlets server, I would suggest looking at the helm chart for a TCP tunnel server. There are also a number of static YAML manifests that you can review and adapt: sample artifacts
If you were using the helm chart for a TCP tunnel, you may set up your values.yaml overrides like this:
dataPlane:
  type: ClusterIP
  ports:
  - targetPort: 22
    protocol: TCP
    name: ssh
    port: 22

ingress:
  domain: tunnel-customer1.example.com
  annotations:
    kubernetes.io/ingress.class: "nginx"
    cert-manager.io/issuer: "letsencrypt-prod"
Remember that the data plane of the tunnel is never exposed on the Internet, only the control plane which is encrypted and secured with a token shared with the client.
The chart assumes that you’re going to use a wildcard DNS record, where each client or customer can use a unique subdomain, but you only need a single TLS record.
So customer 1 may connect to tunnel-customer1.example.com and customer 2 may connect to tunnel-customer2.example.com.
For each customer site
You’ll deploy the inlets client running in TCP mode, exposing port 22, and using an upstream of 127.0.0.1 if running on the appliance, or if running on a separate VM on the customer’s hypervisor, using an upstream host of the appliance’s IP address.
The client will be run as a container or with systemd, so that it gets restarted when the link gets interrupted - as is often the case with running things over a public network.
inlets-pro tcp client \
  --url wss://tunnel-customer1.example.com \
  --token $TOKEN \
  --upstream 127.0.0.1 \
  --port 22
To generate a systemd unit file just add the flag --generate=systemd > inlets.service, and install it using systemd enable.
Connecting to remote hosts from within the cluster
Let’s see how we can connect to SSH on the host for on-demand access, to give support or to diagnose an issue remotely.
The ClusterIP or service name can be used to connect to any of the remote hosts from within the cluster.
Assume that the ClusterIP we picked for the inlets data plane was inlets-customer1 and it was running in the default namespace.
We’d just run:
$ kubectl run ssh-1 -t -i --image alpine:latest /bin/sh
If you don\'t see a command prompt, try pressing enter.
/ #
/ # apk add --no-cache openssh
fetch https://dl-cdn.alpinelinux.org/alpine/v3.15/main/x86_64/APKINDEX.tar.gz
fetch https://dl-cdn.alpinelinux.org/alpine/v3.15/community/x86_64/APKINDEX.tar.gz
(1/10) Installing openssh-keygen (8.8_p1-r1)
(2/10) Installing ncurses-terminfo-base (6.3_p20211120-r0)
(3/10) Installing ncurses-libs (6.3_p20211120-r0)
(4/10) Installing libedit (20210910.3.1-r0)
(5/10) Installing openssh-client-common (8.8_p1-r1)
(6/10) Installing openssh-client-default (8.8_p1-r1)
(7/10) Installing openssh-sftp-server (8.8_p1-r1)
(8/10) Installing openssh-server-common (8.8_p1-r1)
(9/10) Installing openssh-server (8.8_p1-r1)
(10/10) Installing openssh (8.8_p1-r1)
Executing busybox-1.34.1-r3.trigger
OK: 12 MiB in 24 packages
/ #
/ # ssh user@inlets-customer1.default
/ #
At this point, we’d be connected to the remote host and able to carry out any manual work required using SSH.
What if you need to connect from your machine directly?
If you need to connect to one of the hosts from your own machine, you could port-forward the inlets client on port 22 and access it via SSH from your own host.
kubectl port-forward -n inlets deploy/inlets-customer1 2222:22
Followed by:
ssh -i id_rsa -p 2222 127.0.0.1
Automated tasks with a Kubernetes Cron Job
For any automated tasks you want to run, there are a few options:
- Use a Kubernetes Cron Job with a bash script attached as a ConfigMap
- Deploy Ansible as a Pod, and have it talk to the ClusterIP of the tunnel server
- Build your own program using an SDK for SSH, so you can run commands remotely. You can browse the code for K3sup to see how to use SSH from a Go program.
Here’s an example that runs every minute, however you could change it to run “At 00:00 on Sunday.” once per week using 0 0 * * 0
We will need a secret in the cluster, which is mounted in with a private key to access the remote host.
Generate a config that tells SSH not to verify the hostkey. This is optional, you could also build up an authorized_hosts file yourself and mount it in instead of the config.
Create a file named config:
Host *
    StrictHostKeyChecking no
$ kubectl create secret generic \
    customer1-ssh-key \
    --from-file $HOME/.ssh/id_rsa \
    --from-file $HOME/.ssh/id_rsa.pub \
    --from-file ./config
We also want a payload to run inside the container, so let’s create a config map for that:
run.sh
#!/bin/bash

apk add --no-cache openssh
ssh -i /root/.ssh/id_rsa alex@inlets-customer1-ssh.default 'cat /etc/os-release && uptime'
Then create uptimescript-config based upon run.sh:
kubectl create configmap \
    uptimescript-config \
    --from-file ./run.sh
Note that you’ll need to create a container image with SSH installed into it, or install it during the execution.
apiVersion: batch/v1
kind: CronJob
metadata:
  name: update-apt-packages
  namespace: default
spec:
  schedule: "*/1 * * * *"
  concurrencyPolicy: Forbid
  successfulJobsHistoryLimit: 1
  failedJobsHistoryLimit: 3
  jobTemplate:
    spec:
      template:
        spec:
          volumes:
          - name: ssh
            secret:
              secretName: customer1-ssh-key
              defaultMode: 0600
          containers:
          - name: sh
            image: docker.io/alpine:latest
            imagePullPolicy: IfNotPresent
            command: ["/bin/sh"]
            args: ["-c", "/root/scripts/run.sh"]
            volumeMounts:
            - mountPath: /root/.ssh
              name: ssh
            - name: config-volume
              configMap:
                name: uptimescript-config
          restartPolicy: OnFailure
When testing, you may want to try out "*/1 * * * *" which is “run once every minute”, so that you don’t have to wait for a week to test your work.
Our cron job will start up, then install an SSH client before connecting to the remote host over the tunnel and running sudo apt update -qy" to update the list of packages on the system.
Here’s a complete automated run observed on my system:
# kubectl get pod -w
NAME                                       READY   STATUS    RESTARTS   AGE
inlets-server-customer1-6646dc7f55-vwxsg   1/1     Running   0          15m
update-apt-packages-27457451-t96lk         0/1     Pending   0          0s
update-apt-packages-27457451-t96lk         0/1     Pending   0          0s
update-apt-packages-27457451-t96lk         0/1     ContainerCreating   0          0s
update-apt-packages-27457451-t96lk         1/1     Running             0          1s
update-apt-packages-27457451-t96lk         0/1     Completed           0          2s
update-apt-packages-27457451-t96lk         0/1     Completed           0          2s
And when checking the logs of the pod used:
# kubectl logs -f update-apt-packages-27457451-t96lk

fetch https://dl-cdn.alpinelinux.org/alpine/v3.15/main/x86_64/APKINDEX.tar.gz
fetch https://dl-cdn.alpinelinux.org/alpine/v3.15/community/x86_64/APKINDEX.tar.gz
(1/10) Installing openssh-keygen (8.8_p1-r1)
(2/10) Installing ncurses-terminfo-base (6.3_p20211120-r0)
(3/10) Installing ncurses-libs (6.3_p20211120-r0)
(4/10) Installing libedit (20210910.3.1-r0)
(5/10) Installing openssh-client-common (8.8_p1-r1)
(6/10) Installing openssh-client-default (8.8_p1-r1)
(7/10) Installing openssh-sftp-server (8.8_p1-r1)
(8/10) Installing openssh-server-common (8.8_p1-r1)
(9/10) Installing openssh-server (8.8_p1-r1)
(10/10) Installing openssh (8.8_p1-r1)
Executing busybox-1.34.1-r3.trigger
OK: 12 MiB in 24 packages

NAME="Arch Linux"
PRETTY_NAME="Arch Linux"
ID=arch
BUILD_ID=rolling
ANSI_COLOR="38;2;23;147;209"
HOME_URL="https://archlinux.org/"
DOCUMENTATION_URL="https://wiki.archlinux.org/"
SUPPORT_URL="https://bbs.archlinux.org/"
BUG_REPORT_URL="https://bugs.archlinux.org/"
LOGO=archlinux

 16:13:18 up 104 days,  4:31,  1 user,  load average: 0.67, 0.64, 0.56
You could speed up the cron job by adding SSH into a base image, and switching to that.
Another option might be to create your administrative shell scripts in ConfigMaps and to mount them into the CronJob too.
Wrapping up
We are hearing about a need to manage devices in remote locations, and SSH is a tried and tested technology. Kubernetes provides a scalable way to deploy many inlets tunnels and to manage the various SSH tunnels, whilst keeping them private, and not having to expose them on the Internet.
I hope this article gives you an idea of what’s possible. You saw how to set up and manage multiple tunnels, how to connect manually for troubleshooting and how to deploy a cron job for automated tasks. The third option is to launch a Pod for something else like Ansible or your own code making use of a Go SDK. Running a one-time pod is also relatively simple, and you could adapt that from what I showed you for the Cron Job, simply turning it into a one-time Kubernetes “Job”.
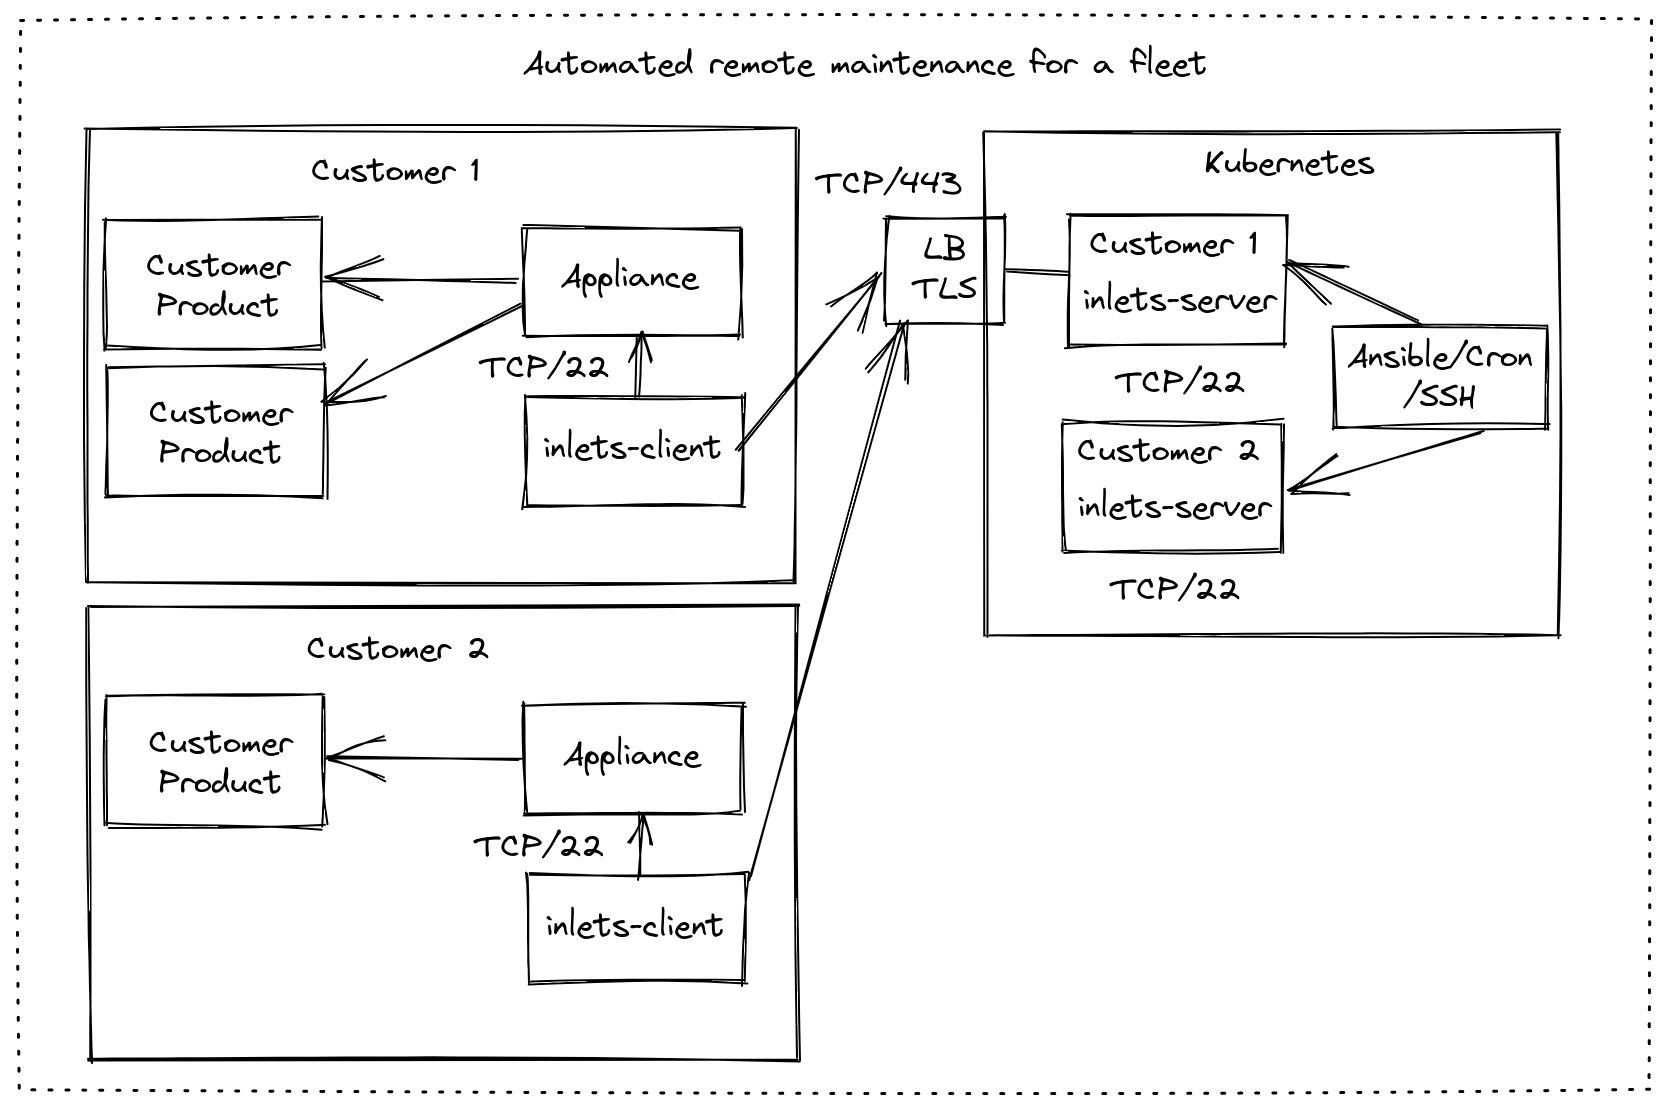
When scaled up, this solution looks very similar to our previous articles, where you run one to many Kubernetes Pods for your inlets servers in a centrally-managed cluster, and then have any number of inlets clients connect from remote locations.

An architecture with a second customer added into the fleet.
You can experiment and try out inlets with the Starter Plan For Professionals over on Gumroad.
If you’d like us to help you design or validate an architecture, feel free to reach out via the contact us page. Or see some of our previous tutorials and case-studies below:
Subscribe for updates and new content from OpenFaaS Ltd.
By providing your email, you agree to receive marketing emails.