Expose local HTTP and TCP services via AWS EC2 with inlets

Alex Ellis
Learn how to automate the two kinds of inlets tunnel servers using AWS EC2 including IAM, SSH key management and monitoring.
Introduction
Typically when I use inlets, I’ll provision VMs to act as tunnel servers on DigitalOcean or GCP. The main reason is the low cost, and the quick boot-up speed, perhaps 10-20 seconds from issuing a command to our inletsctl tool. It’s even possible to create tunnel servers as Pods within 2-3 seconds within a Kubernetes cluster. However, for some of us, AWS will be the cloud of choice; so whether you have free credits, existing infrastructure, or use it for work, this is a guide to exposing your local services via a tunnel server hosted on AWS EC2.
We’ll cover how to set up the required IAM permissions, an SSH key for troubleshooting, then the two types of tunnels and when to use them. You can pick between HTTPS for quick and easy access to HTTP sites, or TCP for more complex use-cases like SSH, Kubernetes API, or self-signed TLS appliances.
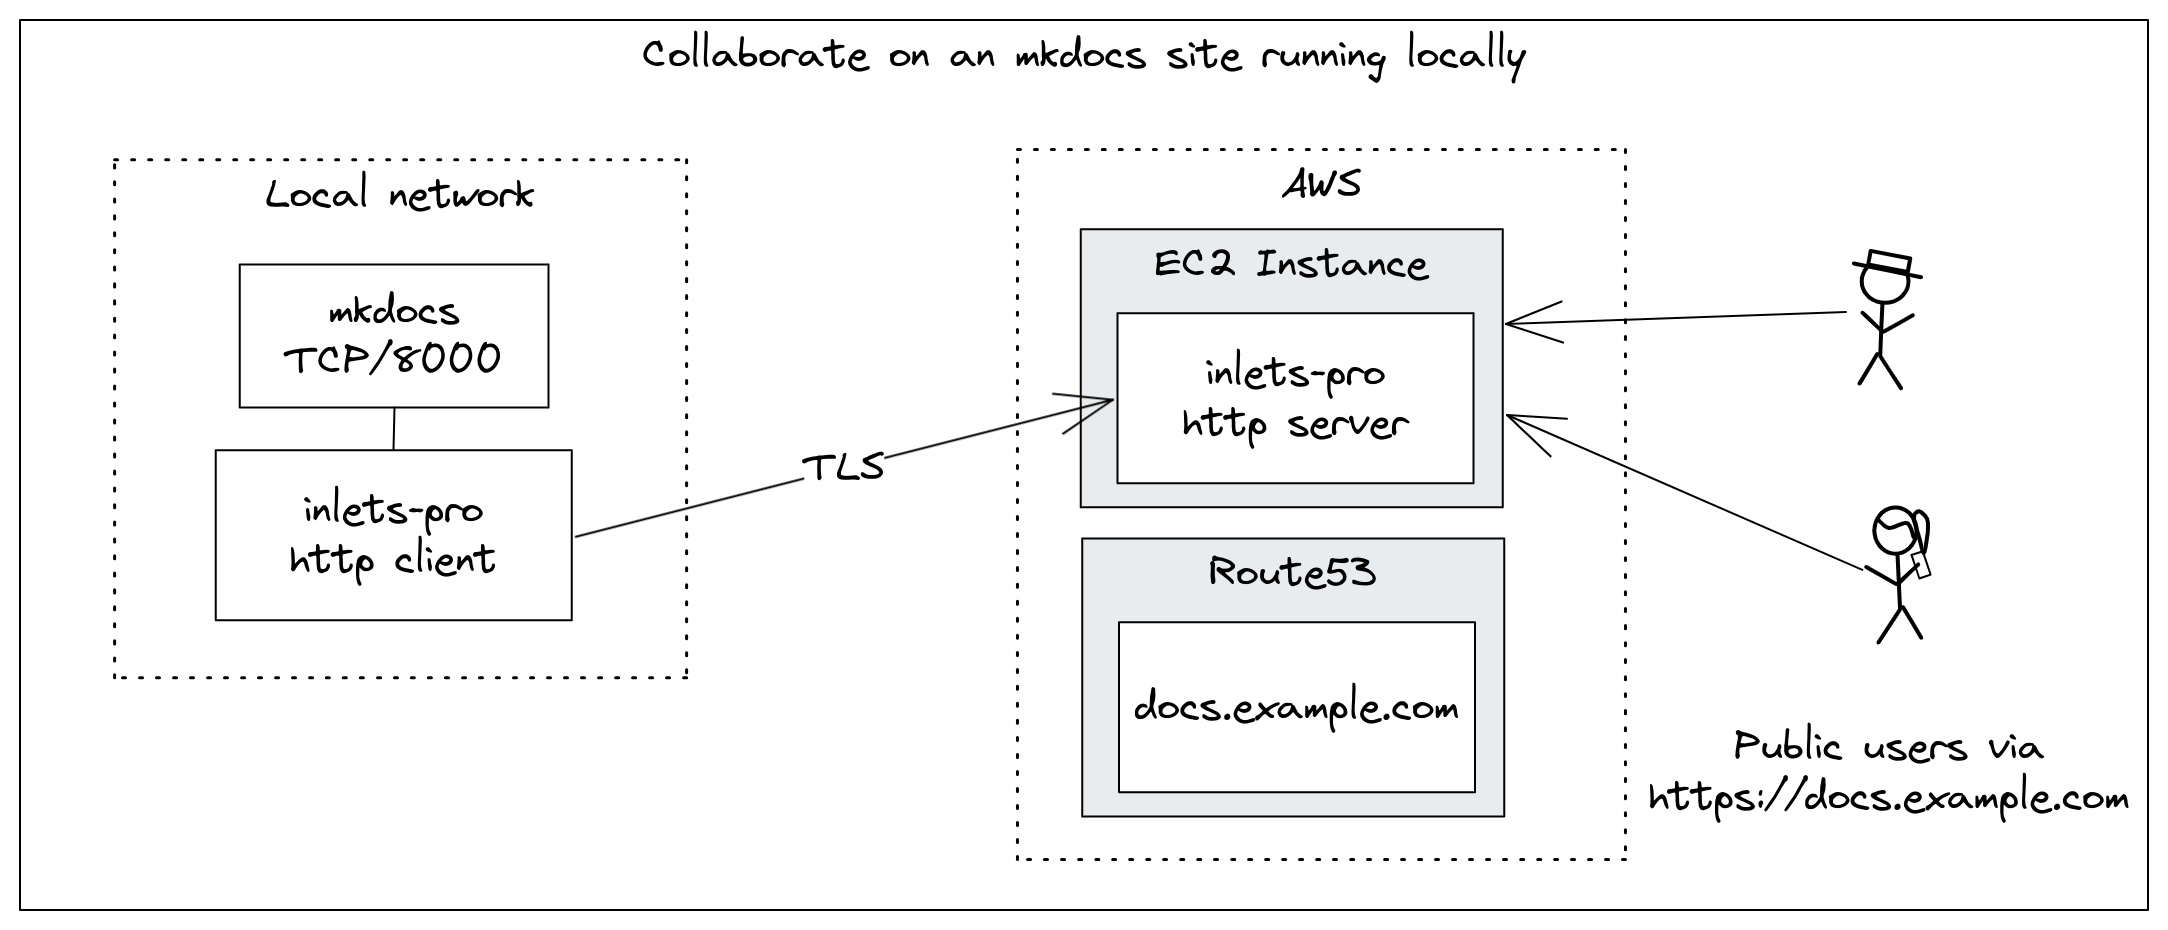
Collaborating on an mkdocs site running locally using an inlets HTTPS tunnel
Prerequisites
- An AWS account
- An inlets subscription
- inletsctl CLI - for automating cloud VMs with the tunnel server pre-installed with systemd
Create an IAM user
Unlike DigitalOcean where a simple access key is all you need, AWS is designed for enterprise, and has much more configuration to put in place before you can access its API from an external tool like inletsctl. You can get instructions for automating tunnels on various clouds in the inletsctl reference guide, or install it yourself manually
Follow the instructions to create an IAM user and credentials in the inlets docs.
Save the access key and secret key to local files i.e. ~/.inlets/ec2-access-key, ~/.inlets/ec2-secret-key.
Create a key-pair
A keypair is not strictly necessary, unless you want to log into the VM to customise it or troubleshoot it. It is handy though, and you can create one SSH keypair, and allocate it to all the tunnel VMs you create on EC2.
Head over to the AWS Console, EC2, then under Network & Security, click on Key Pairs.
Create a new Key Pair of type RSA, and give it the name inlets.
Download the key-pair and save it to your home directory i.e. ~/.inlets/ec2.pem.
Change the permissions on the key file: chmod 400 ~/.inlets/ec2.pem.
You’ll be able to use this key for any future inlets tunnel server VMs that you created on EC2.
Create a tunnel server
There are two types of tunnel server you can create, and are quite different use-cases.
To expose some existing HTTP service over HTTPS, you’ll create a HTTPS tunnel server using the --letsencrypt-domain flag.
To expose TCP traffic like something which is already served with TLS like a reverse proxy, SSH or the Kubernetes API, use the --tcp flag.
Create a HTTPS tunnel server
For a HTTPS tunnel server, work backwards from the custom domain you want to use. For example, if you want to expose https://blog.example.com then you’ll need to create a tunnel server with the domain blog.example.com and a CNAME or A record in your DNS tooling pointing to the tunnel server. On AWS, you’d probably want to use Route 53 for the mapping, however Cloudflare would work just as well.
The HTTPS tunnel server can support more than one domain, so you could expose for instance openfaas, grafana and a blog over the same tunnel server by passing the --letsencrypt-domain flag multiple times.
inletsctl create \
  --provider ec2 \
  --secret-key-file ~/.inlets/ec2-secret-key \
  --access-token-file ~/.inlets/ec2-access-key \
  --region eu-west-1 \
  --aws-key-name inlets \
  --letsencrypt-domain blog.example.com
The region that you specify here, must match the region where you created your SSH Key Pair, otherwise it will not be found. The --aws-key-name flag is optional, but recommended.
Give the path to the access key and secret key, along with the region you want to use and any domains via --letsencrypt-domain.
Example output:
Using provider: ec2
Requesting host: elated-carson0 in eu-west-1, from ec2
Host: i-05cfa985a99435386, status: creating
[1/500] Host: i-05cfa985a99435386, status: creating
[2/500] Host: i-05cfa985a99435386, status: initialising
...
[77/500] Host: i-05cfa985a99435386, status: initialising
[78/500] Host: i-05cfa985a99435386, status: initialising
[79/500] Host: i-05cfa985a99435386, status: active
inlets HTTPS (0.9.21) server summary:
  IP: 52.213.238.52
  HTTPS Domains: [blog.example.com]
  Auth-token: CVxYhvIuD9tUor9y3fiNrqh6tdXd33yDE0vRtHUR02XrWVgRMnyK8KjqqzdjmRTY

Command:

inlets-pro http client --url "wss://52.213.238.52:8123" \
  --token "CVxYhvIuD9tUor9y3fiNrqh6tdXd33yDE0vRtHUR02XrWVgRMnyK8KjqqzdjmRTY" \
  --upstream http://127.0.0.1:8080

To delete:
  inletsctl delete --provider ec2 --id "i-05cfa985a99435386"
As I mentioned in the introduction, AWS takes a little longer than other clouds to create an initialise a VM, we’re talking 2-3 minutes vs 10-20 seconds elsewhere, however once it’s ready, it’ll be on standby for any time you want to use it.
The output from the inletsctl create command shows you the IP address of the tunnel server, and the auth-token you’ll need to use to connect to it.
Create all the DNS A or CNAME records you need, and then you can start the tunnel client.
If there are multiple domains that the tunnel server is serving, then you’ll need to pass the --upstream flag multiple times, once for each domain.
Here’s what I add when I want to expose Jekyll and mkdocs at the same time, which are running on the ports 4000 and 8000 respectively:
--upstream blog.example.com=http://127.0.0.1:4000 \
--upstream docs.example.com=http://127.0.0.1:8000
Create a TCP tunnel server
TCP tunnel servers are better suited to exposing services which are already terminate TLS themselves, like nginx, Caddy, Traefik, self-signed TLS appliances (think: GitHub Enterprise Server), SSH, Databases, the Kubernetes API and similar.
Here’s how you can create a TCP tunnel server to expose SSH from a Raspberry Pi on your home network:
Log into the Raspberry Pi, and add an extra port to the SSH daemon in /etc/ssh/sshd_config:
Add the following line:
Port 2222
Restart the SSH daemon:
sudo systemctl daemon-reload && sudo systemctl restart sshd
Now create a tunnel server with the --tcp flag, and omit the Let’s Encrypt flags:
inletsctl create \
  --provider ec2 \
  --secret-key-file ~/.inlets/ec2-secret-key \
  --access-token-file ~/.inlets/ec2-access-key \
  --region eu-west-1 \
  --aws-key-name inlets \
  --tcp
Example output:
Using provider: ec2
Requesting host: suspicious-mirzakhani8 in eu-west-1, from ec2
Host: i-0ad0bcd7ebca51ed7, status: creating
[1/500] Host: i-0ad0bcd7ebca51ed7, status: creating
[2/500] Host: i-0ad0bcd7ebca51ed7, status: initialising
...
[88/500] Host: i-0ad0bcd7ebca51ed7, status: initialising
[89/500] Host: i-0ad0bcd7ebca51ed7, status: initialising
[90/500] Host: i-0ad0bcd7ebca51ed7, status: active
inlets TCP (0.9.21) server summary:
  IP: 54.170.244.23
  Auth-token: 8ySdPL01XZtWTPwfvGwYHPmjAhYSNLwPd6cfbzRQ0Zi0v8ifOxx0X8rWLgvqlj7A

Command:

inlets-pro tcp client --url "wss://54.170.244.23:8123" \
  --token "8ySdPL01XZtWTPwfvGwYHPmjAhYSNLwPd6cfbzRQ0Zi0v8ifOxx0X8rWLgvqlj7A" \
  --upstream 127.0.0.1 \
  --ports 2222

To delete:
  inletsctl delete --provider ec2 --id "i-0ad0bcd7ebca51ed7"
Run the inlets-pro tcp client command, and change the --upstream flag to point to the IP address of your Raspberry Pi, and the --ports flag to the port you added to the SSH daemon.
For your client, add the specific port to the command, and use the IP address of the tunnel server:
ssh -p 2222 pi@54.170.244.23
Managing and removing tunnel servers
Checking status and connected clients
You can get detailed information about tunnel servers via the status command:
inlets-pro status --url "wss://52.213.238.52:8123" \
    --token "CVxYhvIuD9tUor9y3fiNrqh6tdXd33yDE0vRtHUR02XrWVgRMnyK8KjqqzdjmRTY"
Gives:
inlets server status. Version: 0.9.21 - b0c7ed2beeb6f244ecac149e3b72eaeb3fb00d23

Server info:
Hostname:       ip-172-31-23-1
Process uptime: 1 minute ago
Mode:           http
Version:        0.9.21 b0c7ed2beeb6f244ecac149e3b72eaeb3fb00d23

Connected clients:
Client ID                        Remote Address       Connected Upstreams
efcbfcb3546b4acb956e4f72630afbea 212.229.86.191:52638 7 seconds *=http://192.168.1.15:8080
Prometheus metrics
Prometheus metrics are also available from tunnel servers, you can set up Prometheus to scrape their endpoint, using authentication:
curl -k -SLs https://52.213.238.52:8123/metrics \
    -H "Authorization: Bearer CVxYhvIuD9tUor9y3fiNrqh6tdXd33yDE0vRtHUR02XrWVgRMnyK8KjqqzdjmRTY"
Here are some values from a tunnel server I set up to expose the OpenFaaS mkdocs site:
# HELP http_controlplane_connected_gauge gauge of inlets clients connected to the control plane
# TYPE http_controlplane_connected_gauge gauge
http_controlplane_connected_gauge 1
# HELP http_controlplane_requests_total total HTTP requests processed by connecting clients on the control plane
# TYPE http_controlplane_requests_total counter
http_controlplane_requests_total{code="200",path="/connect"} 2
http_controlplane_requests_total{code="200",path="/metrics"} 1
http_controlplane_requests_total{code="200",path="/status"} 5
# HELP http_dataplane_requests_total total HTTP requests processed
# TYPE http_dataplane_requests_total counter
http_dataplane_requests_total{code="200",host="docs.o6s.io",method="GET"} 3
http_dataplane_requests_total{code="301",host="docs.o6s.io",method="GET"} 7
http_dataplane_requests_total{code="401",host="docs.o6s.io",method="GET"} 9
http_dataplane_requests_total{code="404",host="docs.o6s.io",method="GET"} 15
http_dataplane_requests_total{code="503",host="docs.o6s.io",method="GET"} 2
You’ll find more on available metrics, and observability in the inlets docs.
Connecting with SSH
There is very little reason to log into a tunnel server, however, you may want to check the logs, or troubleshoot a problem.
First, edit the security group of the tunnel server and add port 22 to the TCP allowed list. You can further restrict this to your own IP address if you want to, or add 0.0.0.0/0 if you need to connect from multiple locations.
Then use the private key you created earlier to access it:
ssh -i ~/.inlets/ec2.pem ubuntu@$IP_ADDRESS
Check the service logs:
sudo journalctl -u inlets-pro
Edit the settings for the token or Let’s Encrypt domain in /etc/default/inlets.
Cleaning up tunnel server VMs
To clean up any VMs that you’ve created, use inletsctl delete followed by --id and the ID of the VM you want to delete, or --ip and its public IP address. You can also terminate instances via the AWS console by navigating to EC2, Instances, and then selecting the instance you want to delete.
Wrapping up
Most of the tutorials for inlets use DigitalOcean or another developer-cloud for the examples, because they’re much simpler to use, and quicker to launch tunnel, however today we covered how to use AWS EC2 to create a tunnel server, including the IAM user, key-pair and DNS configuration.
Once the tunnel is up and running, the speed and ease of use is equivalent on AWS as on any other cloud, and you may get the added benefit of using credits, or having your employer pick up the tab.
One way to use a tunnel server is to set it up and leave it for whenever you need it. Only connect clients to it when you need to share work, or collaborate. On our team, we do this as part of our development to expose Keycloak to test OAuth / OIDC or OpenFaaS, or a blog post for review.
We’ve also seen lots of Developer Advocates turn to tunnels for customer demos and conference talks. One such Developer Advocate is Nathan Peck, from the AWS containers team who wrote up how inlets was a better fit than a VPN for giving AWS ECS Anywhere customers access to their local services: Ingress to ECS Anywhere, from anywhere, using Inlets.
You can try out inlets on a free trial, and you’ll also get an invite to a Discord server where you can ask questions and chat with the community.
Subscribe for updates and new content from OpenFaaS Ltd.
By providing your email, you agree to receive marketing emails.