Create Highly Available Tunnels With A Load Balancer

Alex Ellis
We look at Highly Available inlets tunnels, how to integrate with Proxy Protocol to get original source IP addresses, and how to configure a cloud load balancer.
For the majority of use-cases, whether for development or production, a single tunnel server VM and client as a pair will be more than sufficient.
However, some teams mandate that all infrastructure is run in a Highly Available (HA) configuration, where two or more servers or instances of a service are running at all times. This is to ensure that if one server fails, the other can take over and continue to serve traffic.
If you’re using a public cloud offering like AWS, GCP, Hetzner, DigitalOcean, or Linode, you’ll have access to managed load balancers. These are easy to deploy, come with their own stable public IP address, and can be used to route traffic to one or more virtual machines. How does failover work? Typically, when you create the load balancer, you’ll specify a health check, which the load balancer will run on a continual basis, if it detects that one of the servers is unhealthy, it will stop sending traffic to it.
What is a cloud load balancer anyway? If you dig around, you’ll find documentation, blog posts and conference talks where cloud vendors explain how they use either HAProxy, keepalived, or Envoy to provide their managed load-balancers. For anyone who does not have access to a managed load balancer, you can configure and deploy these open source tools yourself, just make sure that your load balancer itself does not become its own Single Point of Failure (SPOF).
In this post, we’ll look at how to create a Highly Available inlets tunnel with a cloud load balancer, and Proxy Protocol support, to get the original source IP addresses.
A note from an inlets user on HA
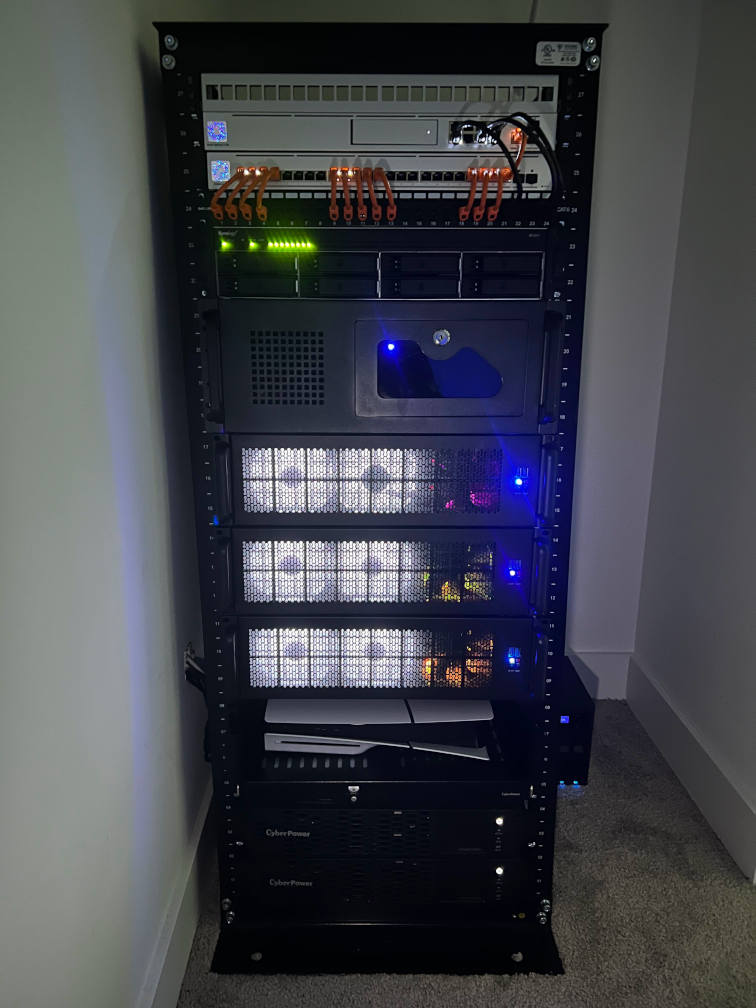
Jack Harmon is a long time inlets user, and sent in a photo of his homelab, which is running Kubernetes (setup with kubeadm) and Traefik as an Ingress Controller. He has a HA tunnel configuration using a Global LoadBalancer on DigitalOcean.
Here’s what Jack had to say about his setup:
I used to work for a company that set up secure cloud infrastructure for governments, which is where I got interested in home labs and HA config, as well as zero trust security. I’ve since left and do financial consulting for businesses. I now have a home lab running in my closet, and another in a city apartment for redundancy.
I use my setup to host my various personal software projects, file sharing, to offer hosting to friends and family, and yes - as a secure way to store client information (or show them financial dashboards) on occasion. Mostly, though, it’s an extremely overbuilt hobby project that I’ve sunk thousands of hours into over the years. I realize there may be a slightly cheaper option with its own limitations, but I prefer the privacy and control, and to support independent developers like yourself.
Jack also wanted to get SSH access into various VMs in the lab, so I told him about our sshmux add-on for inlets where you can expose dozens of sshd servers over a single inlets tunnel. This is a great way to get access to your VMs without needing to expose them directly to the internet. Of course, if you do go down this route, make sure you disable Password login, so that you’re only using SSH keys. SSH keys are going to be almost impossible to attack with brute-force.
Proxy Protocol for real client IPs
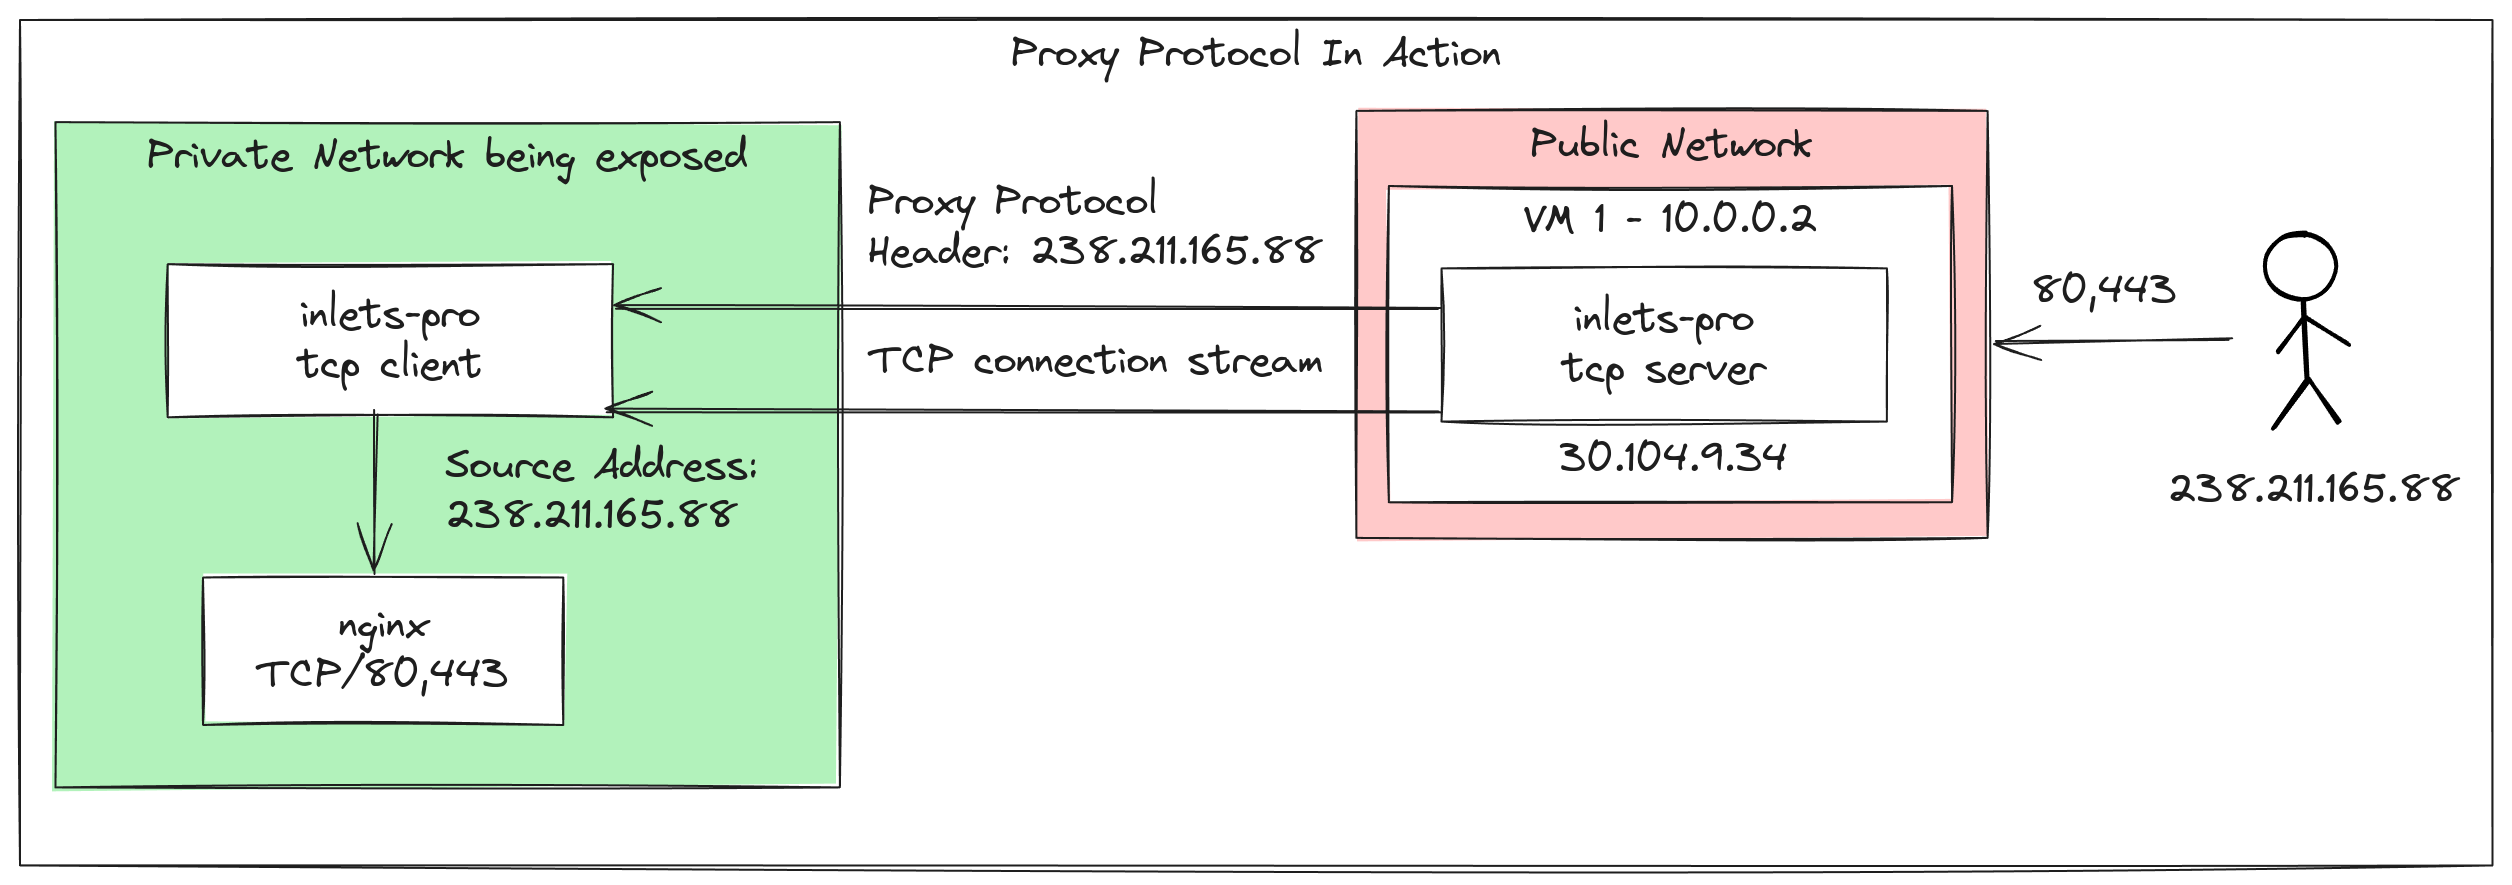
When a TCP connection is made from one server to another, the source IP address is the IP of the server that initiated the connection. This is a problem if, like many of the servers on the Internet, they are directly exposed to their users. Whether you’re working with a Pod in Kubernetes, a VM in an autoscaling group behind a Load Balancer, a service hidden behind Nginx, or a service exposed via inlets, if you want the real IP address of the client, you will need to make use of the Proxy Protocol.
The Proxy Protocol (popularised by HAProxy) is a simple protocol that is sent at the beginning of a TCP connection, and contains the original source IP address and port of the client. This is then passed through the proxy, and can be used by the service to determine the real IP address of the client. There are two versions, v1 which is sent in plain text, and v2 which is sent in binary.
Until the October release of inlets, Proxy Protocol was supported when the inlets tunnel server was run directly on an internet-facing server via the --proxy-protocol flag. That meant the receiving end of the tunnel, the “upstream” would get a Proxy Protocol header and would need to be configured to understand it.
Now, with the new release, Proxy Protocol is now supported when the inlets tunnel server is behind a load balancer by setting the --lb-proxy-protocol flag, in addition to the existing flag.
The conceptual design
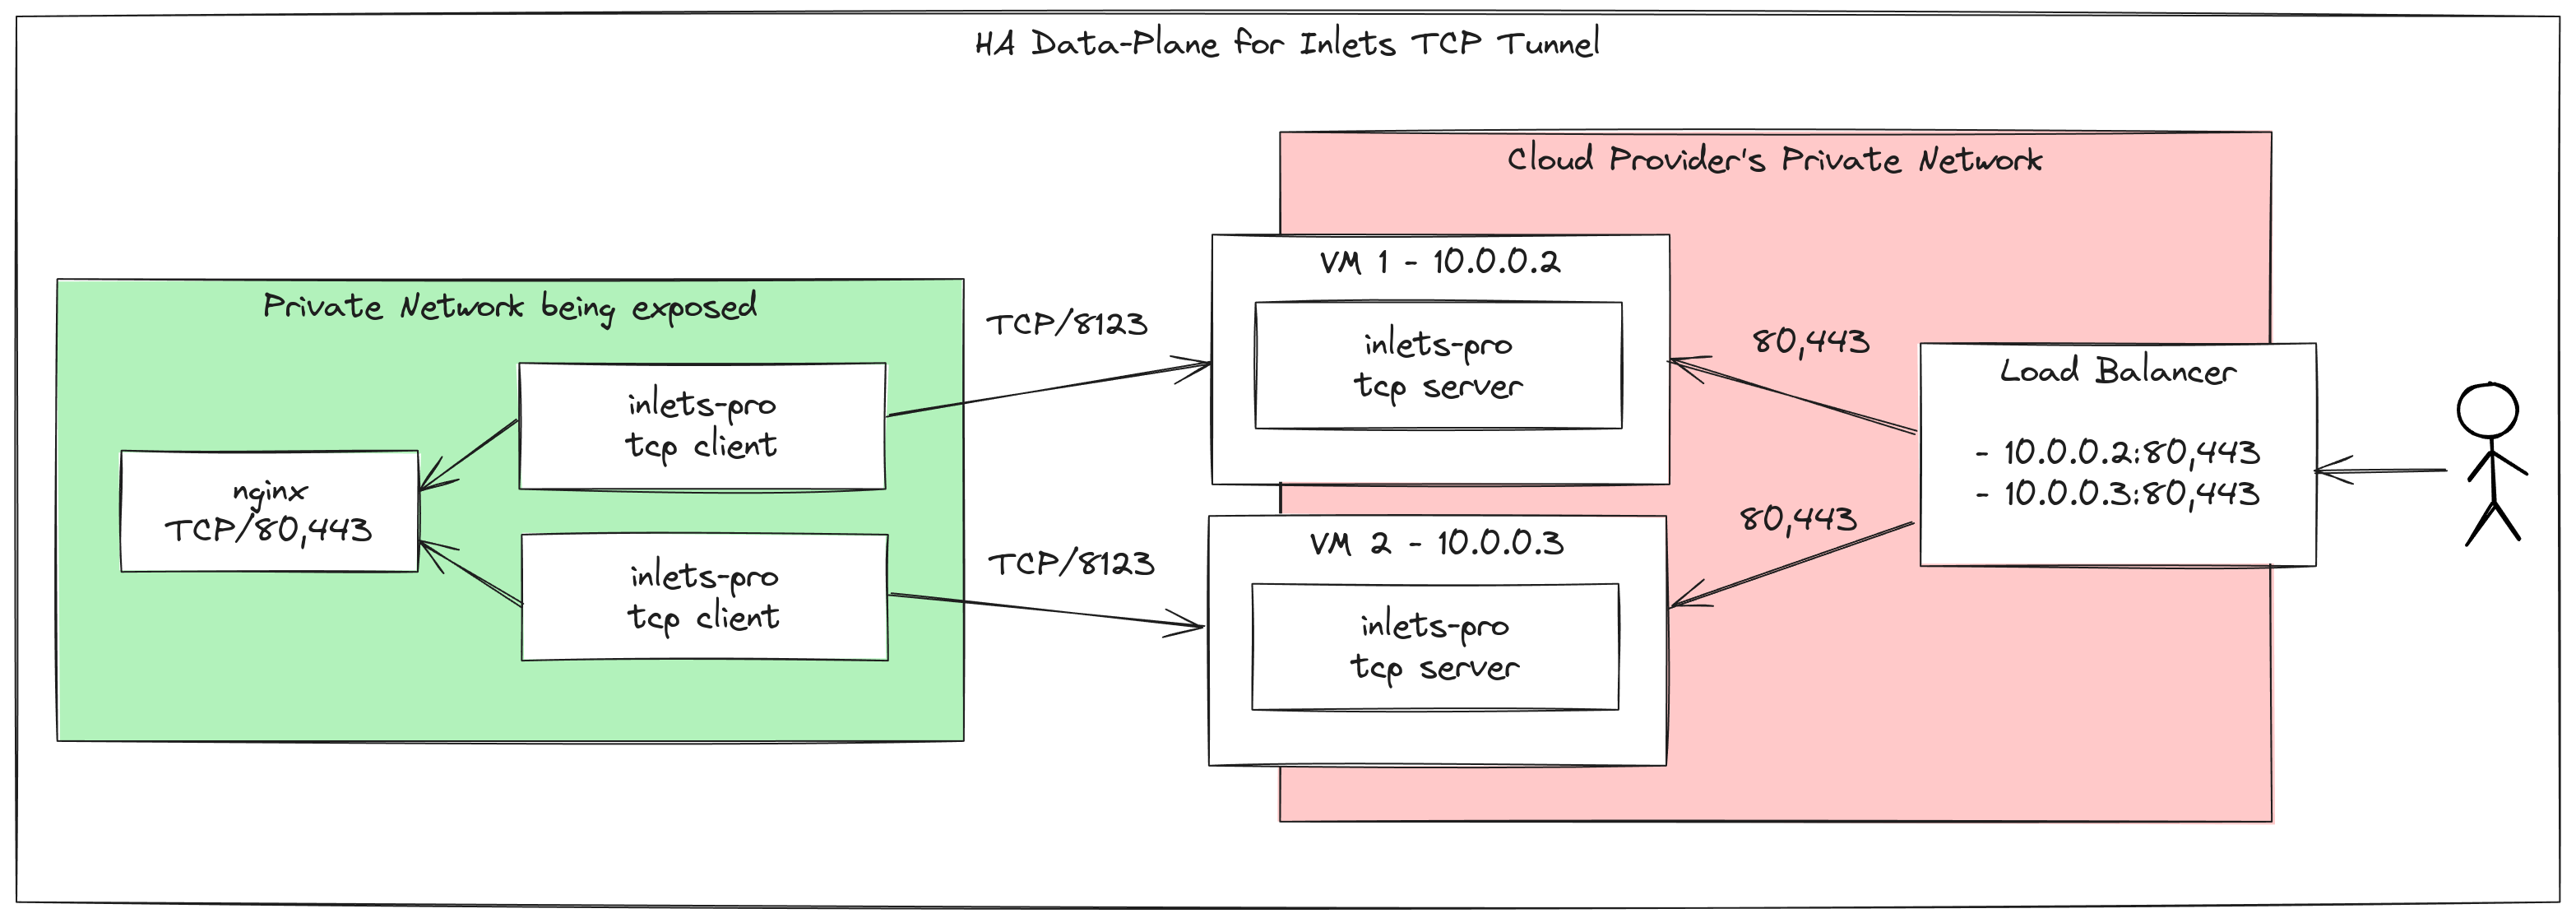
Here’s a diagram of the design we’re going to implement:
An inlets tunnel server has two parts:
- The control-plane, usually served on port 8123. Clients connect here to establish a tunnel.
- The data-plane, these ports can vary, but in our example are 80 and 443, to expose a reverse proxy like Nginx.
The control-plane must not be set behind a load balancer, because if that were the case, both clients could connect to the same server, negating the HA design.
The data-plane will sit behind the load-balancer, and its health checks will ensure that if either of the tunnels goes down, or either of the VMs crashes, the load balancer will stop sending traffic to it.
So, to replicate the architecture in the diagram, you’ll need to:
- Deploy two VMs with the inlets-pro tcp server installed.
- Set up a cloud load balancer to route traffic to the two VMs, on ports 80 and 443.
If the private service that is being exposed over the tunnel supports Proxy Protocol, then this can be used to obtain real client IP addresses. Most proxies and reverse proxies do support the protocol, but if you don’t want to configure this, or don’t need real client IPs to be sent to the private service, you can ignore all references to Proxy Protocol in this post.
Now, ensure you enable Proxy Protocol support on the load balancer itself. Some clouds allow you to specify which version of Proxy Protocol you want to use, if possible, pick v2. DigitalOcean only supports v1.
Whichever you choose, you will need to configure your inlets-pro tcp server process to use the same via the new --lb-proxy-protocol flag. Valid options are: "" (off), "v1", or "v2".
Then you’ll deploy two inlets-pro tcp clients in the private network, pointing at your upstream, i.e. an nginx reverse proxy. Each client must point to its matching server, and not to the load-balancer.
Fail-over not load-balancing
You can actually connect more than one inlets-pro tcp client to a single inlets-pro tcp server, for the sake of load-balancing, and increasing the number of connections that can be handled.
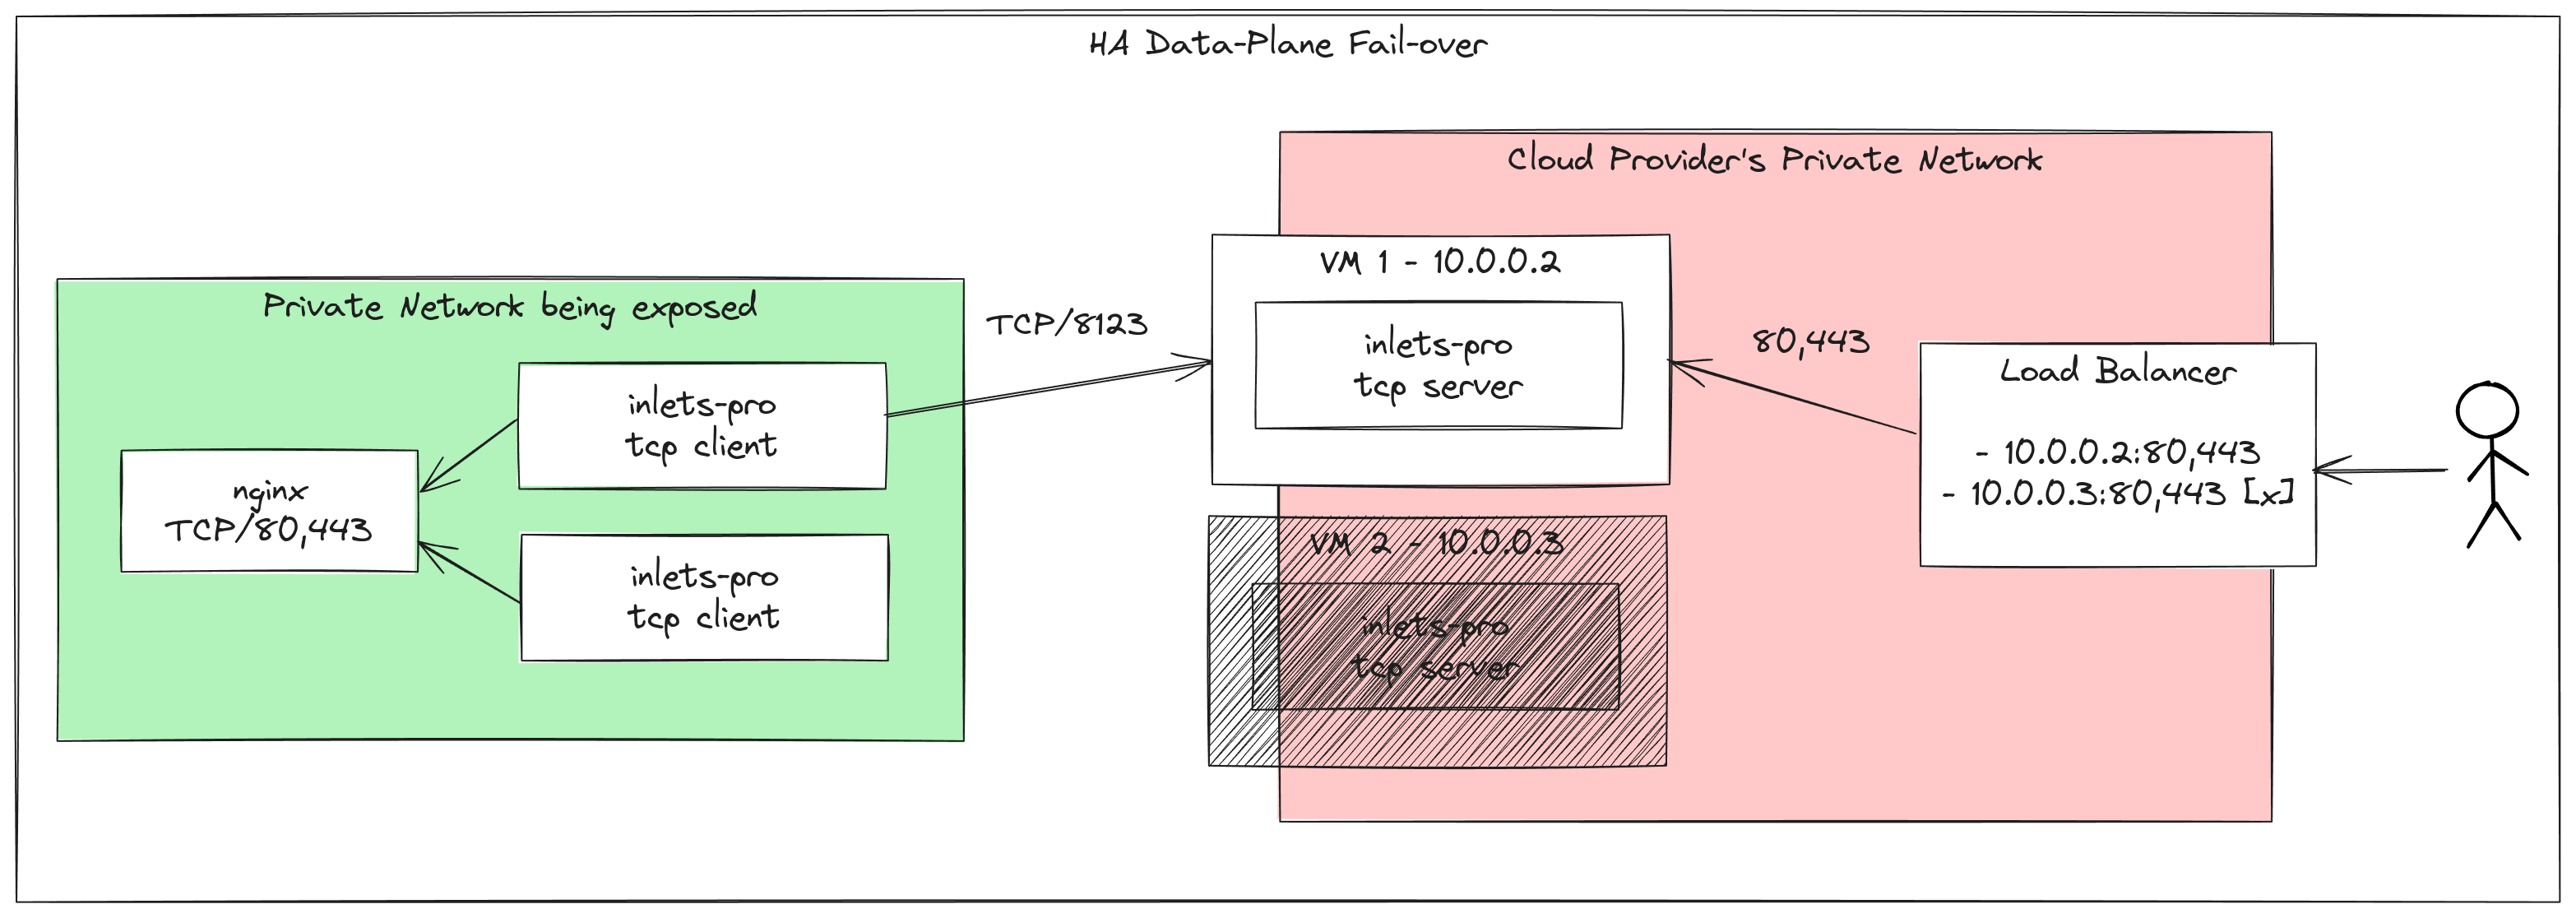
However, load-balancing is not fail-over. If the VM hosting the inlets-pro tcp server fails or crashes, then you won’t be able to serve any traffic.
In the diagram above, we can see that the VM with the private IP 10.0.0.3 failed, and is not reachable by the load balancer. It will mark this endpoint as unhealthy, and stop sending traffic to it.
The other VM with IP 10.0.0.2 is still healthy, and will continue to serve traffic.
Wrapping up
In this post, we’ve looked at how to create a Highly Available inlets tunnel with a cloud Load Balancer, and Proxy Protocol support, to get the original source IP addresses.
If you want to keep your configuration simple, whilst still having a HA setup, you can forgo the use of Proxy Protocol, however I tend to recommend it for debugging and security purposes. Knowing the source IP of your users, or the IP of the client that is connecting to your service can give you insights on where your traffic is coming from, and can be used to block or allow certain IP ranges.
If you’re happy with your current setup with inlets, then there’s nothing you need to change. But one thing you may like to try out, instead of a HA setup, is running a second inlets-pro tunnel client, connected to the same server. Each connection is load-balanced, meaning you can handle additional traffic and more connections.
If you’re exposing a Kubernetes Ingress Controller, here are the instructions for setting it up to expect a Proxy Protocol header.
Both approaches involve editing either a ConfigMap, or the flags passed to the binary in the Kubernetes Deployment.
Subscribe for updates and new content from OpenFaaS Ltd.
By providing your email, you agree to receive marketing emails.


