How To Manage Customer Services From Within Your Product

Alex Ellis
Service providers often need to access remote services in a customer’s network. Building your own agent is an option, establishing multiple VPNs is complex, so how can tunnels help?
Over the years, I’ve heard from customers that were accessing the Kubernetes API server, databases, REST APIs, identity services, bespoke load balancers and SSH services on their customers’ sites. In this tutorial, I’ll show you how to deploy multiple, isolated tunnels, one for each customer service.
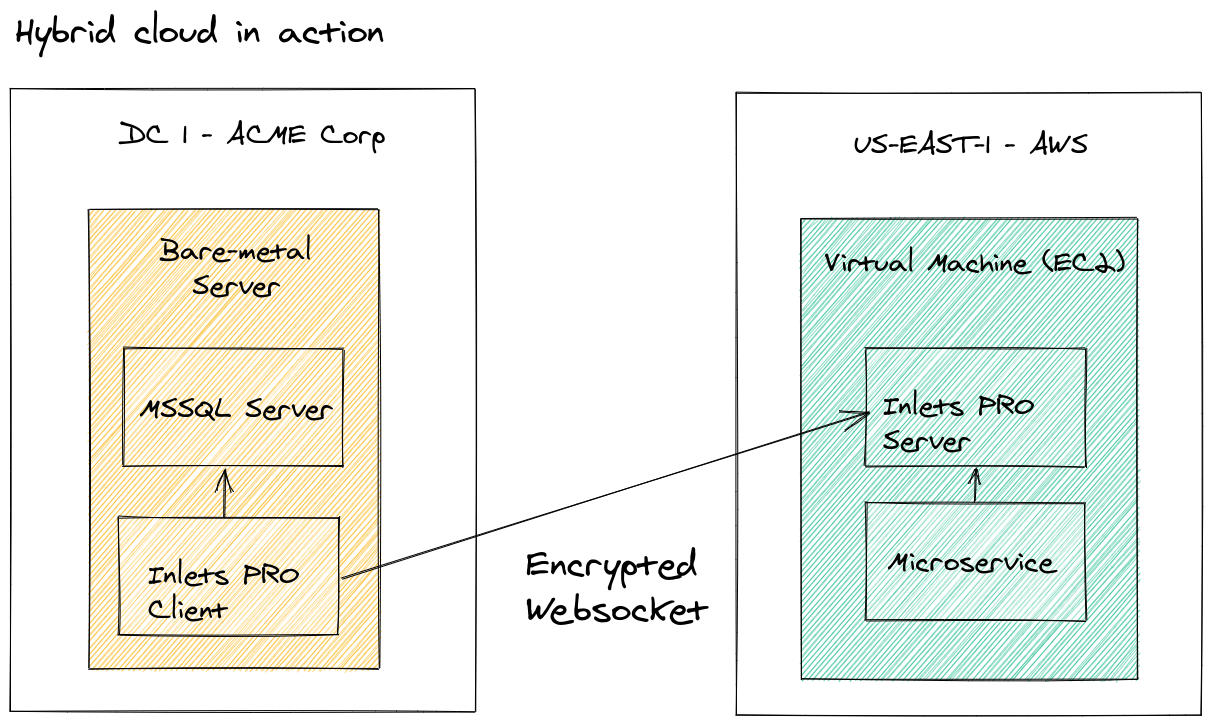
The data plane of a tunnel can be kept private, and only accessed from the local network of the tunnel server. This is ideal for hybrid cloud applications, or for service providers.
Prior work
Before we get into the tutorial, you may want to know how tunnels compare to other options, or want to see some other use-cases, so I’ve collected some prior work from our blog:
- I compare VPNs to direct connect to network tunnels like inlets: Connecting services to Kubernetes clusters with inlets, VPC Peering and direct uplinks
- Inlets provides one of the simplest approaches to accessing remote services for hybrid cloud: The Simple Way To Connect Existing Apps to Public Cloud
- We also showed how to tunnel a database from a private environment back to a Kubernetes cluster for use by a Wordpress instance: How to connect your on-premises databases to Kubernetes in the cloud
You may also like: Official inlets FAQ
The tutorial
We’ll assume that you have a number of different customers, each needing their own tunnels. You want to connect to or manage one or many services per customer, and are going to try inlets.
Inlets has two modes, TCP mode and HTTP mode, with the HTTP tunnels being the more familiar for many people. In both modes, you have a split between what we call a data plane (the tunnel service) and the control plane (an authenticated websocket).
You may be familiar with the idea of exposing services on the Internet using SaaS HTTP tunnels like Ngrok. We are not doing that here, we’re only going to expose the control plane, so our inlets client can connect, then the data plane will be accessed from within a Kubernetes cluster.
When we take this approach, we’re splitting the data and control plane so we could call this a “split plane” approach.
You’ll need a Kubernetes cluster that is available on the Internet. You can use a managed service like Linode Kubernetes Engine, DigitalOcean Kubernetes, AWS Elastic Kubernetes Service (EKS) or Google Kubernetes Engine, to name a few.
You’ll also want a domain available, where we can create DNS records for each of the customers and their services. The domain won’t be used to access the services, but to expose the control plane of the inlets tunnel.
Running a TCP tunnel pair
Here’s a quick look at a tunnel client and server command:
export TOKEN=$(openssl rand -base64 12)
echo $TOKEN > token.txt
export IP=$(curl -sfSL https://checkip.amazonaws.com)
echo $IP > ip.txt

inlets-pro tcp server
  --token-file ./token.txt \
  --auto-tls-san $IP
On the client:
export TOKEN=$(cat token.txt)
export IP=$(cat ip.txt)

inlets-pro tcp client
  --token-file ./token.txt \
  --url wss://$IP:8123
  --upstream 127.0.0.1 \
  --port 5432
In the command above, we use the same token as is configured on the server, this is for authentication. The websocket will be encrypted with TLS, and then any traffic the client receives will be forwarded to the address 127.0.0.1. The client can accept traffic on port 5432, which is the standard port for Postgresql.
Any additional ports for the same IP address can be forwarded at this time, such as SSH or HTTP by adding --port again.
One client, can only forward traffic to one upstream because there’s no way to understand from the incoming traffic, which internal IP address or hostname is being requested. Inlets HTTP tunnels can use the HTTP Host header to expose multiple internal servers over a single client and server.
So for each distinct service at the customer site, we’ll need a pair of server and client processes. But don’t worry, these are extremely lightweight. I’ve left tunnels running for months that have only consumed around 3MB of RAM over that timeframe.
Once you’ve run the two commands, you’ll be able to connect to the server’s IP address on the forwarded port, in this instance it was 5432, but you could also forward any other TCP service here.
Running two tunnels on the same machine
If we connect two inlets tunnels to the same machine, and expose the same ports, then the server will load balance between them.
Likewise, we can start up two different inlets server processes on the same machine as long as their clients publish different TCP ports.
export TOKEN1=$(openssl rand -base64 12)
echo $TOKEN1 > token1.txt
export TOKEN2=$(openssl rand -base64 12)
echo $TOKEN2 > token1.txt

export IP=$(curl -sfSL https://checkip.amazonaws.com)
echo $IP > ip.txt

inlets-pro tcp server
  --token-file ./token1.txt \
  --auto-tls-san $IP \
  --control-port 8123

inlets-pro tcp server
  --token-file ./token2.txt \
  --auto-tls-san $IP \
  --control-port 8124
But what if we want to expose the same port, from two different customers?
We could potentially create temporary local IP addresses on a Linux server using a bridge adapter, and allocating new IP addresses.
Then we can run commands like this:
inlets-pro tcp server \
  --token-file ./token1.txt \
  --auto-tls-san $IP \
  --control-port 8123 \
  --data-addr `10.1.0.2:`

inlets-pro tcp server \
  --token-file ./token2.txt \
  --auto-tls-san $IP \
  --control-port 8124 \
  --data-addr `10.1.0.3:`
Notice how the control-port is different, but the --data-addr binding is different. This allows two clients to expose the same port on the same machine, running two or more different inlets servers. Then you’ll need to access the data plane using the unique address such as 10.1.0.2 or 10.1.0.3.
This is where we’ll see Kubernetes starts to make more sense. Since each server process can run in its own Pod, with a separate network namespace, IP address and hostname that means we don’t have to record any mappings or manage network addresses.
Running a TCP tunnel with Kubernetes
When using Kubernetes, we can use a TCP LoadBalancer to expose each inlets tunnel’s control plane port. This however will add a cost of roughly 10-25 USD / mo to each tunnel. Instead, we can expose our control plane through Kubernetes Ingress and save on that cost per tunnel.
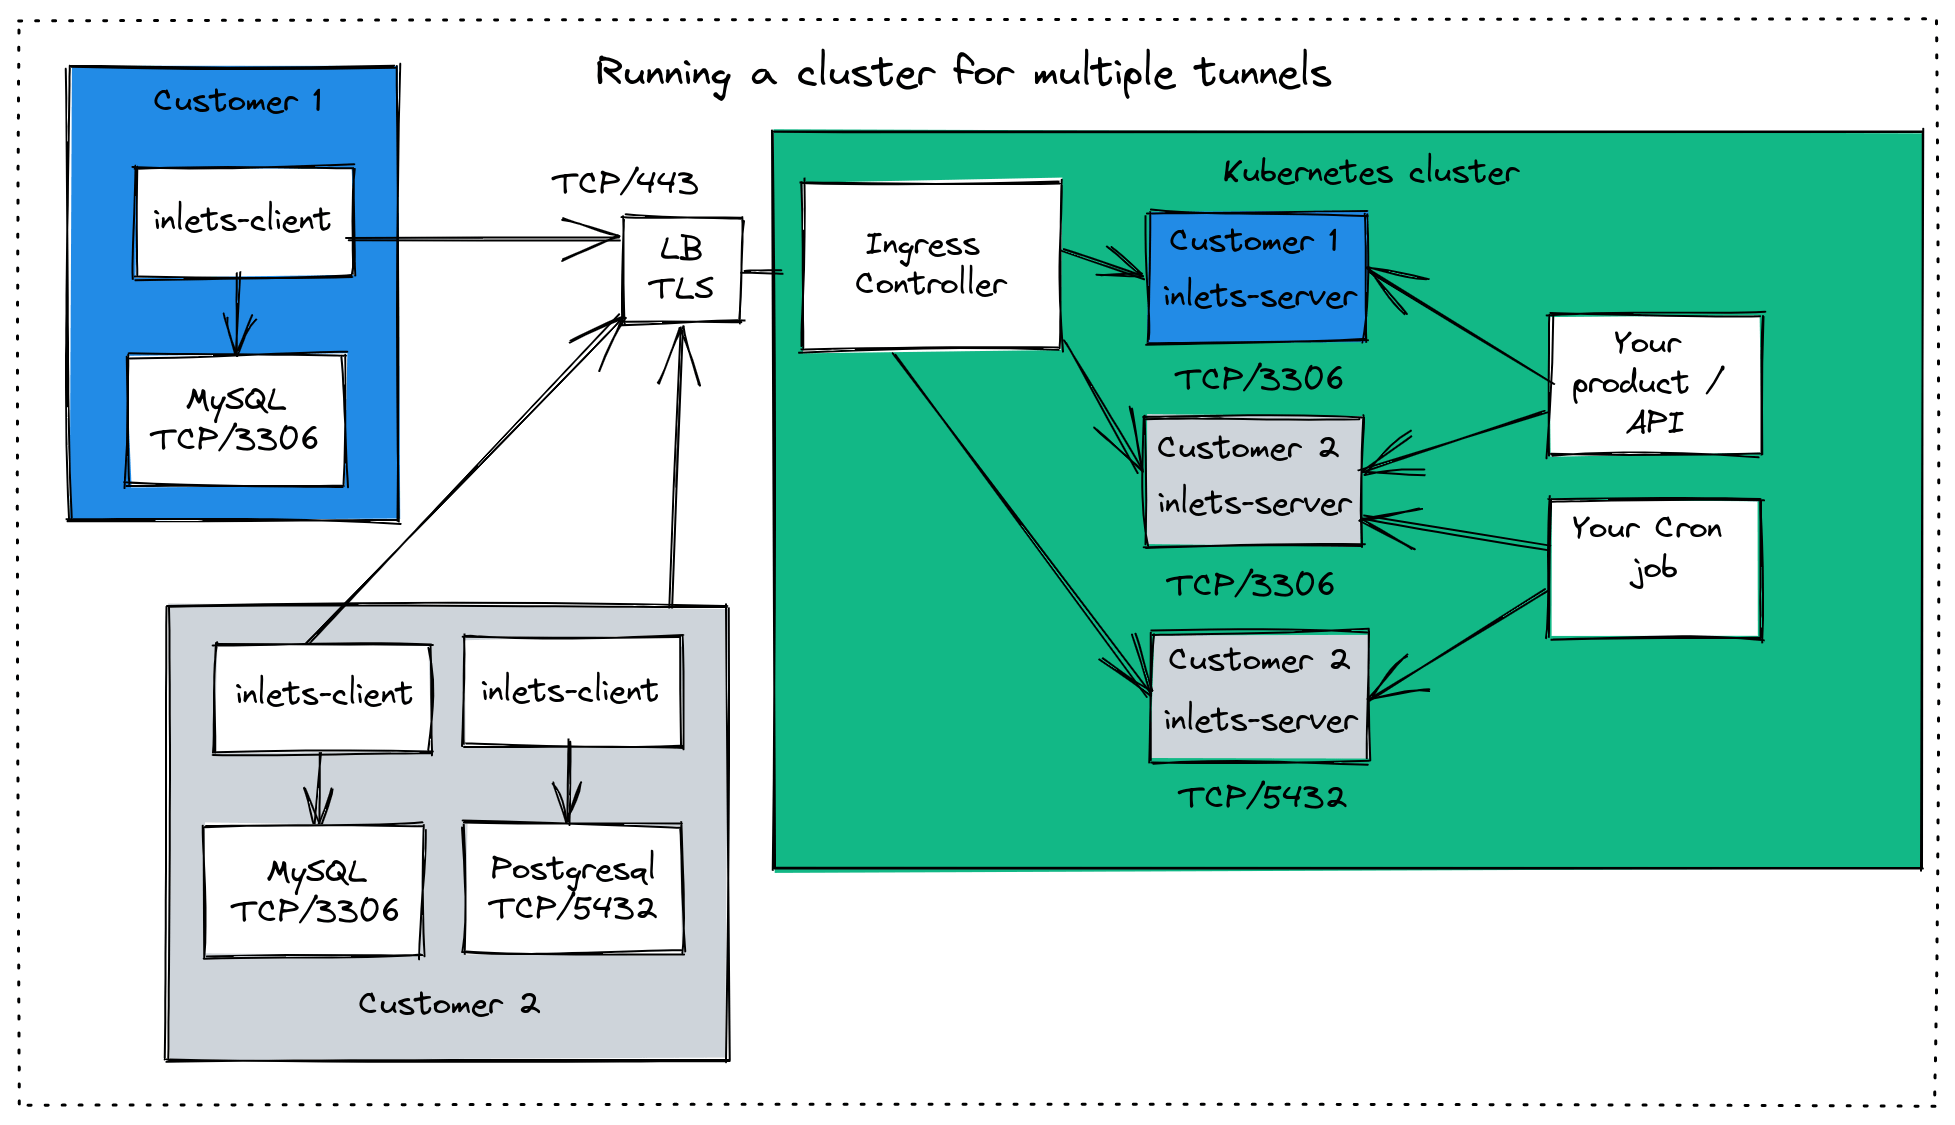
Each service on a customer site has its own isolated inlets tunnel server Pod in the Kubernetes cluster. Each control plane is accessed through the Ingress Controller, to save on costs of separate cloud Load Balancers.
Kubernetes Ingress is a bit more involved, but once set up it means you can add new tunnels very quickly.
Follow the pre-requisites including the step “Install an Issuer” over in the guide: Use your Kubernetes cluster for exit-servers, then join us again for the next few steps.
The instructions assume that you’ll be using ingress-nginx for your IngressController, if you’re not, then you should see the values.yaml file and customise the ingress section.
Generate a token for your inlets-pro server:
# Generate a random password
export TOKEN=$(head -c 16 /dev/random | shasum|cut -d" " -f1)

# Save a copy for later
echo $TOKEN > postgresql-customer1-token.txt

# Create a secret in the cluster for the tunnel server
kubectl create secret generic postgresql-customer1-token \
  --from-literal token=$TOKEN
Create a values-postgresql-customer1.yaml file:
tokenSecretName: postgresql-customer1-token

dataPlane:
  type: ClusterIP
  ports:
  - targetPort: 5432
    protocol: TCP
    name: postgresql
    port: 5432
We set the token’s name in the tokenSecretName field and will have a unique token per tunnel server. Then we define the list of ports that the client will expose in the cluster. Here, we just need 5432, but you can specify multiple ports if required.
Install the inlets-pro TCP server using its helm chart:
export DOMAIN="postgresql-customer1.example.com"

helm upgrade --install postgresql-customer1-tunnel \
  inlets-pro/inlets-tcp-server \
  --set ingress.domain=$DOMAIN \
  -f ./values-postgresql-customer1.yaml
The helm command above will also create a Certificate using cert-manager, and request a TLS certificate from Let’s Encrypt for the postgresql-customer1.example.com domain using a HTTP01 challenge. So make sure you create a new subdomain and map postgresql-customer1.example.com to the IP address of your Ingress Controller’s LoadBalancer.
The address wss://postgresql-customer1.example.com is where the inlets client will connect, you can put that into the --url parameter.
Any code you write and deploy to Kubernetes will be able to access to data plane with the address:
postgresql-customer1-tunnel-inlets-pro-data-plane:5432
Python developers deploying their code to the Kubernetes cluster may write something like the following.
The only change I’ve made to the example from pynative.com was to change the host field:
import psycopg2
from psycopg2 import Error

try:
    # Connect to an existing database
    connection = psycopg2.connect(user="postgres",
                                  password="pynative@#29",
                                  host="postgresql-customer1-tunnel-inlets-pro-data-plane:5432",
                                  port="5432",
                                  database="postgres_db")

    # Create a cursor to perform database operations
    cursor = connection.cursor()
    # Print PostgreSQL details
    print("PostgreSQL server information")
    print(connection.get_dsn_parameters(), "\n")
    # Executing a SQL query
    cursor.execute("SELECT version();")
    # Fetch result
    record = cursor.fetchone()
    print("You are connected to - ", record, "\n")

except (Exception, Error) as error:
    print("Error while connecting to PostgreSQL", error)
finally:
    if (connection):
        cursor.close()
        connection.close()
        print("PostgreSQL connection is closed")
When you run your client, use the token from postgresql-customer1-token.txt that was saved earlier.
Did you know?
- You don’t have to run the inlets TCP client on the same machine as the service you’re forwarding. You can simply change the
--upstreamflag from127.0.0.1to the IP address or hostname of the server you need to forward, and run the client wherever you like. - At any point you can use the
inlets-pro statuscommand to check the number of connected clients, their remote IP address and how long they’ve been connected. - If your tunnel client is running on Linux, then you can generate a systemd unit file with
inlets-pro tcp client --generate=systemdso that the tunnel can restart automatically, and have its logs aggregated into the journal on the machine.
Running multiple TCP tunnels with Kubernetes
Now you have one tunnel set up and are accessing it from your application, you may need a second and third and so on.
Just repeat the steps from before:
Create a different token:
# Generate a random password
export TOKEN=$(head -c 16 /dev/random | shasum|cut -d" " -f1)

# Save a copy for later
echo $TOKEN > mysql-customer2-token.txt

# Create a secret in the cluster for the tunnel server
kubectl create secret generic mysql-customer2-token \
  --from-literal token=$TOKEN
Create a values-mysql-customer2.yaml file:
tokenSecretName: mysql-customer2-token

dataPlane:
  type: ClusterIP
  ports:
  - targetPort: 3306
    protocol: TCP
    name: mysql
    port: 3306
Then install the tunnel server with Helm:
export DOMAIN="mysql-customer2.example.com"

helm upgrade --install mysql-customer2-tunnel \
  inlets-pro/inlets-tcp-server \
  --set ingress.domain=$DOMAIN \
  -f ./values-mysql-customer2.yaml
Create a new subdomain and map mysql-customer2.example.com to the IP address of your Ingress Controller’s LoadBalancer.
Once you’ve connected your second inlets client on the customer site, you’ll now have two different tunnels connected where only the authenticated, encrypted control plane is visible externally, and the data plane remains private within your cluster.
Wrapping up
We looked at how TCP tunnels can be used to access customer services remotely as part of a managed product or service. We then compared various ways to run multiple inlets tunnel server processes. A Kubernetes cluster provided a quick and simple way to add new tunnels as required, without bearing a large cost. You’ll need at least 3 nodes in your cluster, but since inlets processes are so lightweight, that’ll probably last you a while before needing any more nodes.
Over time, you may wish to automate setting up the tunnels in your cluster. ArgoCD provides a way to store configuration for Helm charts and have it synchronised to your cluster on a continual basis. If you’re new to ArgoCD, you may like our post over on the OpenFaaS blog: Bring GitOps to your OpenFaaS functions with ArgoCD
Did you know that you can also monitor each of your tunnels for throughput, re-connection attempts and reliability? See how: Measure and monitor your inlets tunnels
If you want to connect lots of tunnels, that’s not a problem. Inlets tunnel servers consume very little resources and can be managed easily through the provided Helm chart. For more than 5-10 different tunnel servers set up, you should use a DNS01 challenge and a wildcard domain instead of the HTTP01 we used here, to prevent running into rate limits of free certificates from Let’s Encrypt.
See also: How we scaled inlets to thousands of tunnels with Kubernetes
Feel free to contact us if you need help configuring any of the above, or want to discuss scaling inlets for many customers.
Subscribe for updates and new content from OpenFaaS Ltd.
By providing your email, you agree to receive marketing emails.